If your voice chat is not working while playing Valorant, you are not the only one. The said problem can be caused by different things that can depend on your situation. However, this usually includes the game application not being able to access your microphone or when you have the wrong device selected as the input device. When this happens, as a result, you are not able to use the microphone in-game which means your teammates won’t be able to hear you. Fortunately, you can easily go through this problem and get it fixed which is exactly what we will be showing you in this article.

As it turns out, Valorant is a really competitive game and not being able to communicate with your teammates puts your team at a big disadvantage. Whenever your voice chat is not working, it’s obvious that the game is not able to use your microphone. Now, this can be due to a number of reasons and it totally depends on your situation. However, we will be covering most of them so that you are able to know what exactly is causing the issue. With that, you will be able to isolate the source and ultimately solve the problem via one of the methods that we will go through down below. However, before that, let us first go through the possible causes of the issue in question. So, without further ado, let us get started.
- Valorant not Allowed to Access Microphone — The first reason that you might come across this problem is when the game is not able to access the microphone. This can happen when your Windows is set to not allow microphone access to desktop applications. This can be easily changed which will fix the problem if it was caused due to it.
- Third-Party Interference — Another reason that you may encounter this problem is when a third-party application is interfering with the game. This can often happen when you have other sound software applicable on your system that may potentially be using the microphone. This can include software like Asus Gamefirst IV, and more. To fix this, you will have to remove such applications from the system.
- Wrong Microphone Selected — As it turns out, the game uses the default microphone device in Windows as its input device. This can cause issues when you have a dedicated microphone in your gaming setup. To fix this, you will have to edit your audio settings in-game and choose the correct device there.
- Audio Drivers — In some scenarios, the audio drivers that are installed on your system can also cause the microphone to not work on certain applications. To fix this, you will have to manually download the recommended audio drivers for your motherboard from the manufacturer’s website instead of letting Windows download and install the drivers for you.
- Insufficient Permissions — Finally, another possible cause of the problem in question can be insufficient permissions. This happens when other services on your system are intervening with the game process. In such a scenario, you will have to simply run the application as an administrator to resolve the issue.
Now that we have gone through the possible list of causes that can result in the voice chat to not work, we can get started with showing you the different ways of resolving the problem in question. With that said, just follow through and let us get right into it.
Run Valorant as an Administrator
As it turns out, the first thing that you should do when you face the problem in question is to make sure that no other service in the background is interfering with the application. To do this, you will simply have to run the Valorant game as an administrator which will give it more than enough permissions to run smoothly. This will, obviously, require you to be logged into the administrator account so make sure your account has administrative privileges. To run the game as an admin, follow the instructions given down below:
- First of all, open up the Start Menu and search for Valorant.

Searching for Valorant in the Start Menu - On the result shown, right-click and then from the drop-down menu choose Run as administrator.

Running Valorant as an Administrator - Then, on the follow up User Access Control dialog box, click the Yes button.
- Once your game launches, get into a game and see if your voice chat works now.
Change In-game Audio Settings
In some scenarios, the problem arises when your game does not have the correct input device selected in its audio settings. When this happens, the game will try to use a device that you are not talking through or it may simply not be available. To rectify this problem, you will have to simply get into your audio settings and then choose the correct device. Follow the instructions that are given down below to do this:
- First of all, go ahead and launch your game.
- Once it is launched, click on the gear icon located at the top right corner.

Opening Valorant Settings Menu - From the menu that appears, go to the Settings.

Opening Settings on Valorant - Then, on the Settings screen, switch to the Audio tab at the top.
- On the Audio tab, switch to the Voice Chat section right under it.

Valorant Audio Settings - Once there, choose your microphone device from the drop-down next to Input Device.
- In addition to that, make sure Party Voice Chat is enabled along with the Team Voice Chat at the bottom.
- After you have applied these settings, see if the voice is still not working.
Allow Desktop Apps to Access Microphone
As it turns out, Windows has a privacy feature that lets you choose whether applications on your system are allowed to access the microphone or not. The problem, in some cases, may be caused due to Valorant not being able to access the microphone. This happens when you have this feature turned off and as a result Windows prevents the application from accessing your microphone. To fix this, you will have to allow apps to access the microphone. Follow the instructions given down below to do this:
- First of all, open up the Settings app by pressing the Windows key + I shortcut on your keyboard.
- Then, on the Settings app, go to the Privacy section.

Windows Settings - In the Privacy section, on the left-hand side, switch to the Microphone tab.
- There, click on the Allow apps to access your microphone slider first.

Allowing Apps to Access Microphone - After doing that, scroll down and at the bottom, make sure that the Allow desktop apps to access your microphone feature is also enabled.

Allowing Desktop Apps to Access Microphone - Once you have done that, go ahead and launch your game again to see if the problem is still there.
Disable Party Voice Chat
Apparently, the problem in question, for some users, was caused due to the party voice chat being enabled. As a resolution, they had to disable the party voice chat in-game to fix this issue. This might fix the issue for you as well if you are still facing the issue. To do this, follow the instructions given down below:
- First of all, make sure that your game is open.
- Click on the gear icon located at the top right corner.
Opening Valorant Settings Menu - Then, from the menu that appears, click on the Settings option.
Opening Settings on Valorant - On the Settings screen, switch to the Audio tab.
- Then, go to the voice chat section by clicking the Voice Chat option.
Valorant Audio Settings - Once you are there, disable Party Voice Chat by clicking Off next to it.
- After applying this, go and check if the problem is resolved.
Change Microphone Format
As it turns out, in some scenarios the problem is caused by the default format of your microphone. This can be found in your microphone’s advanced properties. This is essentially the sample rate and bit depth that is used when the microphone is being used. Changing this has fixed the problem for multiple users and it might do the trick for you as well. To do this, follow the instructions down below:
- First of all, right-click on the sound icon on your taskbar.

Sound Icon on Taskbar - Then, on the menu that appears, choose the Sounds option. This will open up a new window called Sounds.

Opening Sounds window - On the Sounds window, switch to the Recording tab and then right-click on your microphone and choose Properties from the drop-down menu.
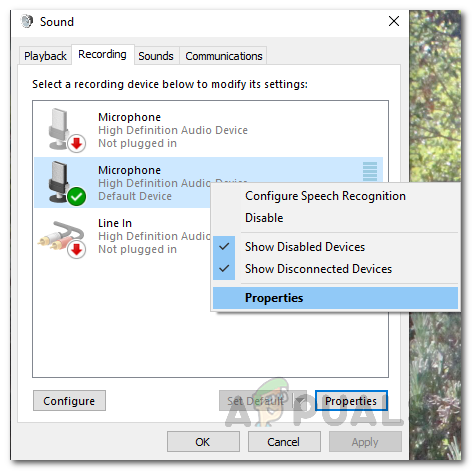
Opening Microphone Properties - On the Microphone Properties window, switch to the Advanced tab.

Changing Microphone Default Format - There, change the Default Format by choosing a different option from the drop down menu.
- Once you have done that, click Apply and then hit OK. Then, click Apply and OK on the Sounds window as well.
- Finally, open up your game and see if the problem is still there.
Reinstall Audio Drivers
The audio drivers installed on your system can also play a vital role in causing the problem in question. This can often happen when you are using the audio drivers that are installed for you by Windows. While these drivers are usually completely fine, there can be scenarios where certain applications may not function properly due to it. In such a scenario, you will have to download the latest audio drivers available for your motherboard from the manufacturer’s website and then install them. For this, you will have to find out your motherboard model so that you can download the required audio drivers. Follow the instructions down below to do this:
- First of all, open up the Start Menu and search for Device Manager. Open it up.

Opening up Device Manager - Once the Device Manager window is open, expand the Sound, video and game controllers list.

Device Manager - From there, right-click on all of your audio drivers and from the drop-down menu, click Uninstall device.

Uninstalling Audio Driver - Once you have uninstalled the audio drivers, open up your motherboard manufacturer’s website and search for your product. Download the audio drivers listed there and then install them on your computer.
- After doing that, go ahead and restart your Windows.
- Once your computer boots up, open up Valorant to see if the problem is still there.
Perform a Clean Boot
Finally, if none of the above solutions have circumvented the problem for you, then it is very likely that the issue is being caused by a third-party application on your system. As we have mentioned, this can often happen if you have other sound applications like Sonic Studio or Asus Gamefirst installed. However, they are not the only ones and in your case, another application might be resulting in the issue. In such a case, you can perform a clean boot to verify this suspicion. Clean boot starts your computer with the most minimal services which means that all the third-party applications are disabled from starting. If your game works fine in clean boot, then it is obvious that a third-party application is causing the problem for you. Follow the instructions given down below to perform a clean boot:
- First of all, open up the Run dialog box by pressing the Windows key + R shortcut.
- Then, in the Run dialog box, type in msconfig and hit the Enter key.

Opening System Configuration - On the System Configuration window that opens up, switch to the Services tab.
- Then, on the Services tab, click the Hide all Microsoft services checkbox.

Hiding all Microsoft Services - After that, click the Disable all button. Follow it up by clicking Apply.

Disabling Third-Party Services - Finally, click on the Startup tab and click on the Open Task Manager option.

Startup tab on System Configuration - On the Task Manager window, choose every application one by one and click Disable for each.

Disabling Startup Applications - Once you have done that, click OK on the System Configuration window and reboot your system.
- After your computer boots up, open up Valorant and see if the problem is still there.
- In case it isn’t, you can enable each service one by one to locate the culprit application.
The post Valorant Voice Chat Not Working? Try these fixes appeared first on Appuals.com.


0 Commentaires