The MountUUP folder is known for growing to be quite big, so it’s understandable why some Windows users might want to delete it in order to free up space. However, getting rid of this folder and its contents is not as easy as you’d want.
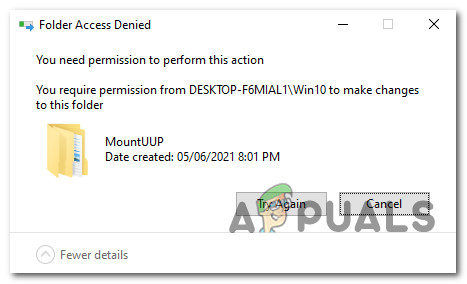
MountUUP falls into a special folder-protected category, so you’ll need to go for an unconventional approach if you really want to delete it.
Can I safely delete the mountUUP folder?
This is a folder that typically gets generated after you download and mount an insider preview build of Windows. You’ll find this folder on Windows 8, Windows 10, and Windows 11.
Unless you have a specific use for the UUP files located in this folder, deleting it is perfectly safe and won’t affect (in any way) the functionality of your current Windows installation.
Update: There are also situations where a download glitch causes this folder to grow abnormally high (over 100 GB) – in this case, you really have to delete the main folder and its contents in order to prevent your HDD / SSD from filling up.
How to delete the mountUUP folder on Windows
Since you will not be able to delete this folder conventionally, you will need to go for a workaround in order to be able to delete this folder and its contents.
Here’s a list with every confirmed workaround that will allow you to get rid of the mountUUP folder:
Note: Every method featured below is confirmed to work on both Windows 10 and Windows 11.
- Delete from an elevated Command Prompt – You can open up an elevated Command prompt via the Advanced Options menu and forcibly remove the mountUUP directory with a CMD command before your OS gets the chance to start mounting files stored in this directory.
- Giving yourself full permission of the mountUUP folder – Although this is a time-consuming method, it will allow you to remove the mountUUP folder if the issue is occurring due to a permission issue.
- Gaining full control over the mountUUP folder before deleting it – One way to ensure that you have the required permissions to delete the mountUUP folder without the need to go for any workarounds is to give your account full permissions. After you do so, you should be able to delete the folder conventionally.
- Unmount the .wim and .vhd files stored inside mountUUP before deleting it – Since the main reason why you are unable to delete this folder is that some files stored inside are currently mounted by your OS, you can usually get away with deleting the entire mountUUP directory by using a DISM command to clean up any currently WIM mounted files.
- Boot in Safe Mode without networking – In case you’re unable to delete this directory because your Windows installation immediately starts using files present inside mountUUP immediately after you boot up, you can probably prevent this from occurring by forcing your OS to boot in Safe Mode without networking and delete the directory in a state where no non-essential component is allowed to start.
- Remove the mountUUP folder from the list of Protected Folders – As it turns out, you can also expect this issue to occur in those situations where Windows Defender has ended up placing the mountUUP folder among the list of protected directories. While mountUUP is part of this list, you will not be able to delete the folder conventionally.
Delete directory via Command Prompt
If you’re looking for a method that will almost certainly be effective, one of the most effective ways of ensuring that you delete the contents of the mountUUP and the directory itself is to boot from the Advanced Options menu and remove the mountUUP directory from a series of commands.
Note: Opening an elevated CMD via the Advanced Options menu is necessary since you will need to perform this task before your OS gets the chance to mount files currently stored in the mountUUP folder.
Follow the instructions below to receive step-by-step guidance on removing the mountUUP folder using an elevated Command Prompt opened using the Advanced Options menu:
- Start by right-clicking on the Windows icon inside your taskbar.
- Next, from the list of options, expand the Shut down or sign out menu, then press and hold on the Shift key while clicking on Restart from the list of available options.
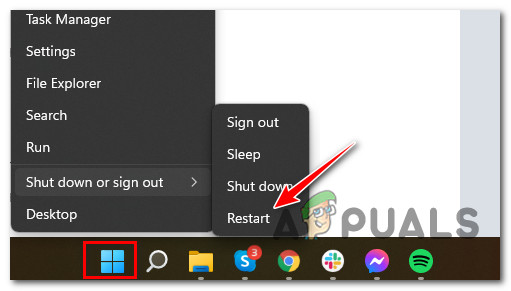
Restart directly into the Advanced Startup menu - Wait until your PC restarts and boots directly into the Recovery menu.
- Once you’re inside, click on Troubleshoot on the first screen, then click on Advanced Options from the list of options.
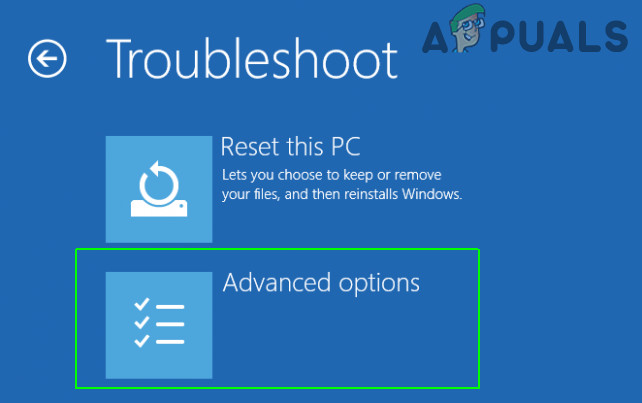
Opening up the Advanced Options menu - Once you’re inside the Advanced Options menu, click on Command Prompt from the list of options.
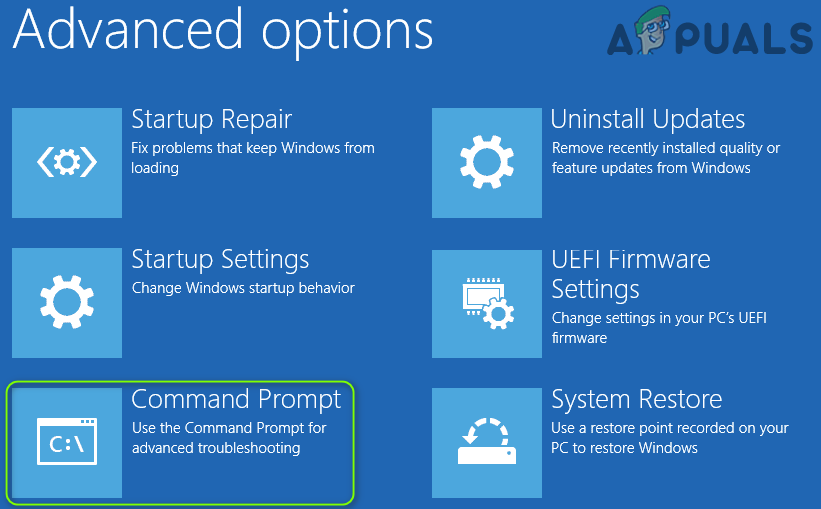
Opening up the Command Prompt window - Once you’re inside the elevated command prompt, take note of the drive letter that will appear with drive letter X.
Note: Keep in mind that the drive letter you’ll see here is not the same as the drive letter you’ll see inside File Explorer. - Next, type the following command and see if you can locate the MountUUP folder:
dir X
Note: X is simply a placeholder – replace it with the actual letter that you discovered at step 6.
- Next, type the following command and press Enter to initiate the deletion action of the MountUUP folder:
rd mountuup /s /q
- Wait until the operation is complete, then restart your computer normally and check to see if the issue is now fixed.
In case you want to avoid this method or you’re encountering an error that prevented you from completing the instructions above, move down below for a different way of deleting the MountUUP folder.
Giving Yourself Full Control of the folder
Most of the time, this particular issue will occur due to a permission issue. If you don’t want to force delete the folder using a procedure like the one featured above, the next best effective alternative is to take full control over the mountUUP folder so you can delete it without experiencing a permission issue.
This method was successfully used by a lot of affected users and it’s confirmed to be effective on both Windows 10 and Windows 11.
If you’re seeing a permission error when trying to delete the mountUUP folder and you haven’t tried to fix the issue by giving yourself full control over the folder, follow the instructions below for step by step instructions on how to do this:
- Open File Explorer and navigate to the location of the mountUUP folder.
- Once you reach the location, right-click on it and choose Properties from the context menu.
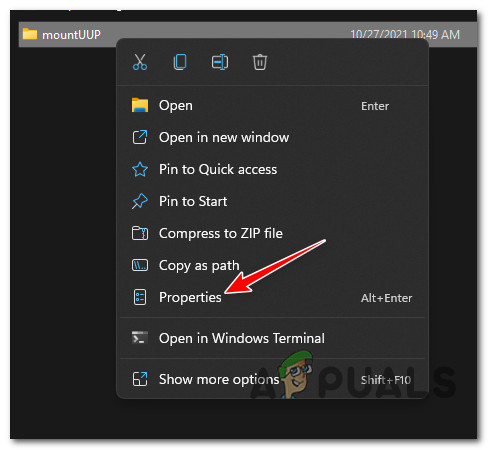
Accessing the Properties screen of mountUUP - Inside the Properties menu of the mountUUP folder, access the Security tab from the horizontal menu at the top, then click on the Advanced button (under the Permissions for Authenticated Users)
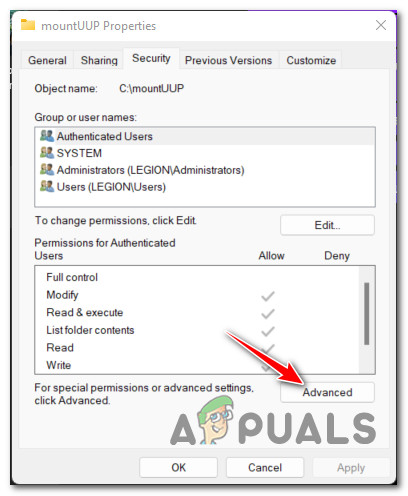
Accessing the Advanced permissions button - From the next screen, click on the Change hyperlink near the owner email, then click on Yes to grant admin access.
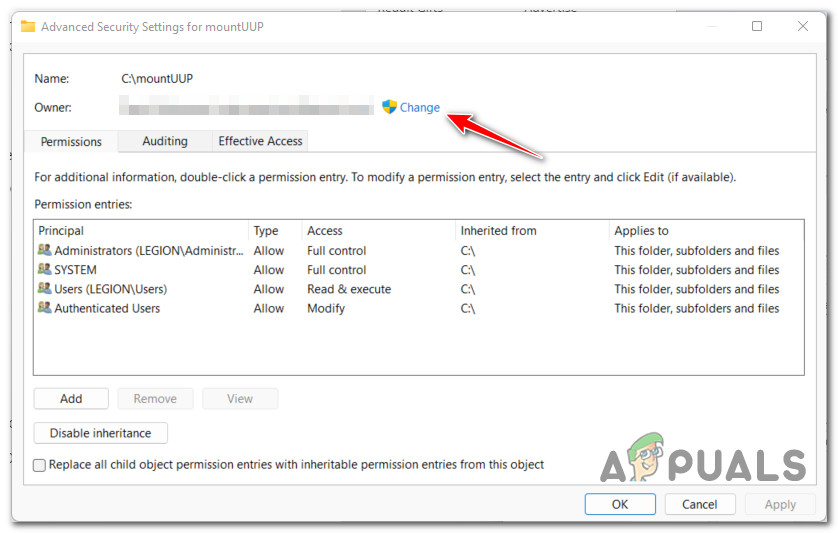
Changing the owner of the mountUUP folder - Once you’re inside the Select User or Group, click on the Advanced button at the bottom of the screen.
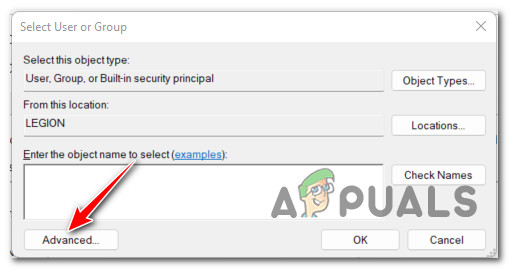
Accessing the Advanced menu - Inside the Select User or Group window, click on the Find Now window.
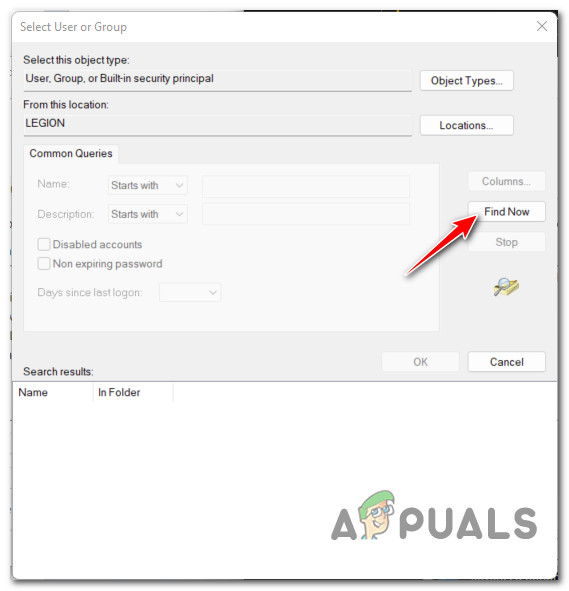
Using the Find functionality - Next, from the Search results, double-click on Administrators, then click Ok.
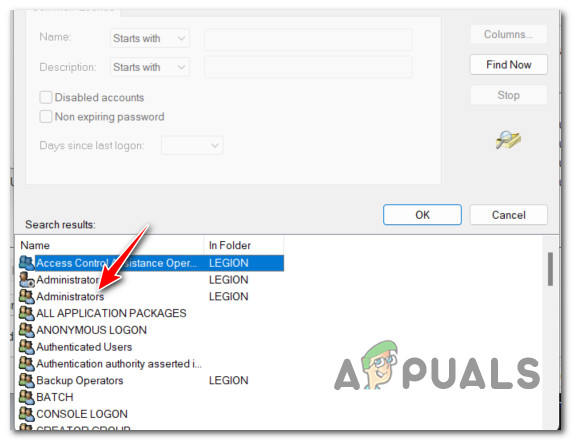
Opening up the Administrators menu - After you are returned to the Select User or Group menu, click Ok to save the changes.
- Next, from the Advanced Security Settings for mountUUP, start by checking the box named Replace owner or subcontainers and objects, then click on Apply at the bottom of the screen.
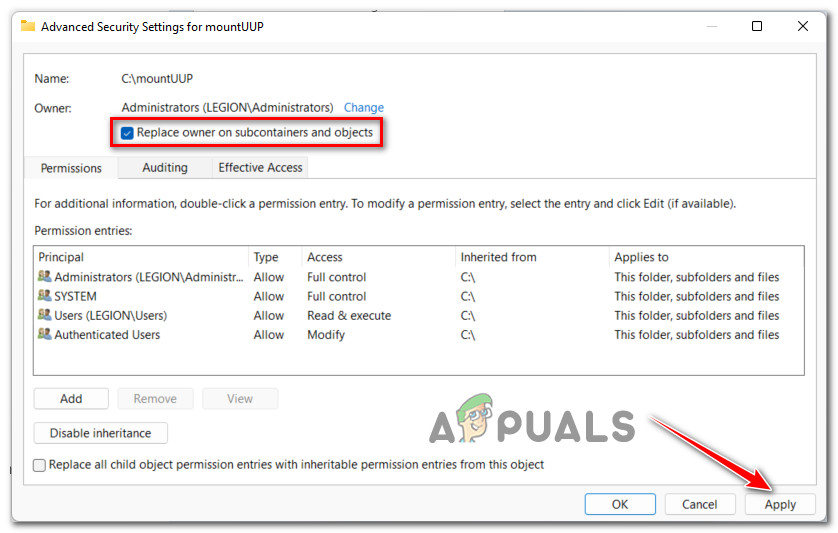
Applying the permission changes Note: When you see the warning pop up about the permission changes, click OK as you can easily disregard it.
- Once you’re back to the root directory of mountUUP Properties, click on Advanced once again.
- Once you are back inside the Advanced Security Settings for mountUUP, look under Permission entries and check to see if the Administrators principal has Full control access. Once you’ve verified this, click Ok and reboot your PC to allow the changes to take effect.

Checking for the required permissions - Once your PC boots back up, attempt to delete the mountUUP folder and see if the operation is successful.
If you’re still prevented from deleting the mountUUP folder, move down to the next potential fix below.
Unmount and Clean the .WIM or .VHD files first
If none of the methods above have been effective in your case, chances are your inability to delete the mountUUP folder is not related to a permission issue. Most likely, you are unable to delete the folder because it contains a .wim or .vhd file that is currently mounted on your PC.
If this scenario is applicable, you can easily take care of the issue by opening an elevated Command Prompt and running a command that will unmount and clean up any WIM image that is currently mounted via DISM (Deployment Image Servicing and Management).
We’ve managed to uncover a lot of user reports confirming that this operation has finally allowed them to delete the problematic mountUUP folder.
Follow the instructions below to unmount and clear any currently mounted .wim or .vhd files prior to deleting the mountUUP folder:
- Press Windows key + R to open up a Run dialog box. Next, type ‘cmd’ inside the text box and press Ctrl + Shift + Enter to open up an elevated Command Prompt.
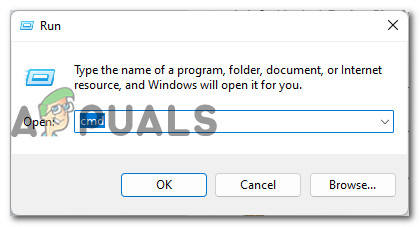
Opening an elevated Command Prompt - At the User Account Control window, click Yes to grant admin access.
- Inside the elevated Command Prompt, type the following command and press Enter to clear any currently mounted.WIM or .VHD files via DISM:
dism /cleanup-wim
- Once the command is processed successfully, navigate to the location where the mountUUP folder is located and attempt to delete it again conventionally (right-click > Delete).
In case this method also produces the same permission error when you attempt to delete the mountUUP folder, move down to the next potential fix below.
Boot in Safe Mode without Networking
Another method that should allow you to delete the mountUUP folder is to boot your computer in Safe Mode without Networking. This operation will ensure that your PC boots up with only the bare essentials – this means that any previously mounted .wim files that are currently stored in the mountUUP folder will no longer be used by the system.
Note: It’s important to boot in Safe Mode without Networking in order to prevent the WU component from using files in the mountUUP folder.
Follow the instructions below to learn how to boot your Windows computer in Safe Mode without Networking via Startup (WinRE):
Note: The instructions below should work on every recent Windows version (Windows 8.1, Windows 10, and Windows 11).
- Right-click on the start icon from your taskbar, then expand the Shut Down or Sign out menu and press the Shift key while clicking on Restart.

Restart directly into the Advanced Startup menu Note: This operation will force your Windows computer to restart directly into the Advanced Startup (WinRE) menu.
- Wait until your PC restarts inside the Recovery menu, then click on Advanced Startup and click on Troubleshoot at the first prompt.
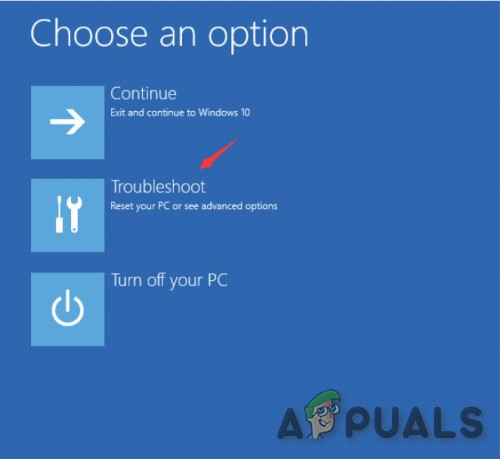
Accessing the Troubleshoot tab - Once you’re inside the Troubleshoot menu, click on Startup Settings from the list of available options.
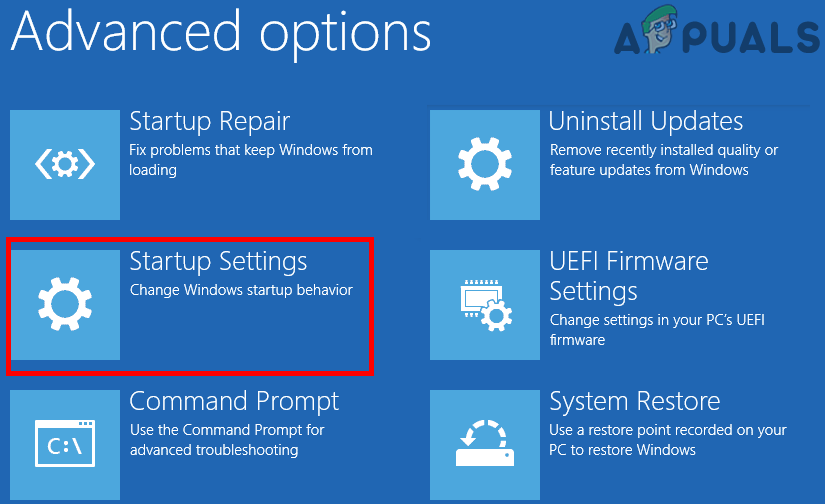
Accessing the Startup settings menu - At the next screen, click on the Restart button to prompt your PC to restart directly into the Startup settings screen.
- After your PC restarts into the Startup screen, press the F4 key or the 4 key in order to boot your PC in safe mode (without Networking).
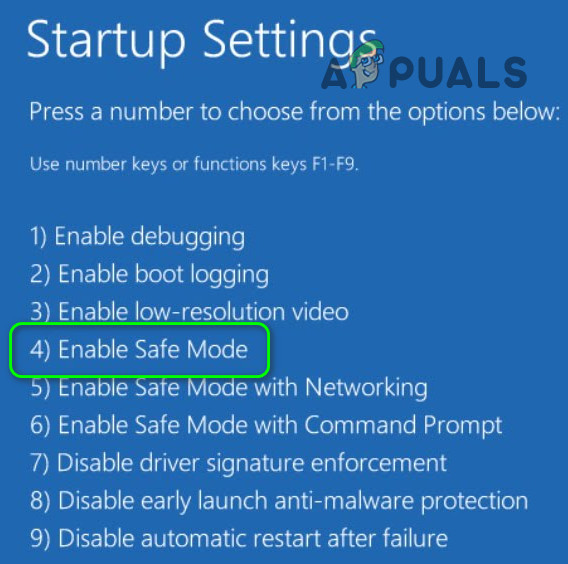
Boot in Safe Mode - Wait until your PC boots into Safe mode, then go ahead and attempt to delete the mountUPP folder once again.
- Once the folder has been deleted, reboot your PC normally to allow it to boot in normal mode.
In case this method was not effective in your case and you’re still unable to delete the mountUUP folder, move down to the next potential fix below.
Remove MountUUP from the list of Protected Folders
A less common but possible reason why you might be unable to delete the mountUUP folder using the methods above is that the folder is included among the list of protected folders inside Windows Defender.
Fortunately for those of you experiencing this issue, the fix is simple – you’ll need to access the Protected Folders menu inside your Windows Defender settings and remove the mountUUP folder from the list before you can delete it conventionally.
If you’re looking for step by step instructions on how to do this, follow the instructions below:
- Press the Start key, then type ‘Windows Security’ in the search box and access Windows Security from the list of results.
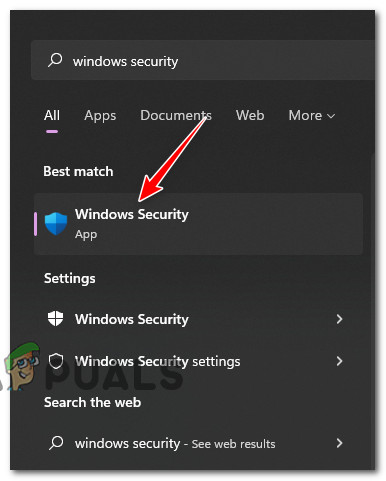
Open up the Windows Security tab - Once you’re inside the root directory of Windows Security, click on Virus & Threat protection from the vertical menu on the left. Next, click on Manage ransomware protection under Ransomware protection.
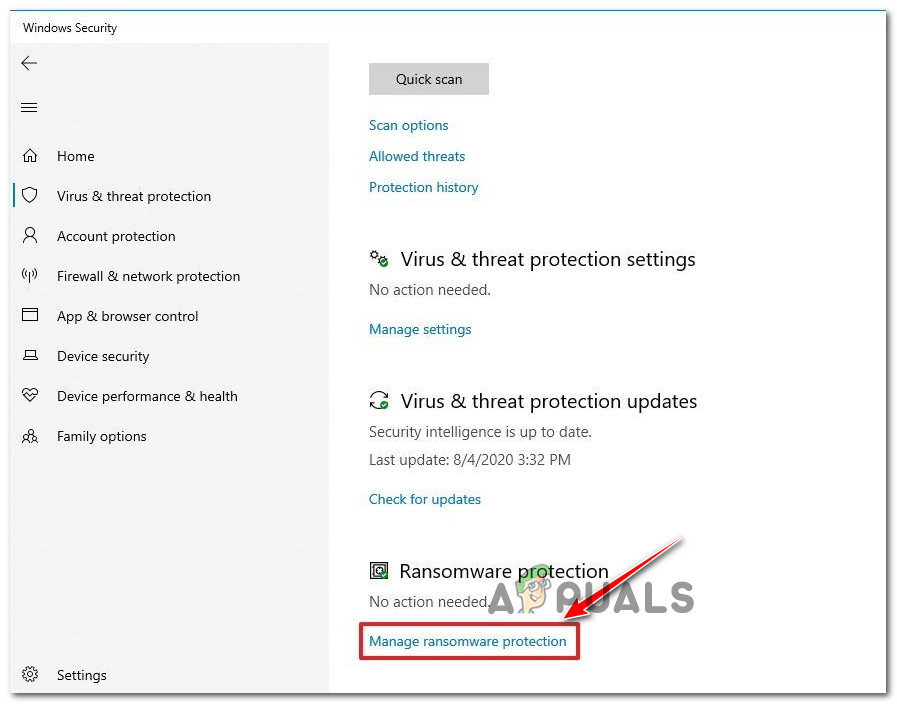
Manage the Ransomware protection settings Note: If the vertical menu is hidden by default, click on the action button in the top-left corner.
- Next, from the dedicated Ransomware protection menu, click on the Protected folders hyperlink (under Controlled folder access).
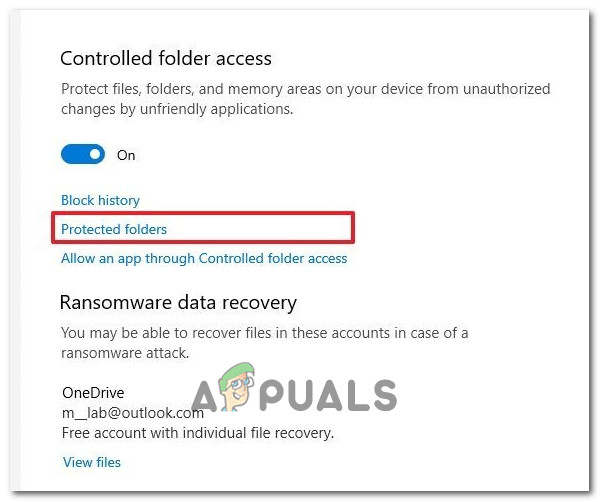
Accessing the Protected folders menu - Once you’re finally inside the Protected folders menu, scroll down through the list of folders that are currently part of the protected fleet and see if you can locate the entry for the mountUUP folder.
- When you see it, click on it once to bring up the context menu, then click on Remove and confirm your choice.
The post Can’t Delete the MountUUP Folder? Here’s How to Fix It appeared first on Appuals.com.


0 Commentaires