Since the release of Battlefield 2042, players have encountered a few bugs and issues that are not letting them play the game properly. One of the most common ones is the game crashing while playing and sometimes won’t start when the game is launched. This issue is typically encountered on PC.
After many reports were made, we have investigated this error closely and come up with a shortlist of motives that might be the reason that this error is happening:
- Missing admin access – Some players have stated that the game is crashing and won’t start because it can’t access all the restricted parts of your Windows system. To fix this. you need to go to the Properties and give the administrator permission permanently to the game.
- Incompatible 3rd party antivirus – In case you are using a 3rd party antivirus, a local interference might cause Battlefield 2042 to act up and crash as it’s unable to access certain dependencies. You can fix this by disabling the AV or uninstalling it permanently (depending on if you’re using an antivirus or a security suite complete with a firewall component).
- Outdated GPU drivers – This error might be caused by outdated graphics card drivers or driver equivalents that we’re migrated over from an older Windows version and aren’t fully compatible. You can simply fix this by making your PC reinstall the newest GPU drivers or use the proprietary updating application to automatically install the latest updates.
- Incompatible overlay feature – An under-the-radar culprit that might cause this problem is an overlay feature. We manage to find out user reports confirming that this is the main cause of the crash. To fix this, you need to disable the overlay feature from the settings of the app or uninstall it if you want to get rid of it completely.
- Missing Media Feature Pack – A few affected players have reported that the missing Media Feature Pack is causing Battlefield 2042 to act unproperly. This pack is needed to render certain cutscenes. The fix for this is to manually install the feature from the Apps & Programs menu from the Settings.
- Missing Visual C++ Redist Packages – This error might be also caused by some missing Visual C++ Redist Packages that you should have installed for the game to work. You can fix this by downloading & installing them from the official Microsoft site.
- Corrupted files – Some corrupted files might cause Battlefield 2042 to crash and not start because it can’t access some important game dependencies. To fix this issue, you can check the integrity of the files from the repairing process from the Origin.
- Uninstalled EasyAntiCheat – Another reason why this problem might be happening is that the anti-cheating tool is not installed properly. You can manage to fix the issue by making sure that the EasyAntiCheat is installed (located in the game’s folder).
- Max Link Speed is set to AUTO – If you’re using a powerful GPU and the Max Link Speed is set to AUTO, you might end up severely limiting the capabilities of your GPU causing the game to crash. In this case, you can fix the problem by changing the Max Link Speed to Gen 3 from your BIOS / UEFI settings.
Now that you know all the possible causes of this error, here are some methods that will help you fix the Battlefield 2024 crashing and won’t start error:
1. Run the Battlefield 2042 executable with admin access
The first thing you need to do to fix this error is to run the Battlefield 2042 executable with administrator access, as well as the launcher executable.
By doing this you will offer the app permission to access restricted parts of your Windows system that otherwise will be limited.
This will fix the issue in a situation where the problem is actually occurring because the main Battlefield 2042 executable doesn’t have the required permissions to call upon all the game dependencies.
If you don’t know how to run the executable with administrator access, here are the exact steps:
- Open the folder where you have the game installed and right-click on the game’s exe, then click on Properties.
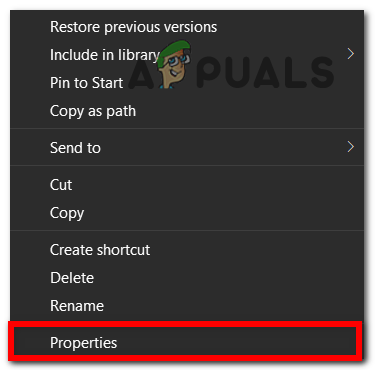
Accessing the Properties screen - Inside the Properties menu, click on Compatibility located on the upper side, then check the box next to Run this program as an administrator and make sure to save the changes by clicking on Apply.

Running the program as administrator - Now right-click on the Battlefield 2042 launcher, access the Properties, and check the box where it says Run this program as an administrator.

Accessing the Battlefield 2042 launcher - Now launch the game to see if it still crashes with the same kind of behavior.
If the first method didn’t help, go to the next one.
2. Disable or Uninstall 3rd party antivirus
This error could also be caused by an overprotective security suite that is making the game crash and not start.
There are several antiviruses suites that might interfere with Battlefield 2042, but Zone Alarm Extreme Security and AVG Antivirus (Free Version) are by far the most common culprit.
If that is the case for you, you should be able to fix it by disabling or uninstalling the 3rd party antivirus.
Note: We recommend you uninstall the AV suite to make sure that you are not leaving behind any traces of the security suite that might cause your game to crash.
Here are the steps on how to do that:
- Press the Windows key + R to open a Run dialog box and type ‘appwiz.cpl’, then press Enter to open the Programs and Features menu.
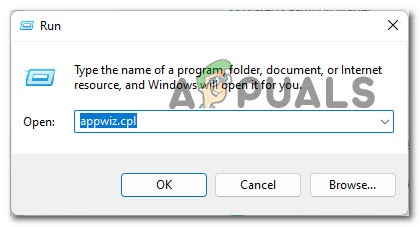
Open up the Programs and Features menu Note: If you’re prompted by the User Account Control window, click Yes to grant admin access.
- After the Programs and Features menu appears on your screen, scroll through the list until you find the overprotective suite that you want to uninstall. When you find it, right-click on it and click on Uninstall.
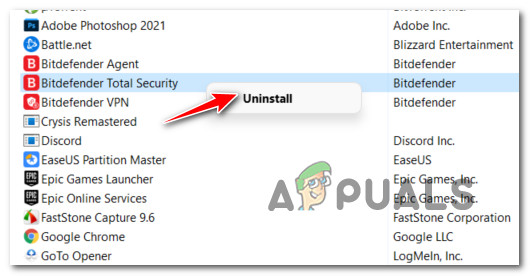
Uninstall the antivirus - Now follow the instructions that are on your screen to complete the uninstallation of the security suite, then reboot your computer.
- After the computer boots back, try to open Battlefield 2042 to see if you can launch it or if it will crash again.
If this method didn’t help, check the next one.
3. Update GPU drivers (PC Only)
Another reason that might cause your Battlefield 2042 to crash is that your GPU is missing the latest update. In most cases, the outdated GPU is causing the game to crash and not start.
In this case, you should be able to fix it by making your PC reinstall the latest compatible graphics card driver. Additionally, you can use the proprietary updating application (Nvidia Experience or Adrenaline) to install the newest updates automatically.
Here are the steps you need to follow in order to do this:
- Press the Windows key + R to open a Run dialog box and type ‘devmgmt.msc’ and press Enter to open up the Device Manager.

Open up Device Manager Note: You will be prompted by the User Account Control, click on Yes to grant administrator access.
- After the Device Manager appears on your screen, scroll down until you find the Display Adapters, then extend the drop-down menu.
- Now right-click on your dedicated GPU and click on Update driver.
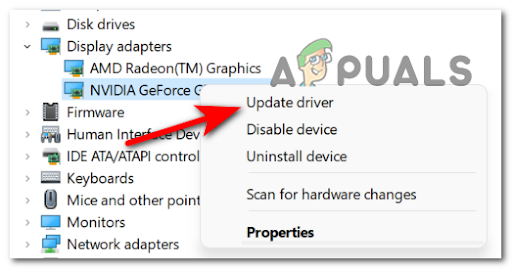
Updating the driver via Device Manager - After that, click on Search Automatically for updated driver software. Then follow the instructions that appear on your screen to download and install the latest GPU driver that the scan has identified.
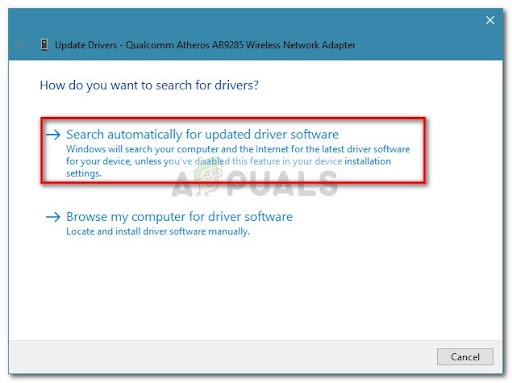
Searching automatically for updated driver software - After you follow the on-screen instructions and complete the installation, restart your computer and wait until it boots back.
- When your computer is fully turned on, test Battlefield 2042 to see if the same errors occur.
Note: If the Device Manager didn’t manage to find any newer driver version for your graphics card, you should try and use the proprietary software from your GPU manufacturer to make sure that you’re using the newest update:
- GeForce Experience – Nvidia
- Adrenalin – AMD
If this method was not applicable in your case as you already had the latest version of your GPU driver, move down to the next potential fix below.
4. Disable game mode
A few affected players have managed to fix the Battlefield 2042 errors by disabling the game mode. You can do this from the Settings of your Windows, in the Gaming section.
It’s unclear why this method has worked for so many users, but games are speculating that there’s currently a glitch with Game Mode that is forcing the game to crash.
Here’s how you can disable the Game Mode on Windows 10 or Windows 10 to fix the problem:
- Open a Run dialog box by pressing the Windows key + R. Inside it, type ‘ms-settings:’ and press Enter to open the Settings menu.
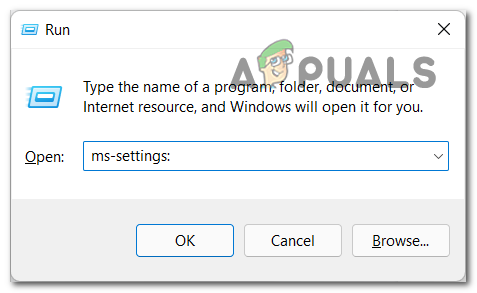
Accessing the Settings menu on Windows 10 / Windows 11 - Inside the Settings menu, click where it says Gaming.
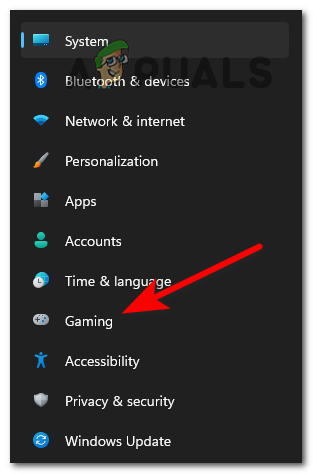
Accessing the Gaming menu - From the next menu that just appeared, access the Game Mode menu.

Accessing the Game menu - Now toggle the Game Mode to Off by clicking on it.

Disabling the Game Mode menu - Once you’ve done that, test the game to see if you still encounter the same issues.
If this fix didn’t repair your game, check below the next one.
5. Disable overlay feature
These Battlefield 2042 issues might be caused by a screen overlay that is making the game crash when you are trying to screen record the gameplay or when the screen overlay is detected on the screen.
You can fix this by disabling the non-essential in-game overlay or by uninstalling the tool altogether. Most of the time the conflict occurs either between OBS and Nvidia Experience or between OBS and Discord in-game overlay.
In case you have both Nvidia Experience overlay and Discord overlay enabled, here are the guides you need to follow (sub-guide A and sub-guide B) to disable the in-game overlay function to stop the errors from happening.
If you don’t really need a second overlay tool and you simply want to delete it, follow the third guide (C sub-guide).
Disable NVIDIA Overlay
Here are the instructions to disable the in-game overlay from the NVIDIA Experience settings menu:
- Firstly you need to stop the game, then open Nvidia Experience and click on the Gear icon located in the top right corner to access the Settings menu.

Access the Settings menu of Nvidia Experience - After you are inside the Settings section, access the General section located on the left side of the screen.
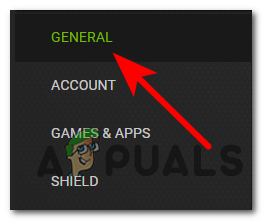
Accessing the General tab - Now scroll down until you see where it says In-game Overlay, then click on the toggle next to it to disable the feature.
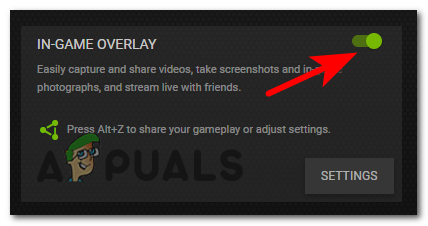
Disable the In-Game NVIDIA Overlay - After you’ve made the change, save the changes and close the Nvidia Experience.
Disable Discord Overlay
In case you are using the Discord overlay, here are the steps on how to disable it from the Settings menu of the VoIP software:
- You need to start by opening the Discord app, then look for the gear icon to open the User Settings menu.
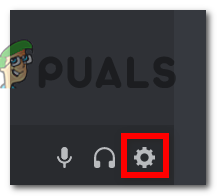
Accessing the User Settings menu - After you’re inside the User Settings menu, scroll down through the left side list until you find where it says Activity Settings, then click on Game Overlay which is located under it.
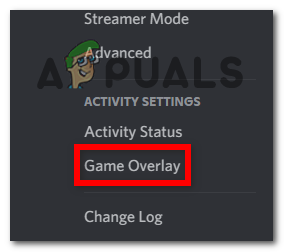
Open up the Game Overlay tab in Discord - Now you will see the Enable Overlay section, right under it where it says Enable in-game overlay you will need to toggle off the feature by clicking on the button.
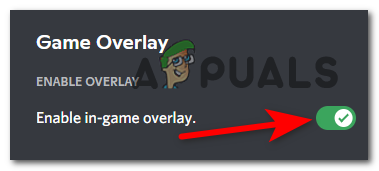
Disable the overlay feature in discord - After that, save the changes and test the game to see if it will crash.
Uninstall the Overlay Software
If you’re using dedicated overlay software, chances are you won’t be able to toggle it on and off. In this case, you will need to uninstall it via the Programs and Features menu.
Follow the instructions below for specific instructions on how to do this:
- Open a Run dialog box by pressing the Windows key + R, then type ‘appwiz.cpl’ and press Enter to open the Programs and Features menu.
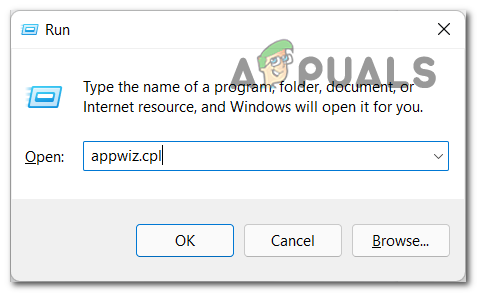
Open up the Programs and Features menu - After you are inside the Programs and Features menu, scroll down through the list until you find the overlay software that you want to uninstall.
- Once you find it, right-click on it and click on Uninstall to uninstall the software.

Uninstall the overlay feature - Now follow the on-screen instructions to uninstall the software, then reboot your PC.
- After your computer boots back, launch Battlefield 2042 to see if you can start the game and if it still crashes.
If this method didn’t fix your game problems, go check the next method.
6. Download and install the Windows Media Feature Pack
This error could also be caused by the missing of the Windows Media Feature Pack. This pack is needed to render certain character-related cutscenes and items related to the EA store.
To fix this you need to access the Apps & Programs menu and install the feature manually from the Optional Feature option.
In order to do this follow the next instructions:
- Press the Windows key + R to open a Run dialog box, then type ‘ms-settings:appsfeatures’ to open the Apps & features menu.
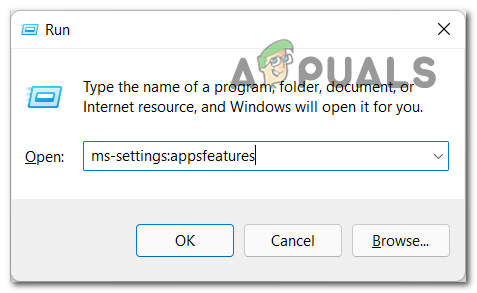
Open up the Apps and Features menu - Now inside the Apps & features, you need to click on Optional features.
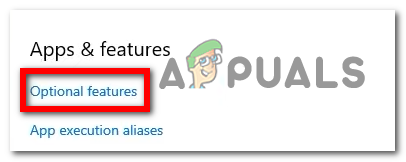
Accessing the Optional features menu - Now click on the Add feature button. When the menu appears on your screen, search for the Media Feature Pack and select it, then click on install to download and install the feature.
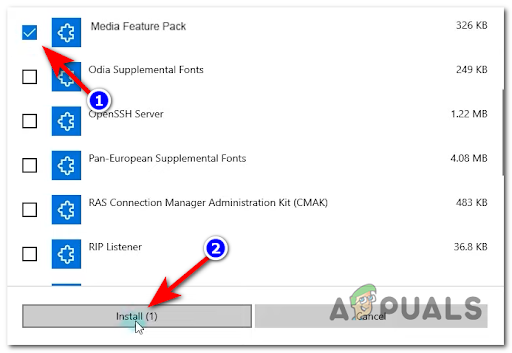
Install the Media Feature Pack - Afterward, reboot your PC and wait until it boots back.
- After you get past the startup screen, test the game to see if the errors still occur.
If you still encounter the same type of crash with your Battlefield 2042 installation, check the next method.
7. Download the Missing Visual C++ Redist Packages
Another motive that might cause your Battlefield 2042 to crash and not start is missing Visual C++ Redist Packages. People have managed to fix this by installing the Visual C++ Redist Packages manually using the official Visual C++ redist installer tool from Microsoft.
If you don’t know how to do this, here is the step-by-step guide you need to follow do to install the Redist Packages manually:
- Start by accessing the official Microsoft page where you can download the Visual C++ Redist Packages directly.
- After you are inside the site, you need to download the specific version of the Visual C++ Redist Packages that is compatible with your PC (32-bit or 64-bit).
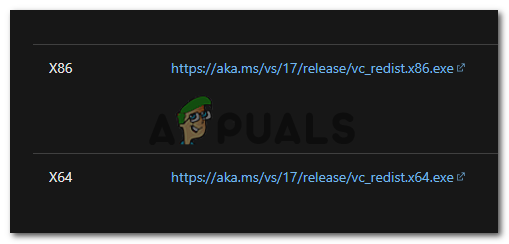
Downloading the Visual C++ Redist installer - After you download it, click to install it and follow the on-screen instructions. When you are finished, restart your computer to apply the modifications.
- After your computer boots back, launch Battlefield 2042 to see if the errors persist.
If the same kind of issue is still occurring even after you install all the missing redist. packages (or you already had every version installed), move down to the next potential fix below.
8. Repair the game via Origin
If you’ve come this far without a viable fix, you can also try to repair the game from Origin to fix the game’s crash error. By doing this, Origin will verify the integrity of all the game files and will repair them if there are any corrupted files.
If the crash resulted from a missing game dependency or a game file affected by corruption, this should fix the issue for you.
Here are the steps you need to follow if you don’t know how to do this:
- Firstly you need to open the Origin app, then access My Game Library.
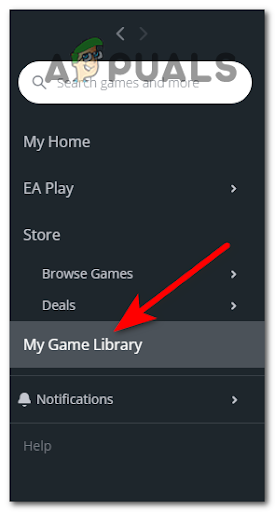
Access the My Game Library menu - Once you are inside My Game Library, locate Battlefield 2042 and click on the gear icon to open the Settings menu, then click on Repair to start the process.
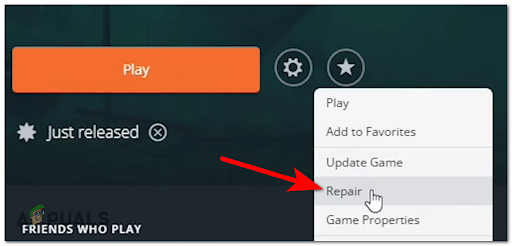
Repairing Battlefield 2042 via Origin - Now wait until the integrity of all the files is completely verified, then if there are any harmed files they will be repaired.
- After the process is complete, you need to open the game to see if you still encounter the same errors.
In case not even this method has fixed your Battlefield 2042 issues, try the next one.
9. Make sure EasyAntiCheat engine is installed
If you’ve come this far without a viable fix, you can also try to fix your Battlefield 2042 by making sure that the EasyAntiCheat is installed. The game might end up crashing because it detects that the EasyAntiCheat engine is missing or has been altered.
Note: The EasyAntiCheat is an anti-cheating tool that is made to stop online cheating for Battlefield 2042 and other shooters.
If you don’t know how to reinstall the EasyAntiCheat engine to make sure that is not conflicting with your game, here is the guide you need to follow:
- You first need to access the game’s folder, then you need to double-click on the EasyAntiCheat folder to open it.

Accessing the Easy Anti Cheat folder - After you are inside the folder you need to right-click on the EasyAntiCheat Setup, then click on Run as administrator. You will be prompted by the User Account Control, click on Yes to grant permission to start the installation.
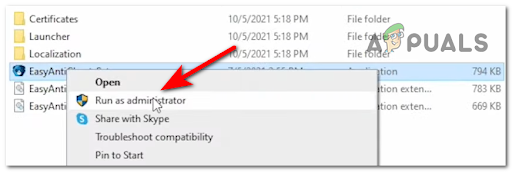
Run Easy Anti Cheat with admin access - Now follow the on-screen instructions and complete the installation.
- When the installation is complete, reboot your computer. Once it boots back, test the game to see if the same errors still occur.
If the issue is still not fixed even after reinstalling the Easy Anti Cheat engine, move down to the final potential fix below.
10. Change Max Link Speed from Auto to Gen
The last method you could try that has helped a lot of affected players to fix the Battlefield 2042 crash and won’t start errors is to change the Max Link Speed from Auto to Gen. You can do this from the BIOS menu.
Note: The reason why this small change can make a lot of difference in the stability of the game is that selecting Gen 3 gives your GPU double the bandwidth to handle data streams.
In case you don’t know how to access the BIOS menu to change the Max Link Speed from Auto to Gen, here are the steps:
- During the computer startup, press the specific key that was set by the manufacturer of your graphics card to open the BIOS menu.
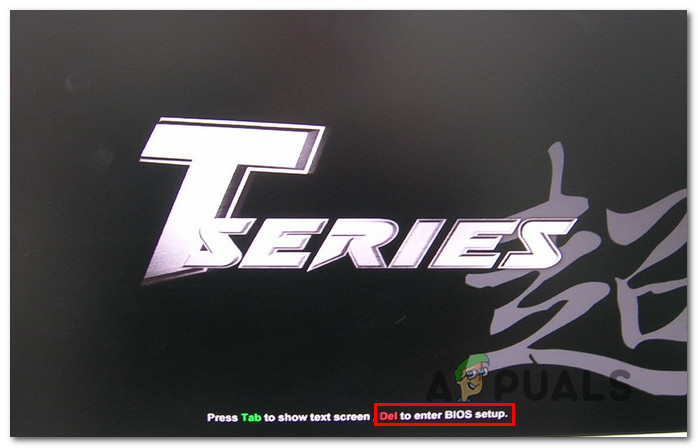
Accessing the BIOS menu - Now inside the BIOS menu, you can only navigate with your keyboard. Cycle through the available settings and find the Max Link Speed option (typically under System Settings) and change it to Gen 3 if it’s set to AUTO.
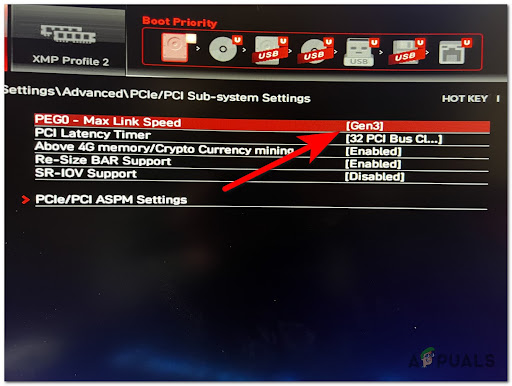
Change the Max Link Speed - Save the changes and exit the BIOS / UEFI settings to allow your PC to boot normally.
- Launch BattleField 2042 normally and see if the problem is now fixed and the crashes have stopped.
The post Battlefield 2042 Won’t Start or Crashing on PC? Here How to Fix It appeared first on Appuals.com.


0 Commentaires