COD’s Warzone launching issue is one of the most reported issues of the game. The issue occurs on the PC as well as on consoles (like a PS4). When a user launches the Warzone game, it just gets stuck on the loading screen and the game does not start or its lobby is shown. If the game does not crash after some time, then a user has to forcefully close the loading screen of Warzone (from Task Manager or by using Alt+F4).
There can be multiple causes due to which Warzone won’t load but the following can be regarded as the main:
- Outdated Game or Device’s OS: If the Warzone’s installation or device’s OS (like PS4’s firmware) is outdated, then one’s incompatibility with the other may cause the loading issue at hand.
- Corrupt DNS Cache or Database of the Device: If the DNS cache of the PC or database of the PS4 is corrupt, then it may stop the Warzone from launching.
- Incompatible, Outdated, or Corrupt Graphics Driver: If the system’s graphics driver is outdated, corrupt, or has become incompatible (after the latest update) with Warzone, then the Warzone game may fail to load.
- Corrupt Game Files: If the Warzone’s essential games’ files are corrupt, then the Warzone may get stuck on the loading screen.
Update Warzone to the Latest Build
Warzone might fail to load if its installation is outdated or the result of a bug in the game. In this scenario, updating the game to the latest build may solve the problem.
- Launch the Battle.net app and open Warzone.
- Now select Options and click on Check for Updates.
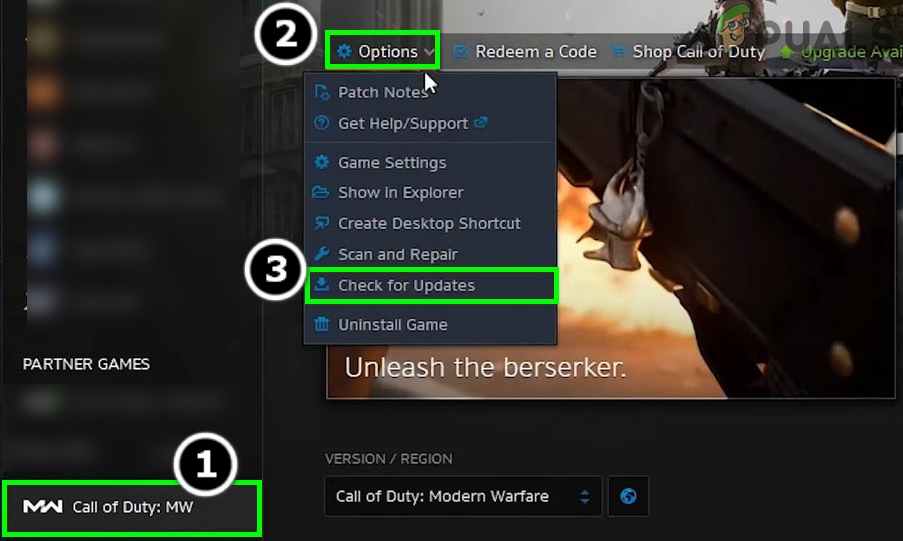
Check for Call of Duty Warzone’s Updates - If a Warzone update is available, let it download and install.
- Once installed, relaunch the Battle.net launcher and open Warzone to check if it is launching properly.
Update the PS4’s Firmware to the Latest Build
Warzone’s loading issue can occur due to a bug in the console’s firmware or if the PS4’s firmware is outdated. In this scenario, updating the PS4’s firmware to the latest build may solve Warzone’s loading problem.
- Launch the PS4’s Settings and open the System Software Update.
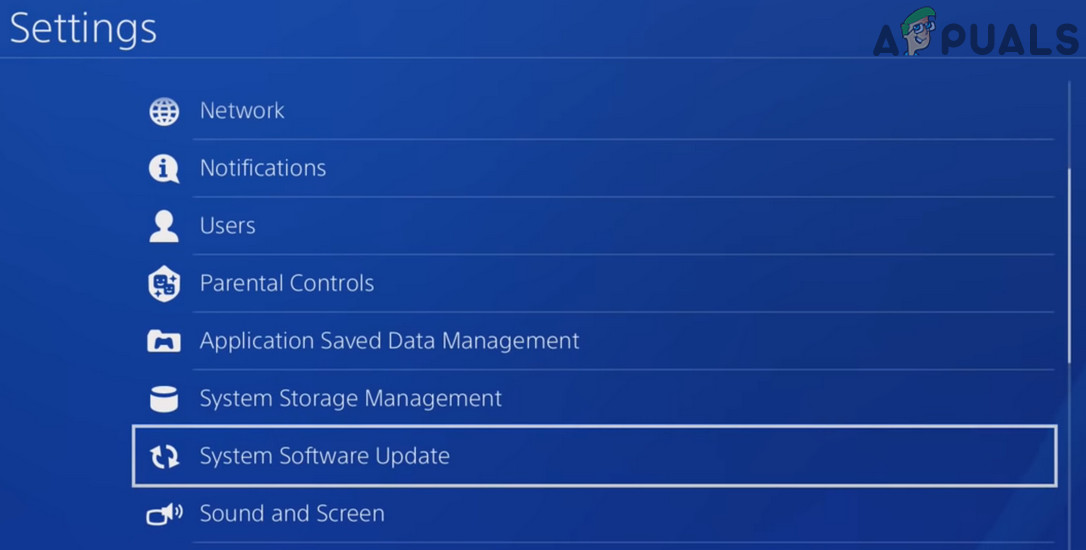
Open System Software Update in the PS4 Settings - Now select Update Now and if an update is available, select Next to download/install the update.
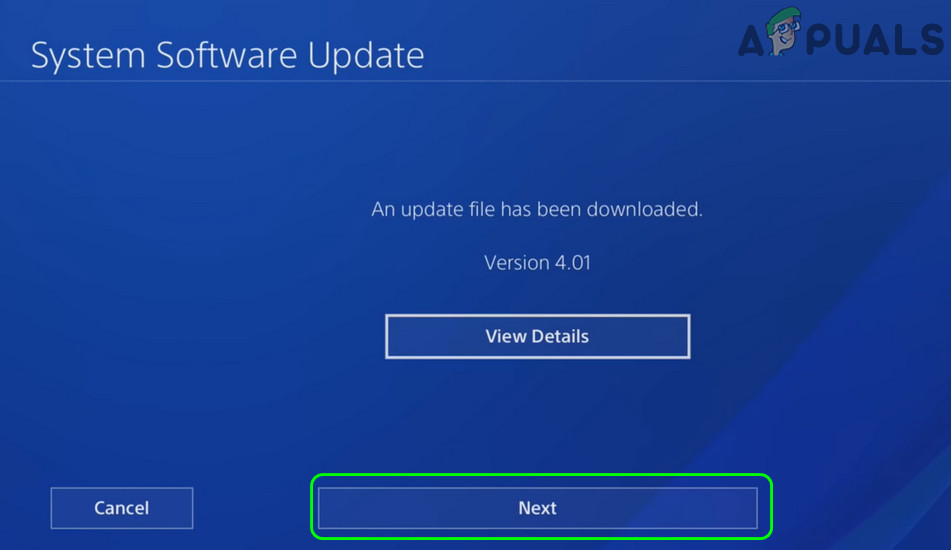
Click Next if an Update of PS4 is Available - Once installed, reboot your console and upon reboot, check if Warzone’s loading issue is cleared.
Edit the Config File of Warzone
Config file of the Warzone is responsible for many of the game’s pre-loading features like textures, graphics, etc. and if the said file is not configured properly, then the game may fail to launch. Here, editing the config file of Warzone may solve the problem.
- Right-click Windows and select Run.
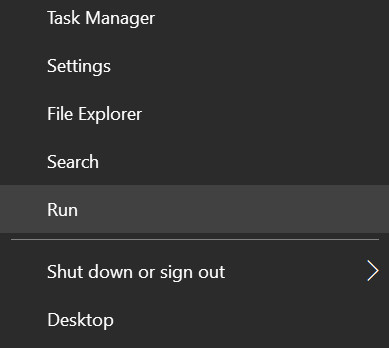
Open the Run Command Box - Now navigate to the following path:
Documents
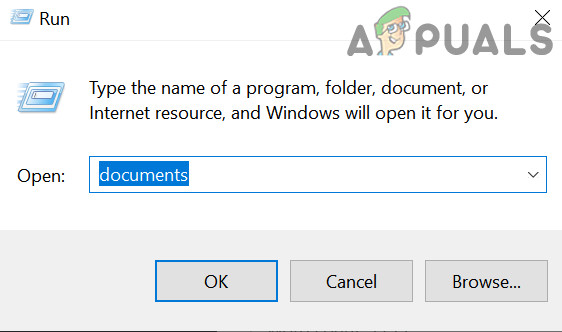
Open Documents Folder Through the Run Command Box - Then, open the Call of Duty folder and double-click Players.
- Now, right-click on Config.cfg file and select Edit. If there are multiple config files, move all such files except one to somewhere else (like Desktop) and edit that remaining file.
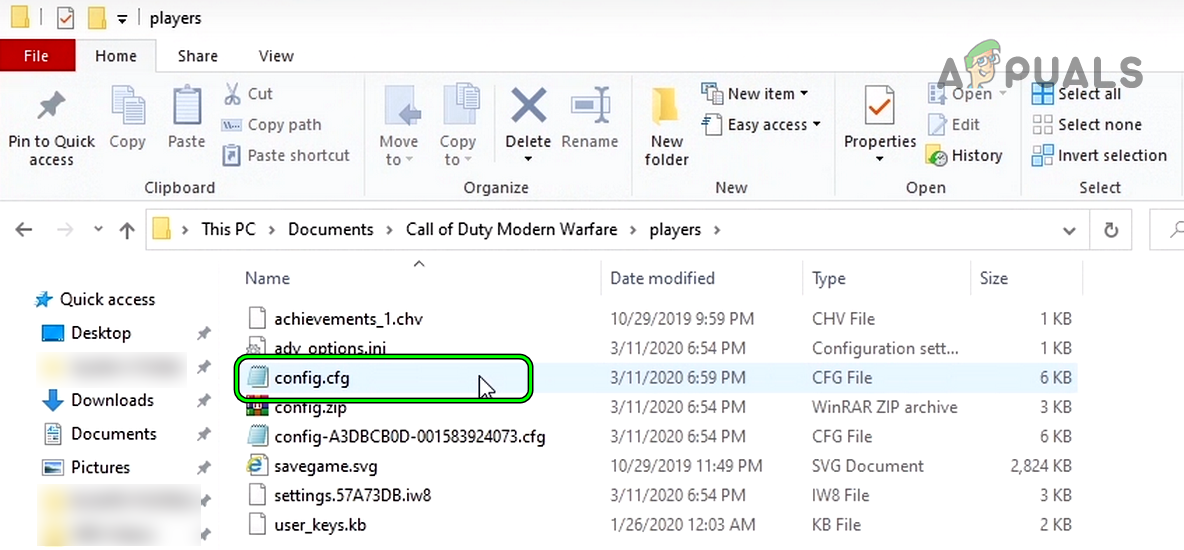
Open the COD Config File in Notepad - Then select Notepad and use the Find to search for the following:
setcl -1836731280
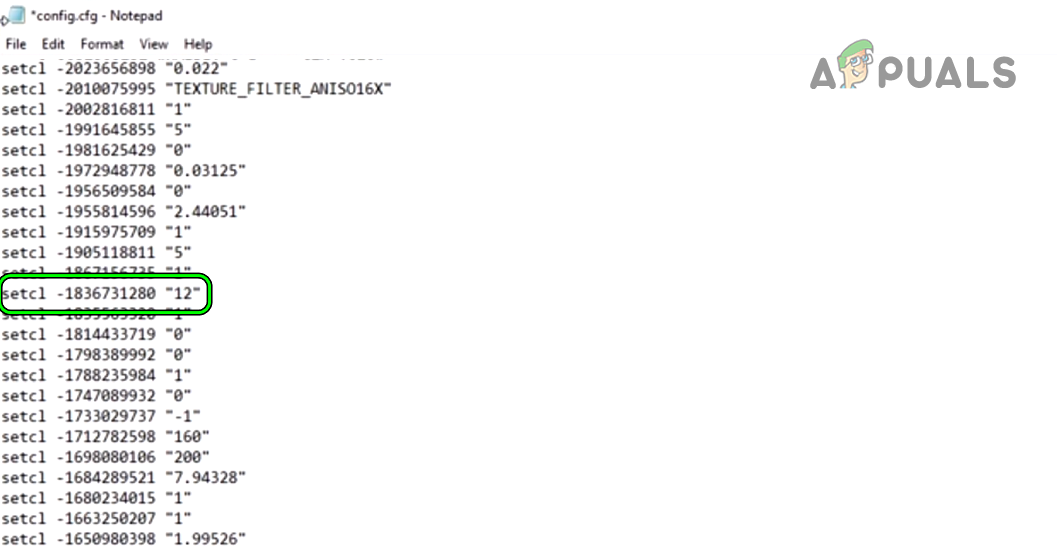
Set the Value of setcl -1836731280 to 12 - Now change its value from 1 to 12 and close the file after saving it. If there is no such entry, then add one at the end of the file.
- Then launch Warzone and check if it is operating fine.
- If not, check if trying different values of the SETCL entry from the range of 0 to 12 (e.g., 11) clears out the error.
- If the issue persists, again right-click on the Config file of Warzone in the Players folder and select Properties.
- Now, checkmark the attribute of Read-Only and apply the changes.
- Then launch Warzone and check if it is loading without issue.
- If that did not work, check if renaming the Config file or deleting it (a new one will be created on the game’s launch) and then launching Warzone solves the problem.
Rebuild the PS4’s Database
The PS4 might show the Warzone issue at hand if its database is corrupt. In such a case, rebuilding the PS4’s database may solve the problem.
- Firstly, make sure the PS4 is powered off, not in the rest/sleep mode.
- Now hold the power button until the beep sounds twice and afterward, release the power button.
- Then, wait till the console boots into the safe mode and afterward, connect the controller to the console.
- Now scroll down and select Rebuild Database.
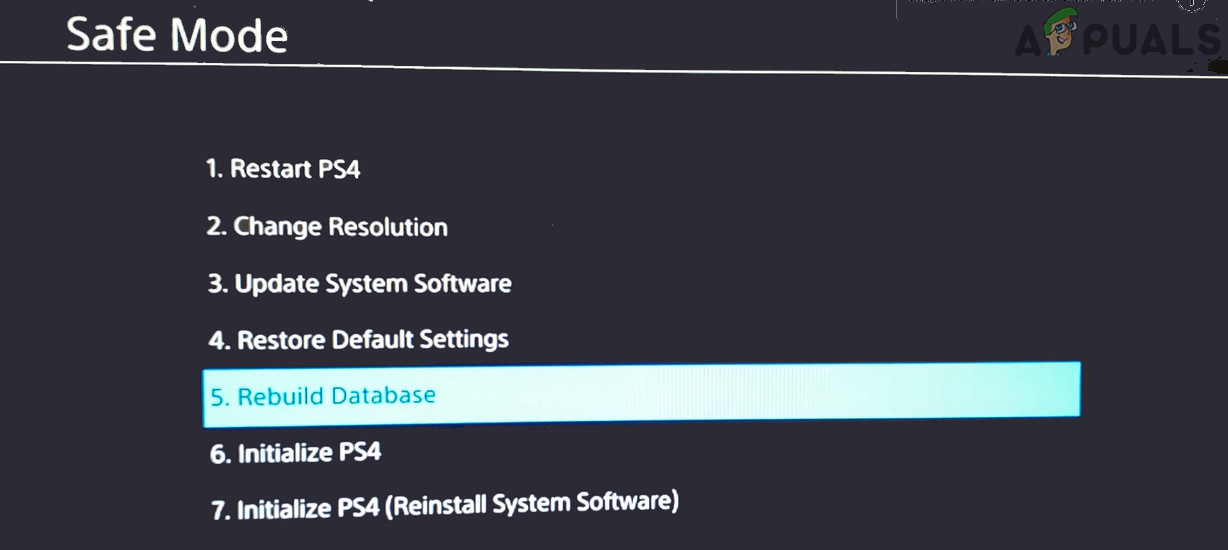
Rebuild Database of the PS4 Console - Then confirm to start the rebuild process and wait till the process is done. It may take time (minutes to hours) depending on the size of the contents on the console’s storage.
- Once done, restart the PS4 console and check if the Warzone is loading normally.
Flush the DNS Cache of the PC
A PC uses its DNS cache to resolve the frequently contacted web addresses and if the PC’s DNS cache is corrupt, then it may stop Warzone from loading. In this case, flushing the DNS cache of the system may solve the Warzone problem.
- Click Windows, search and right-click on Command Prompt.
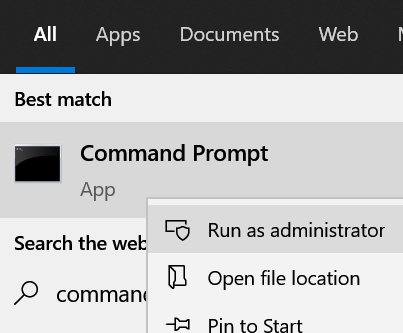
Open Command Prompt as Administrator - Now select Run as Administrator and execute the following (one by one) in the Command Prompt:
ipconfig/flushdns

ipconfig /registerdns

ipconfig /release

ipconfig /renew

netsh winsock reset

FlushDNS of Your System - Now exit the Command Prompt and restart your PC.
- Upon restart, launch Warzone and check if it is operating fine.
- If the issue persists, check if disabling the IPv6 solves the Warzone problem.
Scan and Repair the Games’ Files of Warzone
The corrupt game files of Warzone may not let the game load properly and cause the issue under discussion. Here, scanning and repairing the games’ files of Warzone may solve the problem.
- Right-click on the Windows and select Run.
- Then navigate to the following:
Documents
- Now delete the Warzone.exe (if present) and then delete the Call of Duty folder.
- Then open the Battle.net client and select Warzone.
- Now open its Options and select Scan and Repair.
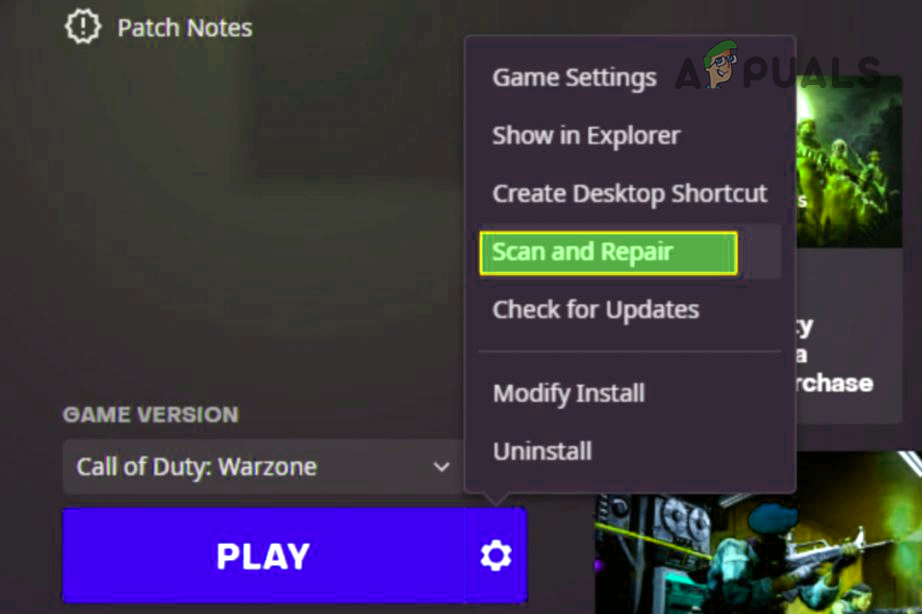
Scan and Repair Warzone - Then wait till the games’ files are scanned for any errors and repaired.
- Once done, relaunch the Battle.net client and check if the Warzone loading problem is cleared.
Roll Back the Graphics Driver to the Previous Version
If the Warzone issue started to occur after a recent graphics driver update, then the updated driver’s incompatibility with the game may be causing the issue. Here, rolling back the graphics driver may solve the Warzone problem.
- Right-click Windows and select Device Manager.
- Now expand Display Adapters and double-click on the graphics device.
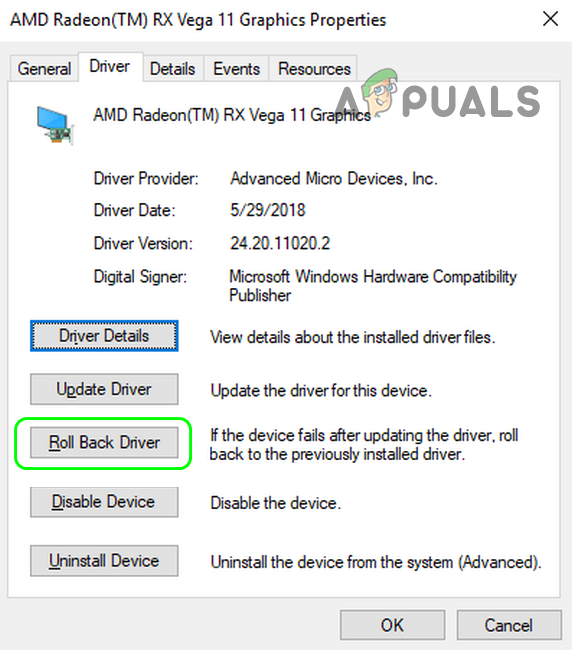
Roll Back the Radeon Driver - Then head to the Driver tab and click on Roll Back Driver.
- Now follow the prompts on the screen to roll back the driver and afterward, check if Warzone is loading normally.
If the issue was resolved after rolling back the graphics driver, then you may disable the driver’s update (till the issue is reported to be resolved).
Update the Graphics Driver to the Latest Build
If the graphics driver is outdated, then its incompatibility with the COD Warzone may cause the loading issue at hand. In such a case, updating the graphics driver to the latest build may solve the problem.
- Update the PC’s Windows (as many OEMs prefer to use the Windows Update to update the device drivers) and check if the issue is resolved.
- If not, right-click Windows and select Device Manager.
- Now expand the option of the Display Adapters and right-click on the graphics device.
- Then select Update Driver and click on Search Automatically for Drivers.
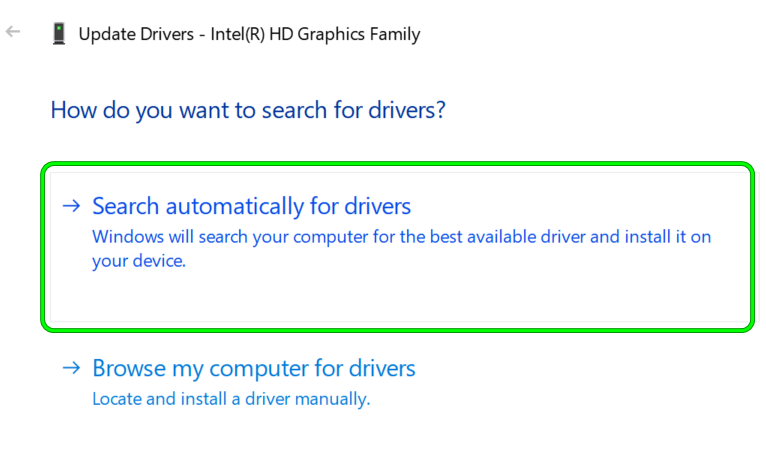
Search Automatically for Update Graphics Driver - Now let the updated driver install (if an update is available). If your OEM has an update utility like Dell Support Assistant, then use it to update the drivers.
- Once the graphics driver is updated, reboot your PC and upon reboot, launch Warzone to check if its loading problem is solved.
If that did not work, check if changing the screen resolution to 1080 solves the problem.
Reinstall the Graphics Driver
Warzone might fail to load if the system’s graphics driver is corrupt and reinstalling the same may solve the problem.
- Firstly, download the latest version of the graphics driver from the OEM website (like Dell or Nvidia).
- Then, right-click Windows and open Device Manager.
- Now expand Display Adapters and right-click on the graphics card.
- Then select Uninstall Device and in the sub-menu, checkmark Delete the Driver Software for This Device.
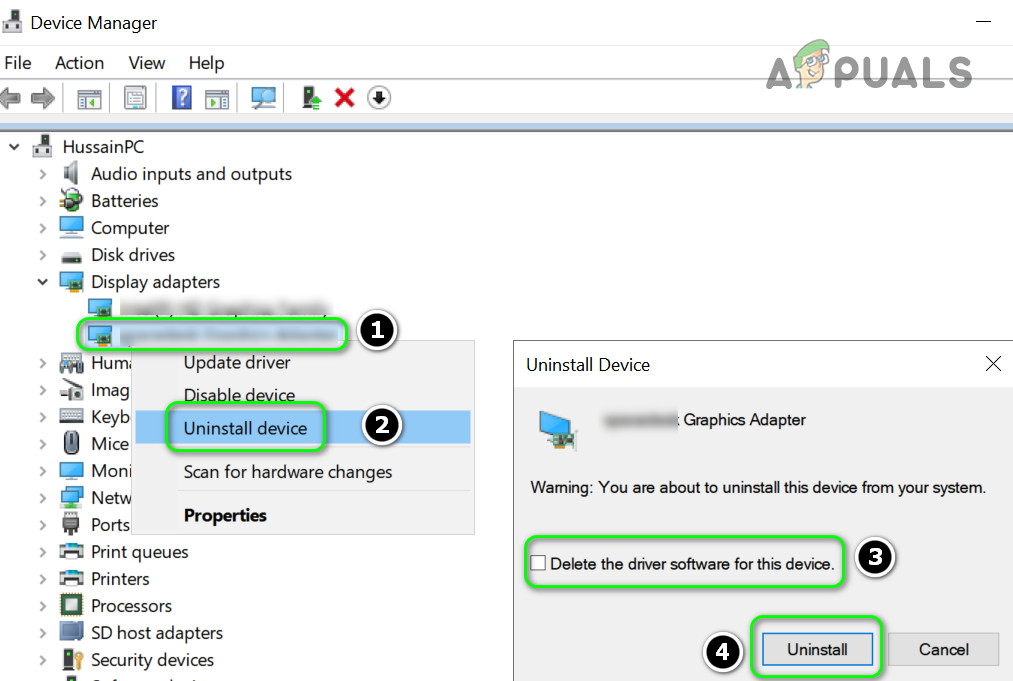
Check the Option of Delete the Driver Software for This Device for the Display Adapter and click on Uninstall - Now click on Uninstall and wait till the driver is uninstalled.
- Once uninstalled, restart your PC and upon restart, let the Windows install a generic driver (if it tries to).
- Then launch Warzone and check if it is working fine.
- If not, reinstall the driver (use the clean install option if supported) and check if that clears the Warzone loading issue.
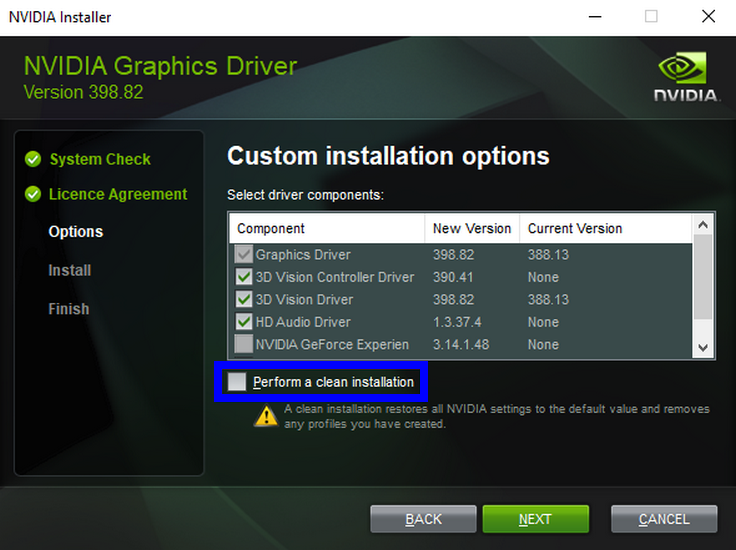
Perform a Clean Installation of Nvidia - If the issue persists, then check if reinstalling the graphics driver after uninstalling it with a 3rd party uninstaller utility like Device Drive Uninstaller (DDU) solves the problem.
Try Another Network or VPN
Warzone may get stuck on the loading screen if the network is not optimized for Warzone or restricts Warzone’s access to an essential online resource. In this context, trying another network may resolve the Warzone loading issue.
- Disconnect the system/console from the network in use and connect to another network (like a mobile’s hotspot) or use a VPN (like Exitlag, Speedify, etc.).
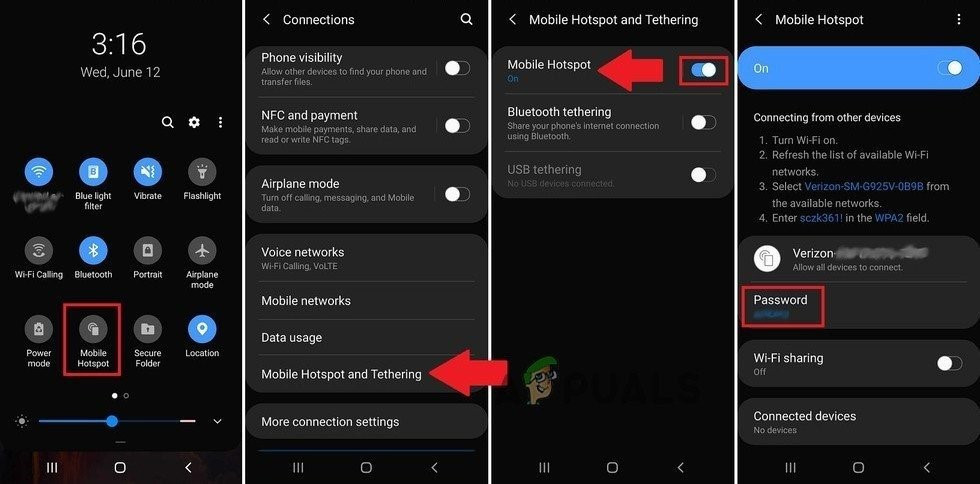
Enable Hotspot of Your Phone - Now launch the Warzone game and check if it is working fine.
- If so, connect back to the previous network and check if the loading issue is resolved.
If the issue reoccurs, then you may use the other network, reset the router to the factory defaults (discussed later), change the NAT type of the router to open or contact the ISP to optimize the network for Warzone.
Lower the MTU Value of the Network
The MTU (Maximum Transmission Unit) is the largest size of a data packet that can be sent over a network. If the MTU value of your network is not compatible with the Warzone, then Warzone may fail to load. In this scenario, lowering the MTU value of the network may solve the problem.
- Navigate to the web portal of the router and log in using your credentials.
- Now, open Advanced>> Setup>> WAN Setup and set the MTU value to 1372.
- Then apply the changes and check if Warzone is working fine.
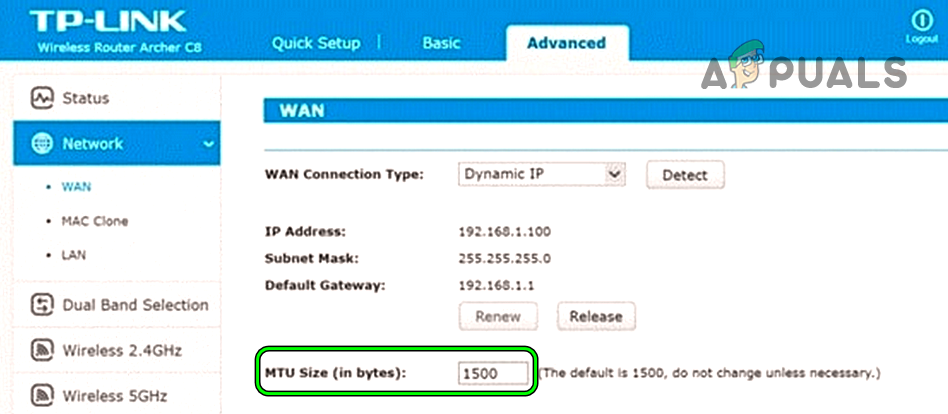
Change the MTU Value of the Router - If not, you may edit the MTU value of the device (like PS4 or PC). On a PS4, open its Settings and select Network.
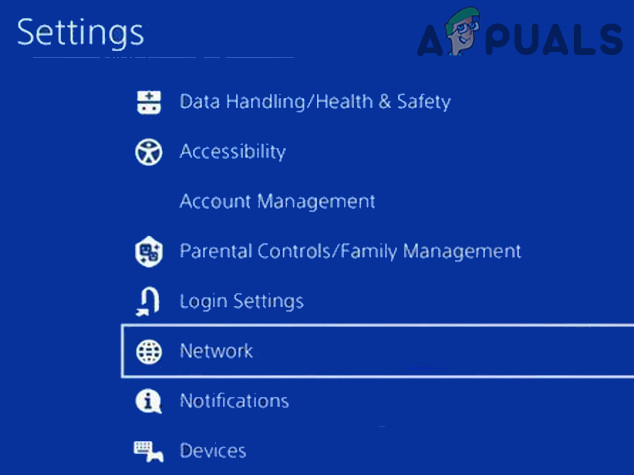
Open Network in the Settings of PS4 - Now open Setup Internet Connection and select the appropriate connection type (LAN/Wi-Fi).
- Then select Custom and use the Automatic IP Settings.
- Now select Do Not Specify for DHCP and set the DNS settings to Automatic.
- Then, on the MTU Settings screen, select Manual and enter 1372.

Select Manual MTU Settings of PS4 - Now click on Next and set Proxy to Do not Use.
- Then let the connection test pass and afterward, launch Warzone to check if its loading problem is cleared.
- If the issue persists, you may try some other MTU values (like 1492, 1500, etc.) to solve the problem.
Disable or Uninstall the Security Software of Your PC
If the security product of your system is hindering the operation of the game modules of Warzone, then it may get stuck on the loading screen. In this scenario, disabling or uninstalling the security product of the PC may solve the Warzone loading problem.
Warning:
Advance at your own risk as disabling or uninstalling the security product (like firewall, antivirus, etc.) may expose your system/data to threats. Webroot and Citrix applications are reported to cause the issue at hand.
- Expand the hidden icons of the system’s tray and right-click on the security product (e.g., ESET).
- Now, in the menu shown, select Pause Protection and if a UAC prompt is received, click Yes.
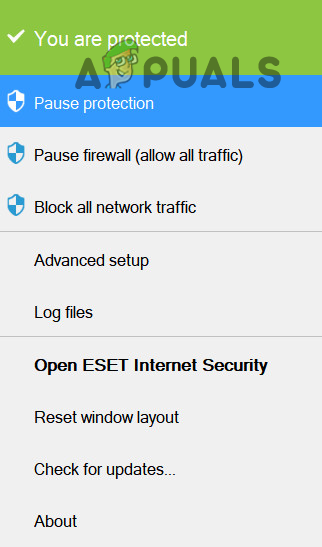
Pause Protection of ESET Internet Security - Then confirm to disable the real-time protection and again, right-click on the security product (e.g., ESET) in the system’s tray.
- Now select Pause Firewall and afterward, confirm to disable the firewall.
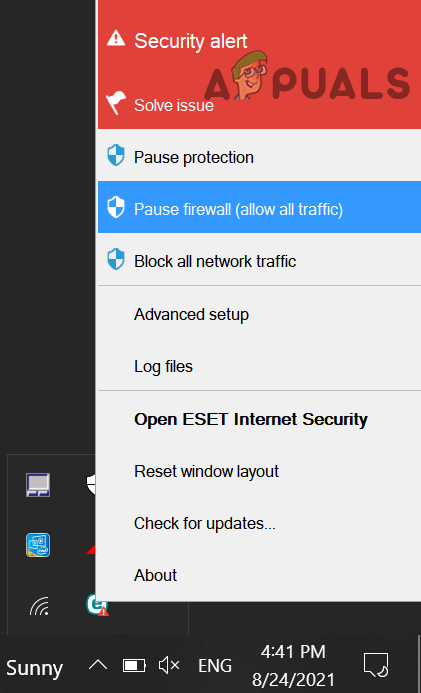
Pause Eset Firewall of Your System - Then disable the Windows Defender antivirus/firewall as well.
- Now launch the Warzone game and check if it is loading fine.
- If not, right-click on Windows and select Apps & Features.
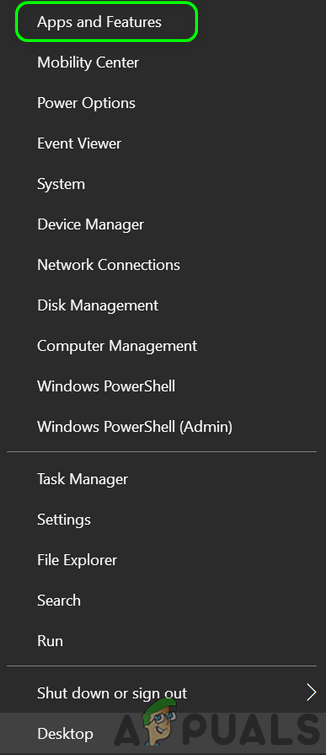
Open Apps & Features - Now expand the security product (like ESET) and click on Uninstall.
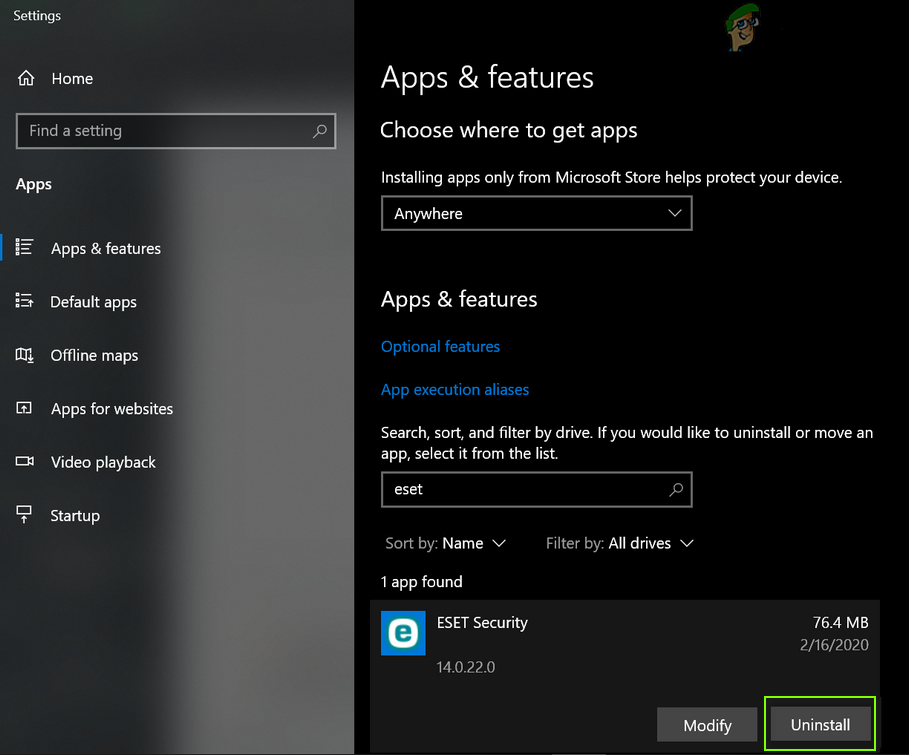
Uninstall Eset Security - Then confirm to uninstall the security product and follow the prompts on the screen to uninstall the security application.
- Once uninstalled, restart your system, and upon restart, launch the Warzone game and check if it is working fine.
Reset the Router to the Factory Defaults
The Warzone loading issue might occur due to a misconfiguration of the router’s settings or if the router’s firmware is corrupt. In this context, resetting the router to the factory defaults may solve the problem.
- Firstly, note down the information required to reconfigure the router after a factory reset.
- Now, try to locate the reset button of the router. Usually, on the back or bottom of the router. Some models use the power button as the reset button if pressed/held for a specific time.
- Once the reset button is found, press/hold the reset button for 30 seconds. You may use a pointy object (like a paperclip).
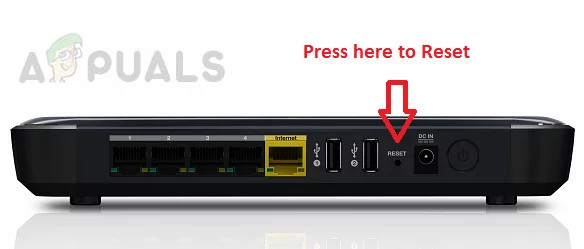
Reset Your Router - Now, wait till the router stabilizes and all the required lights are as per the OEM’s instructions.
- Then configure the router as per the requirements and afterward, launch the game to check if it is operating fine.
Reinstall the COD Warzone
Warzone won’t load if the game’s files are corrupt to a level where repairing them did not work, then the troublesome task of reinstalling the game (100+GBs download) may solve the loading issue.
- Firstly, create a backup of the essential data/info of the game.
- Now open the Battle.net app and select the COD Warzone.
- Then, click on Settings and select Uninstall.
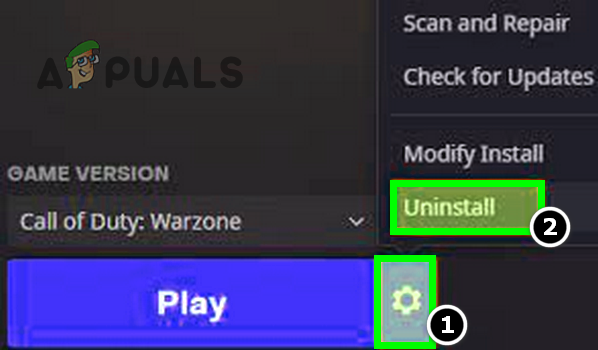
Uninstall Call of Duty Warzone - Now confirm to uninstall Warzone and wait till the COD game is uninstalled.
- Then restart your system and upon restart, right-click Windows and select Apps & Features.
- Now check if Warzone is shown there, if so, uninstall it and restart your system.
- Upon restart, delete the remnants of the Warzone game from the following directories:
%temp%

C:\Windows\Temp

C:\Program Files\

C:\Program Files (x86)\

C:\Program Files\Common Files\Blizzard Entertainment

C:\Users\Public\Games\

C:\Users\Public\Public Documents\Blizzard Entertainment\
- Once done, restart your system and upon restart, reinstall the Warzone game. During the reinstallation process, make sure the download does not pause or the system goes to sleep during the download process, otherwise, you may encounter the loading issue again.
- Once done, launch the game and hopefully, it will be clear of the loading issue.
If the issue persists, then you may reinstall the device’s OS or reset it to the factory defaults.
The post Warzone Pacific won’t Load? Here’s How to Fix it appeared first on Appuals.com.

0 Commentaires