Since the appearance of Windows 11, many people who have decided to update their Windows version are constantly reporting that sometimes they can’t boot into Windows 11. This error appears when they turn on their PC, or after a restart. When it is happening, the users are stuck on the loading screen and nothing happens, while they are not able to do anything. People have encountered this issue on desktops as well as on laptops.

After a lot of reports were made by users, we’ve decided to do an in-depth investigation to see what could be the causes of this issue. Here’s a short list of all the possible causes for why you can’t boot into Windows 11:
- Corrupted files – One of the most common causes that people have reported is some corrupted files that exist on your PC, which might cause this error to appear. This can happen because a few files from your computer have become harmful, making you unable to boot into Windows 11. To fix this, you can do a Startup Repair for a simple process that might fix it, you can use the Command Prompt to manually scan your PC and fix it, or you can factory reset your PC to restore all the files as fresh ones.
- Incompatible drivers – Another cause that the users have managed to find is some drivers that were recently installed on their PC. Because they were new and unoptimized good enough, they turned out to be incompatible with the Windows 11 version that they are using. This could be some Windows updates, GPU drivers, etc. So all you have to do to fix this is to use the Recovery Menu to roll back the latest driver that was installed on your PC.
- Problematic Windows version – As people report, another possible reason that might cause this issue is the Windows that became corrupted in time because of some updates or other reasons. In this case, you can fix this by doing a System Restore and reverting back to the latest version that was saved by your Windows.
Now that you know what can cause this error, here’s a list of all the methods that you need to use in order to be able to boot into Windows 11:
1. Perform a Startup Repair
The first thing you should do when you encounter this issue is to perform a Startup Repair. This Windows 11 issue might be caused by some corrupted files that are impacting your computer. So it is recommended to do a startup repair to see if it will fix your issue.
Startup Repair is a Windows automatic troubleshooter that is made to fix problems associated with the booting of the issue. This recovery solution scans your system and fixes the problems that it finds.
But to do this method, you have to access the Advanced options of your Windows, which can be found in the Recovery Menu.
Here are the steps on how to perform a startup repair from the Recovery Menu:
- The first thing you should do is access the Recovery Menu. To do this, you have to press the F11 key when the PC is booting into Windows 11. Press the button a few times until you are inside it.
Note: In some other cases, the Recovery Menu could be accessed by pressing the F9 or F12 keys, so if you need more information search for the specific instructions for your motherboard manufacturer. - Once you are inside the Recovery menu, you have to access the Troubleshoot section. You can either navigate using the keyboard or you can use the mouse and click on it.
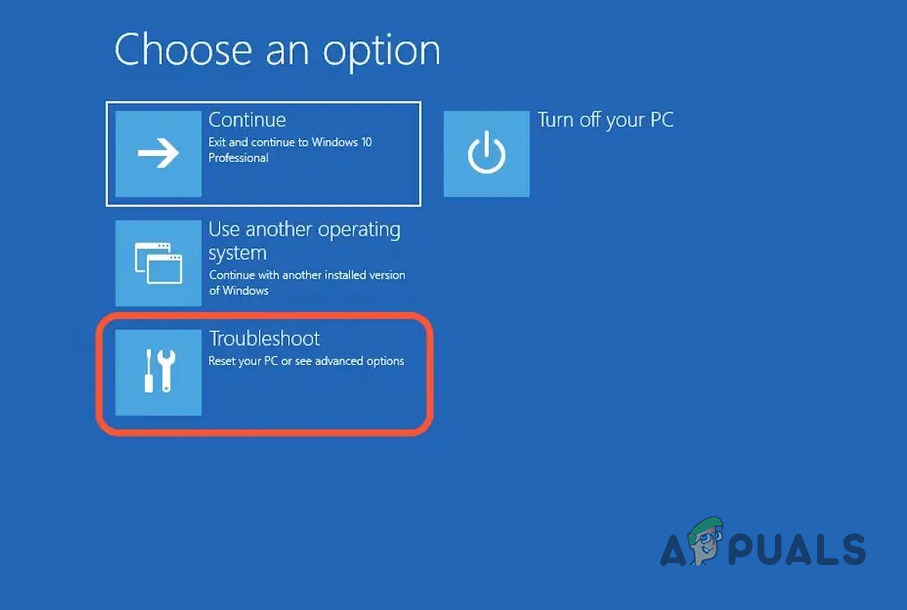
Inside the Recovery Menu accessing the Troubleshoot section - After you are inside the Troubleshoot menu, you have to look for Startup Repair inside the list of available options and select it.
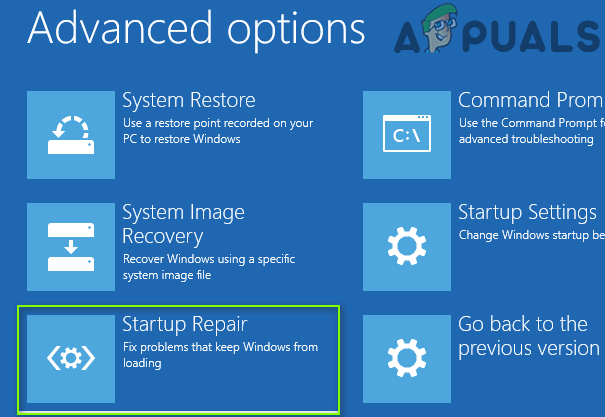
Starting the Startup Repair process - Once you’ve reached the Startup Repair page, follow the on-screen instructions to begin and complete a Startup Repair procedure.
- Restart your computer one final time after the procedure is finished to see if the problem has been fixed.
In case this method didn’t help with your problem, go to the next one below.
2. Uninstall the latest update
The second thing you should try when you can’t boot into Windows 11 is to uninstall the latest update that was installed on your computer. Some users have managed to fix their PC after they have reverted the installation of the update.
This can be also done from the Recovery menu, where you will find the Uninstall Updates section. You have to uninstall the latest quality update because the process will be quicker and could be enough to fix the issue. If not, you can also uninstall the latest feature update but the process will be longer.
In case you don’t know how to uninstall the latest update, here are the steps you need to follow:
- You need to start by entering the Recovery Menu. To do this, you have to press the F11 key after you power up the computer.
- After you are inside the Recovery Menu, you need to go to the Uninstall Updates section and select it.
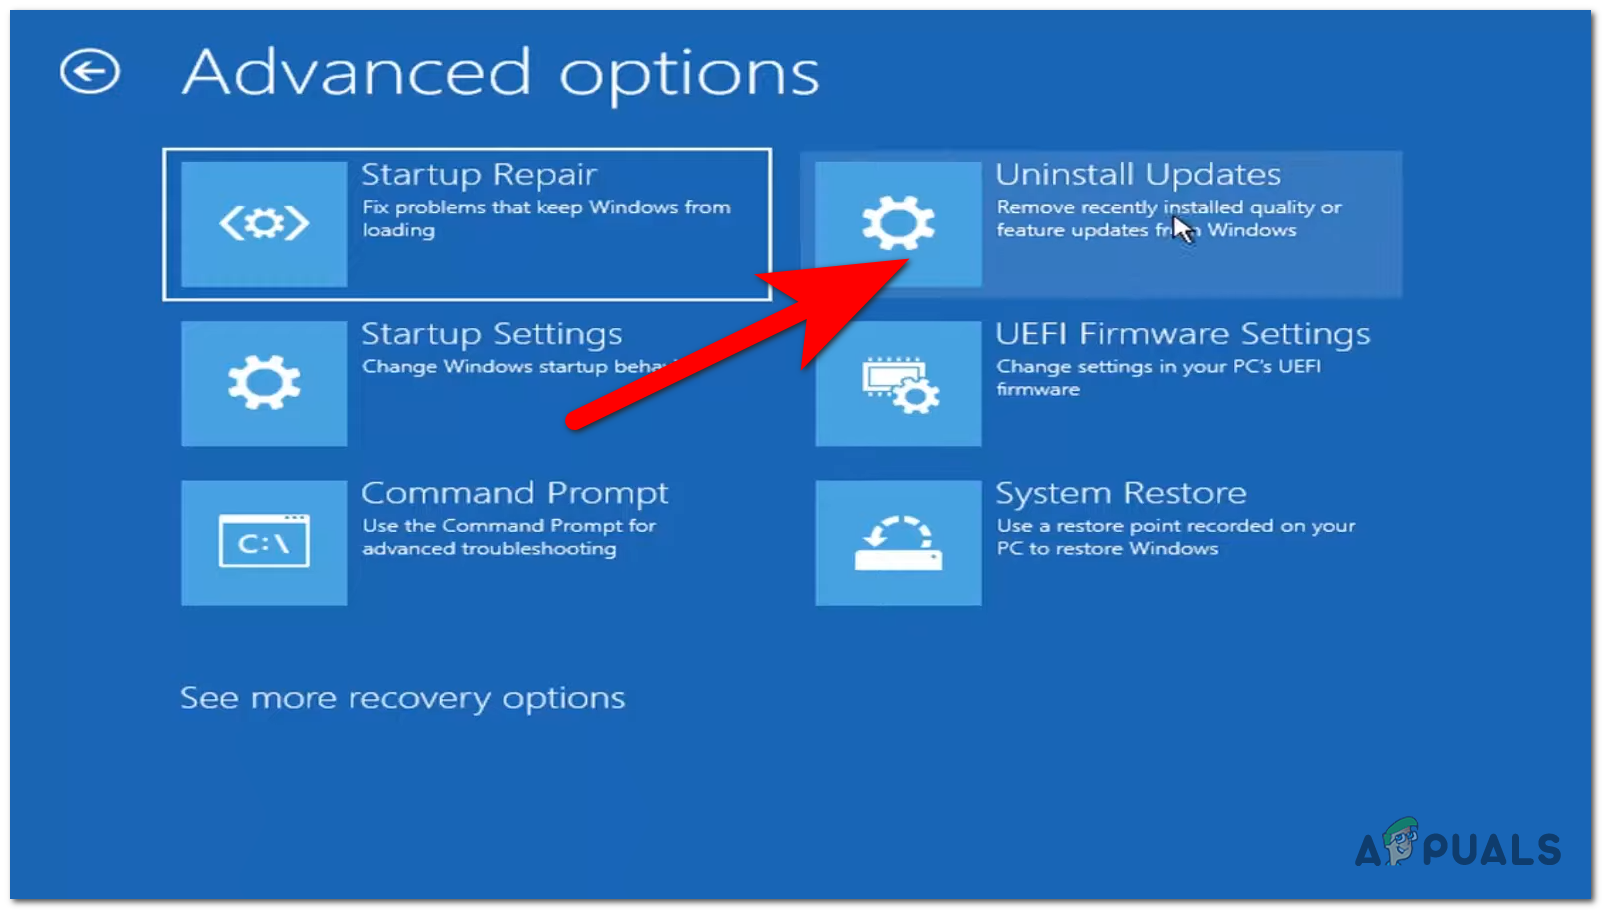
Accessing the Uninstall Updates section inside the Recovery Menu - Now you need to choose between the two options. Choose the Uninstall latest quality update option at first to see if it is enough.
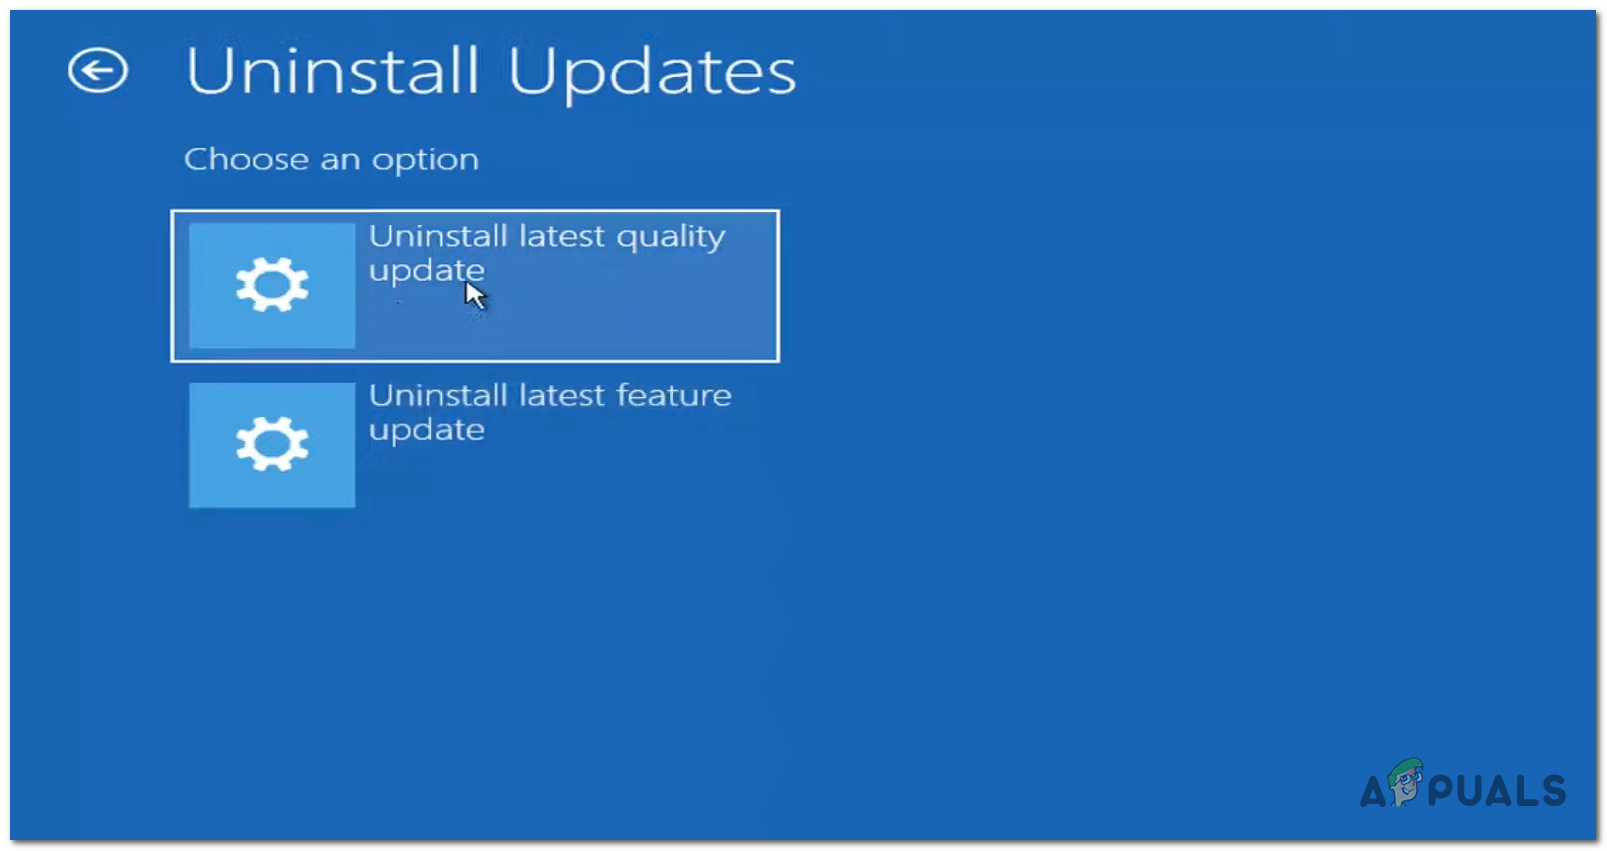
Starting the uninstalling process of the latest quality update - Once the process is complete, test to see if now you are able to boot into Windows 11.
- In case the problem is still not fixed, you can also choose the Uninstall latest feature update if you want but is a longer process than the one before because the update is bigger. If your PC is still not working after uninstalling the latest quality driver, go to the next method below.
3. Perform a System Restore
Another thing that the people affected by this issue have done was to use System Restore to revert back to the latest version registered by the automatic snapshot. In some cases, this was enough to fix the can’t boot into Windows 11 error.
With the help of this utility, you can resolve serious faults by putting your complete Windows installation back in a stable situation where the issue never happened. However, in order to make use of this fix, your operating system must have previously taken a snapshot that may be used to roll back the Windows installation to an earlier time. But if you haven’t changed the default behavior, Windows should be set up to frequently save System Restore Snapshots (after every installed Windows update).
But before you try out this solution, be aware that it will basically undo any modifications that have been made since the snapshot was first created. Any program installations, game downloads, or user preferences that were implemented after the snapshot was made will be lost.
If you choose to proceed with the system restoration process, use the next guide to see how you can do it:
- The first step is to access the Recovery Menu. Boot your computer and press the F11 key or the one that is specific to your motherboard manufacturer.
- Once the Recovery Menu appears on your screen, you have to use the mouse to click or navigate with your keyboard to select the System Restore section.
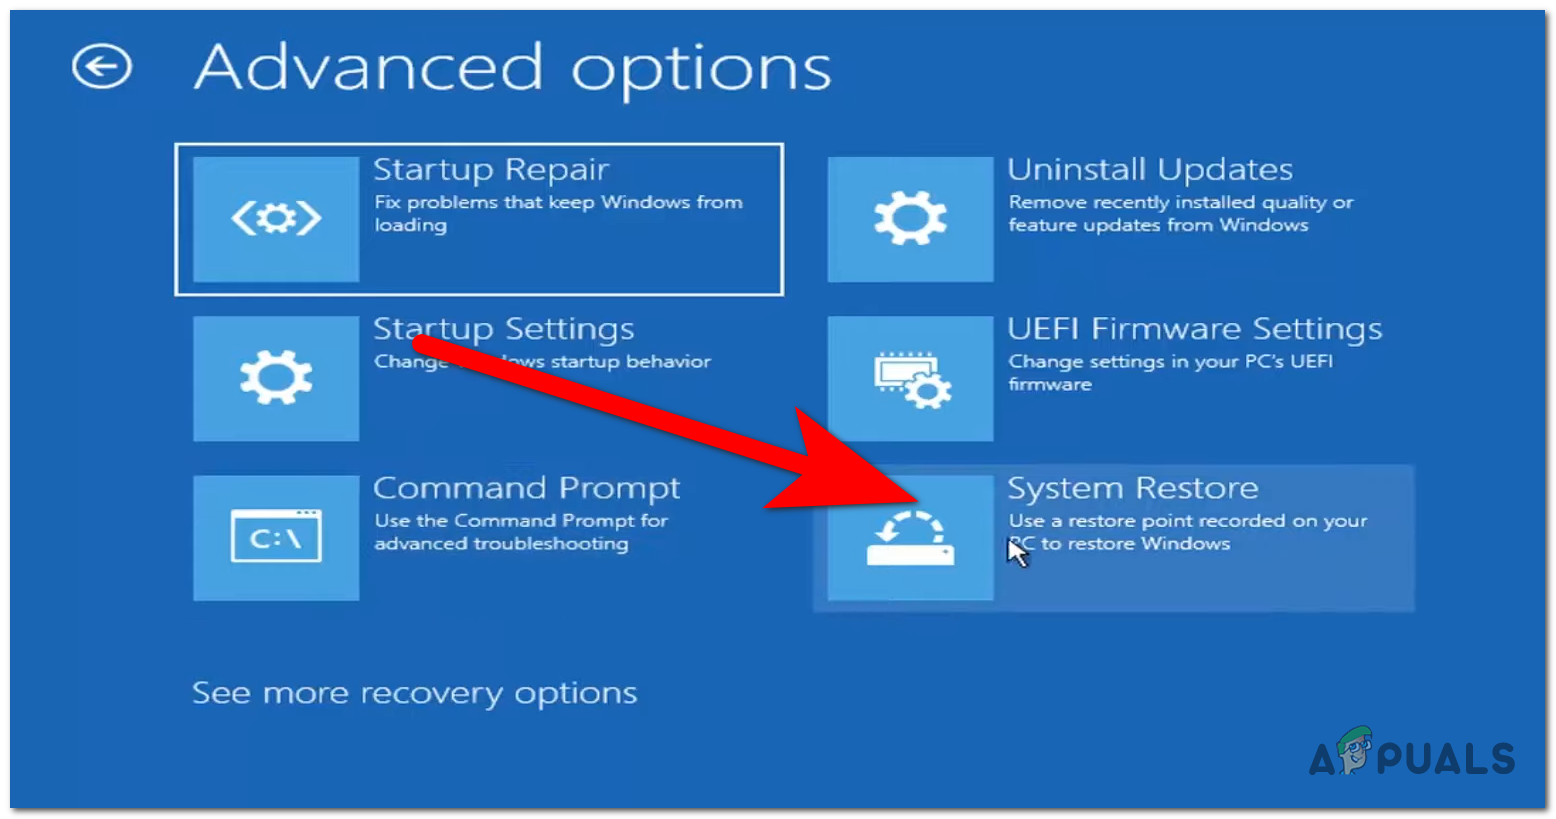
Accessing the System Restore menu inside the Recovery Menu - This will take you to the System Restore window. Click on Next to continue with the process, then select the latest restore point that appears on your computer.
- Once you’ve done that, you need to choose Finish to start the System Restore process. You will have to confirm the decision to be able to continue with it.
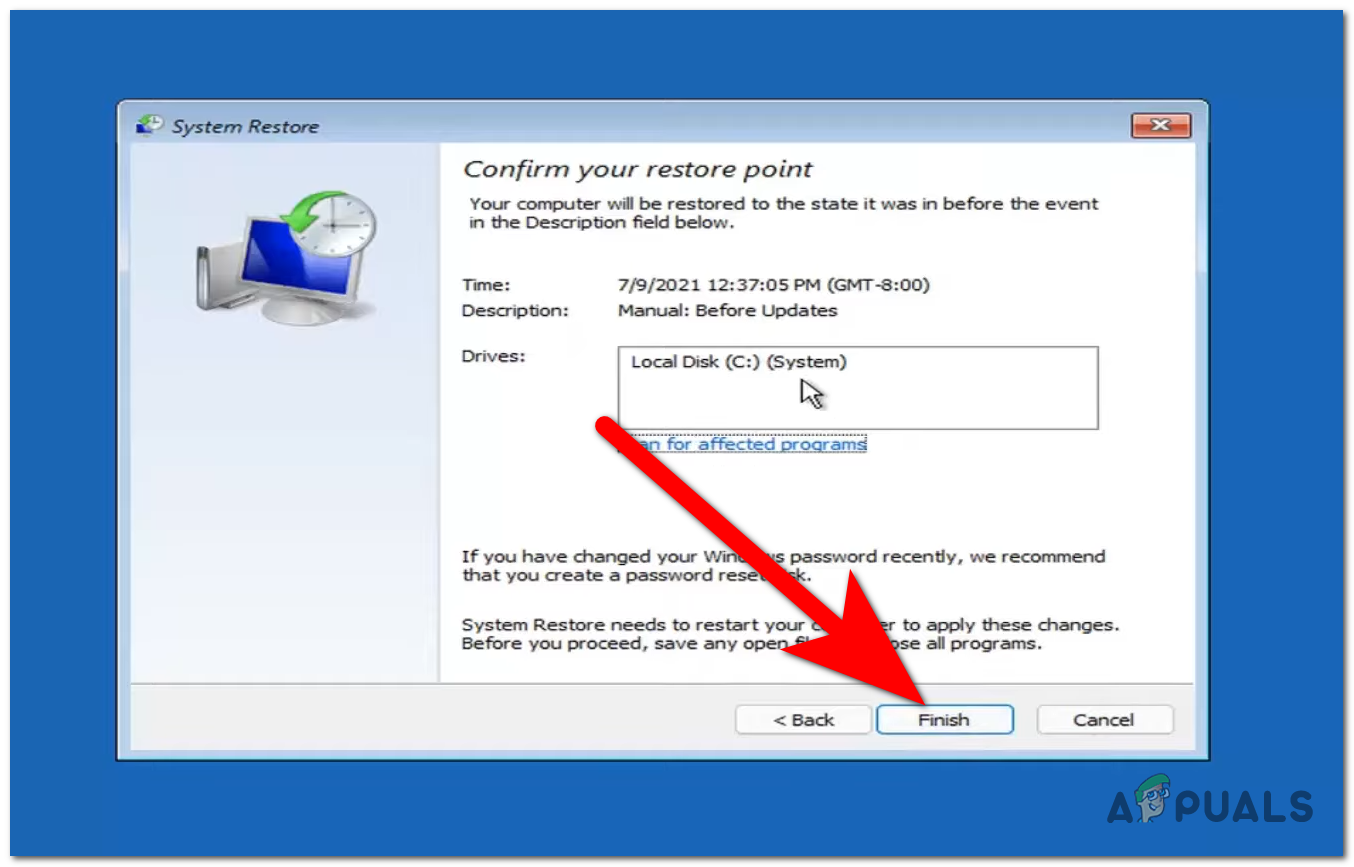
Confirming that you want to start the System Restore process - The process will take a few minutes depending on your PC, so wait until it’s complete.
- Once your system was restored to the latest recovery point available, test the PC to if you still can’t boot into Windows 11.
If your PC still doesn’t want to boot into Windows 11, go to the next method below.
4. Use the Command Prompt
Some other users have reported that they have also managed to fix this issue by doing a few scans using the Command Prompt. By doing this, the Command Prompt will scan your PC and try to find out what causes this issue, and then fix them.
All you have to do is to use the Recovery Menu to open the Command Prompt. There you will have to insert some commands that will trigger the scans. The scan will take some time depending on your PC. Wait for each scan to do its job.
Here is a guide that has the exact instructions on what you have to do:
- Firstly you have to open the Recovery Menu to be able to continue. To do this, press the F11 key when your PC is booting.
- Once you are inside the Recovery Menu, you have to navigate to the Command Prompt section and select it.
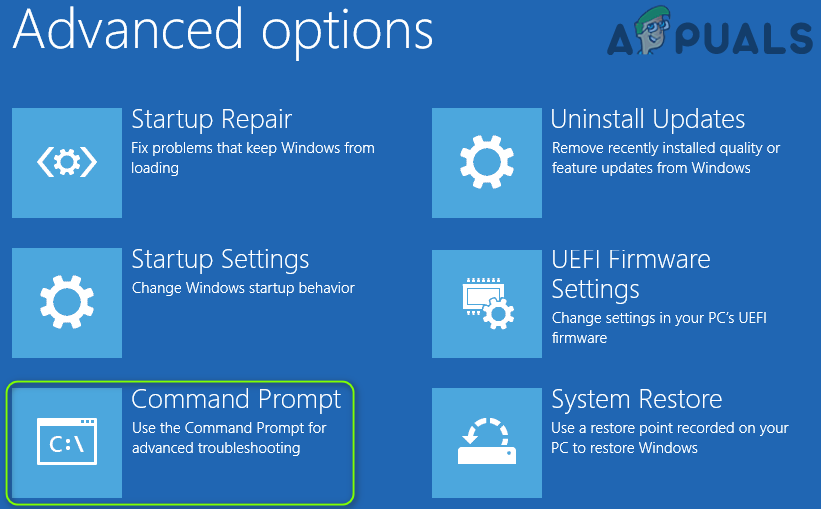
Accessing the Command Prompt section inside the Recovery Menu - After the Command Prompt appears on your screen, the first command you have to type is ‘BCDEdit‘. After you press Enter, you have to scroll down through the list until you get to osdevice. Now you need to look and keep in mind the drive letter of the system volume. (in the next screenshot is C)
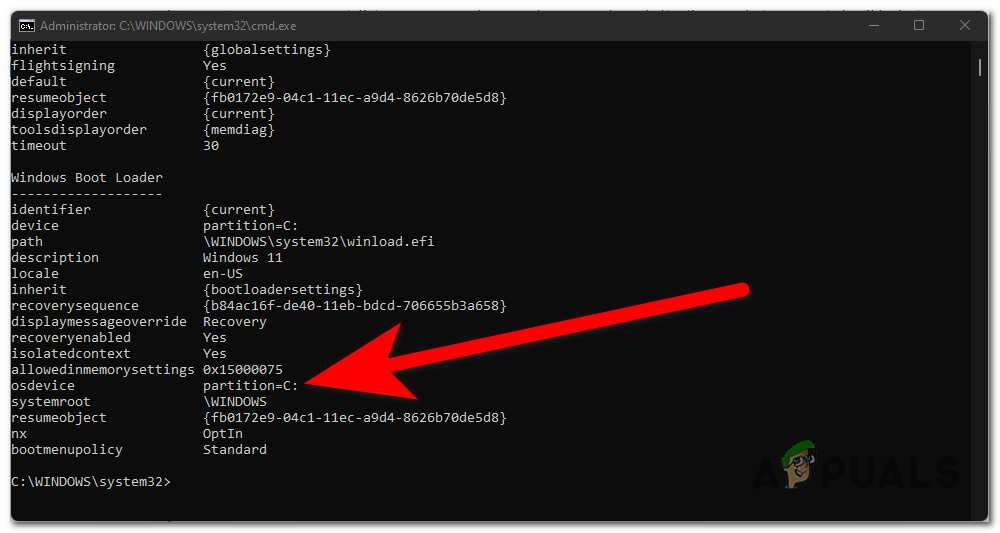
Looking for the letter of the system volume inside the Command Prompt - Now that you know what is the letter of the system volume, you have to insert the following commands and wait for each of them to complete the process:
CHKDSK /f C:
DISM /image:C:\ /cleanup-image /restorehealth
SFC /scannow /offbootdir=C:\ /offwindir=C:\windows
Note: In case you see other letters than C as the system volume, you need to also change the letter C with the one you have when you insert these commands.
- Once these scans are complete as well, here is another list of commands that you have to insert one by another. Make sure to insert every one of them for this process to be complete:
C:
bootrec /fixmbr
bootrec /fixboot
bootrec /scanos
bootrec /rebuildbcd
exit
- After you have inserted the exit command, the Command Prompt will be closed.
- To make sure that this method is complete, you also have to do a Startup Repair.
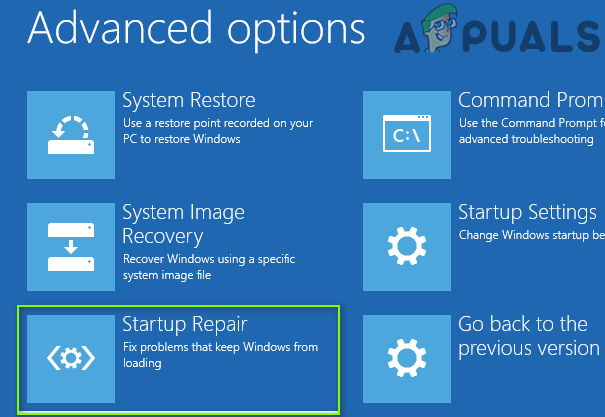
Starting the Startup Repair process to complete this method - When the process is complete as well, test it to see if you are now able to boot into Windows 11.
In case you still can’t boot into Windows 11, go to the next possible fix below.
5. Start your PC in safe mode
The people that have gone through this problem are also suggesting that you should try to start your computer in safe mode to see if it works. In case it works fine in safe mode, you should perform a clean boot while you are inside the safe mode to try to fix this issue.
A clean boot will start the computer with the bare minimum of drivers and software, allowing you to identify whether the problem is being caused by a background program. After performing a clean boot on the computer, several of the startup programs won’t load. When you reset the machine to start properly once you’ve finished troubleshooting, though, that functionality will return.
In case you don’t know how to do this method, here are the steps you need to follow:
- The only way you can access the Safe Mode in your case is from the Recovery Menu. To open it, you have to press the F11 key right after you boot the PC.
- Now that you are inside the Recovery Menu, access the Troubleshoot option and select the Advanced options, then click on Startup Settings. To continue it, you will have to click on the Restart button and your PC will restart.
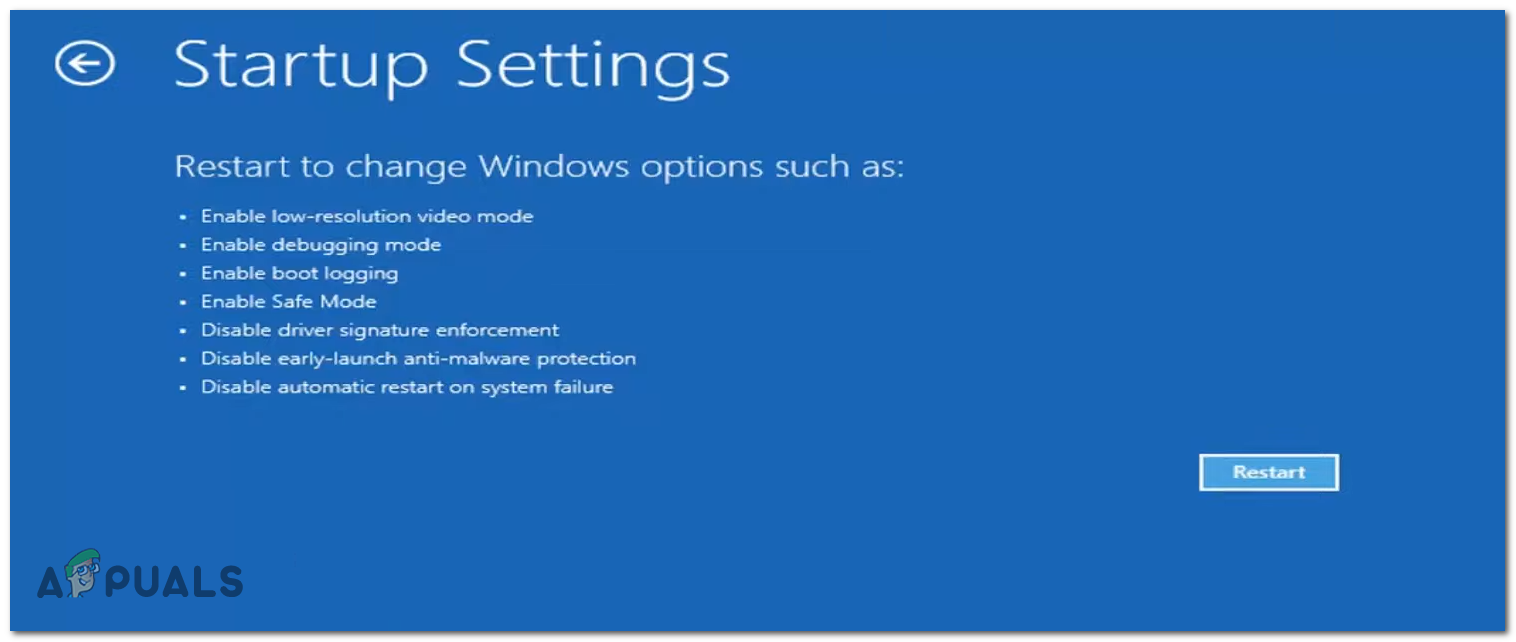
Starting the Safe Mode inside the Recovery Menu - Once you are taken to the next screen, you have to press the 4 or F4 keys to enable the safe mode.
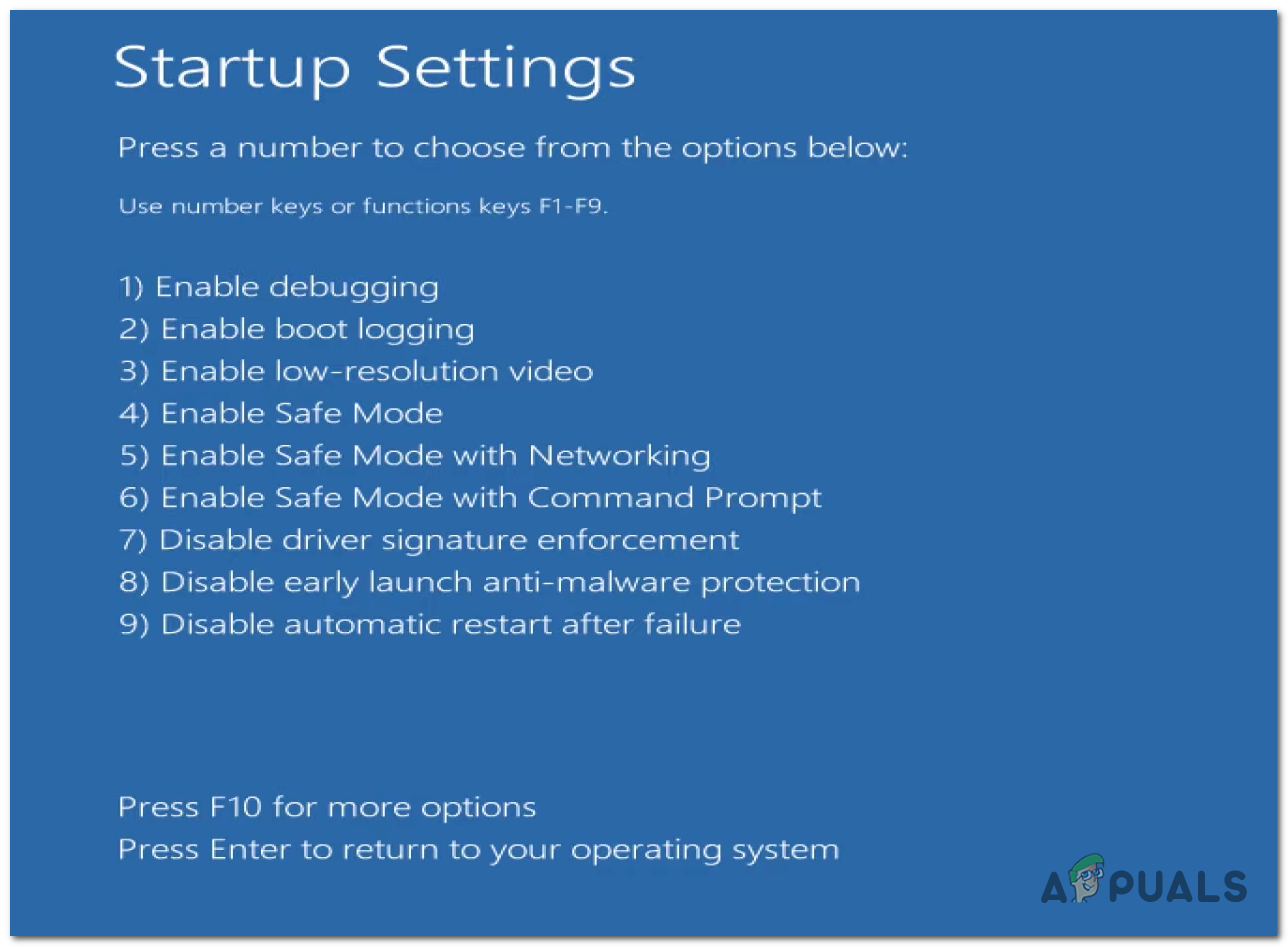
Selecting the Safe Mode through the list of available options - If you manage to get inside the Safe Mode and it works fine, you should do a clean boot to see which are background apps that are causing this issue.
- In case you don’t know how to do a clean boot, follow the steps in this article to do a clean boot.
- If you have determined the apps that are causing you to not be able to boot into Windows 11, make sure to delete them.
In case you still cannot boot into Windows 11 even after deleting the apps that were causing problems, go check the next and last method below.
6. Reset your PC
The last thing you should try in order to fix the cannot boot into Windows 11 issue is to try to reset your PC. You can do this from the Recovery Menu of your Windows, and it is an easy process that will take a few minutes but could be crucial in fixing this error.
All you have to do is to go to the Recovery Menu and access the Troubleshoot section, where you will be able to choose the Reset this PC option. You have two options to choose from, you can either keep your personal files or delete them, so it depends on you which action you want to do.
Note: Even if you will probably want to keep your personal files, it is recommended you delete everything to basically do a factory reset. This way, all the possible corrupted files will be restored, so that should fix your problem.
In case you don’t know how to do this, here are the steps you need to follow to reset your personal computer:
- Firstly you have to be inside the Recovery Menu to be able to do this method. So, when you boot your computer press the F11 key to open the Recovery Mode.
- Now you need to click on the Troubleshoot section, then select Reset this PC.
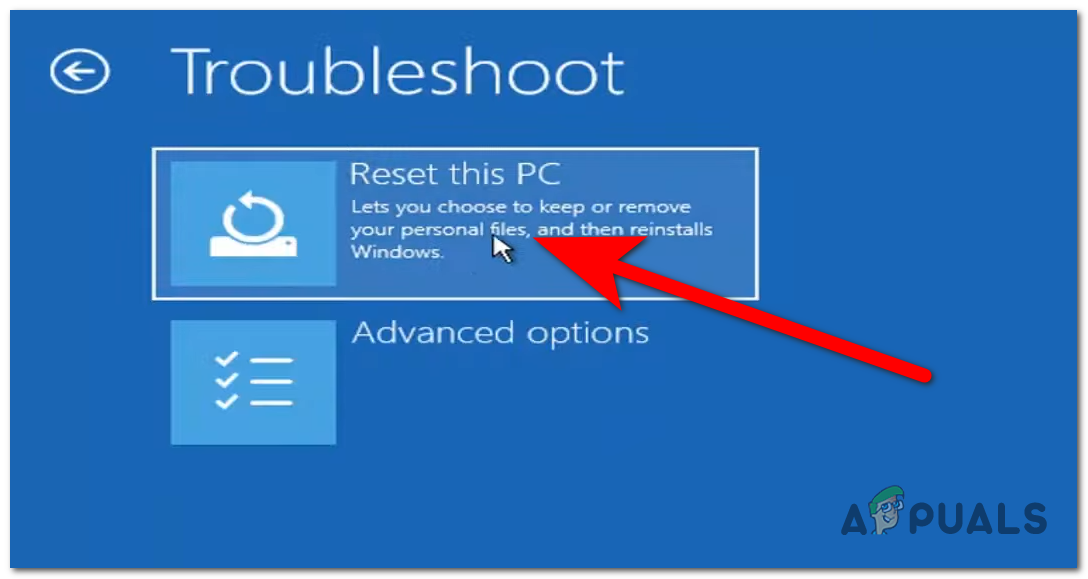
Proceeding with the reset of your PC action - Now you have to choose between two options, you can either keep your personal files and delete the rest of the apps and settings, or you can delete all of them. The majority of the people recommend to Remove everything to make sure that you get rid of the corrupted files that were somehow causing your PC to not boot into Windows 11.
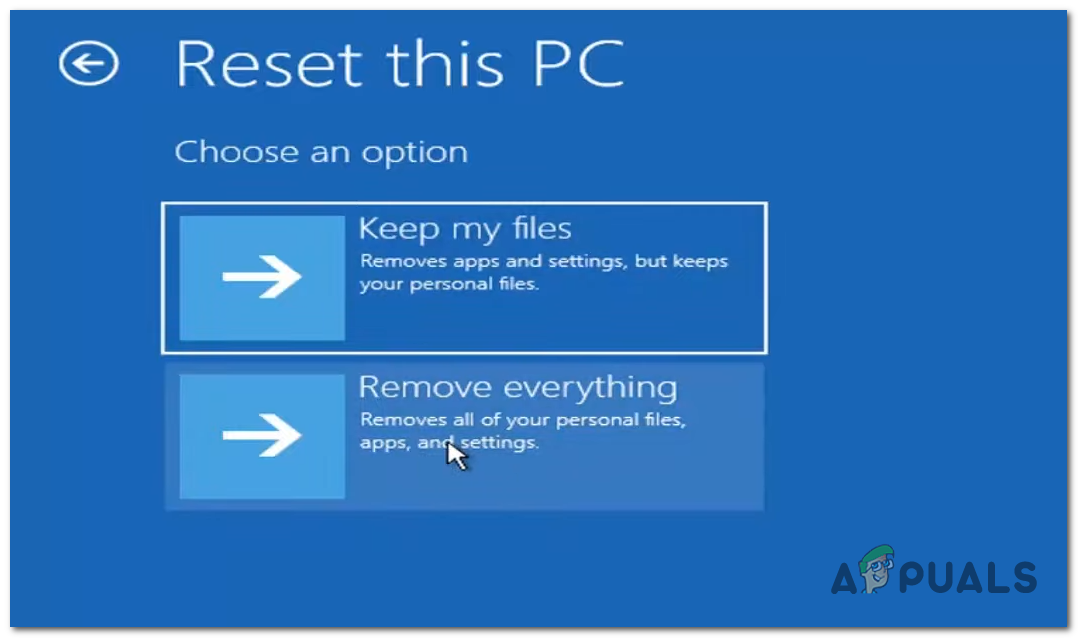
Choosing if you want to keep only the personal files or delete everything - Now follow the on-screen instructions and go further with it until you complete the process.
- When your Windows 11 has been factory reset, try to boot into it to see if now it works.
The post Can’t Boot Into Windows 11? Here’s the FIX appeared first on Appuals.com.


0 Commentaires