PowerShell is a really powerful command-line tool used for automating and scripting of different tasks in Windows. It is a fully featured advanced version of Command Prompt.
PowerShell is also used to perform different file related operations, such as file creation, and modification, It also provides various commands and functions for file management, including the ability to delete files.
Deleting a single file using PowerShell
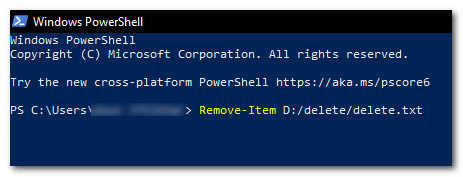
In order to delete a single file in PowerShell, you will need to use the “Remove-Item” command.
- Open the start menu and type “Windows PowerShell” in the “search box”
- Open it and type the command “Remove-Item” along with the file location and name
type the command “Remove-Item” along with the file location and name
Remove-Item <FilePath>
Here, <FilePath> is the location of the file you want to delete. For example, if you wanted to delete a file called “example.txt” which is located in the “C:\Temp directory“, you would use the following command:
Remove-Item C:\Temp\example.txt
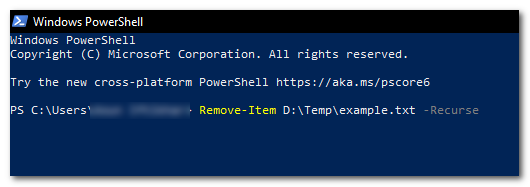
Deleting files and folders recursively
To delete files and folders recursively, you can use the “-Recurse” parameter with the “Remove-Item” command.
- Open “Windows PowerShell” and type the command “Remove-Item” along with the file location and name with “-Recurse” at the end
type the command “Remove-Item” along with the file location and name with “-Recurse” at the end - This will delete the folder located at “x” and all of its contents.
For example
Remove-Item C:\Temp\example.txt -Recurse
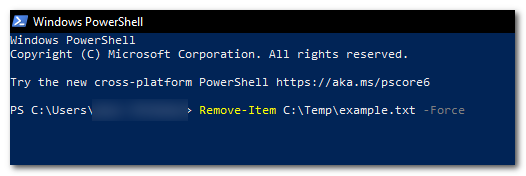
Force Deleting a File
In order to force delete a file that is write-protected or in use by any process through PowerShell, you will need to use the “-Force” parameter with the “Remove-Item” command.
- Open “Windows PowerShell” and type the command “Remove-Item” along with the file location and name, with “-Force” at the end
type the command “Remove-Item” along with the file location and name, with “-Force at the end - This will delete the file located at “x” even if it is read-only or in use by another process
For example
Remove-Item C:\Temp\example.txt -Force
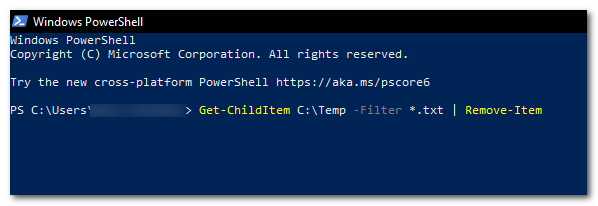
Deleting files recursively based on file extension
In order to delete files recursively based on file extension (e.g., .txt), you can use the “Get-ChildItem” command with the “-Filter” parameter to retrieve a list of files and then deleting the files with the “Remove-Item” command.
Get-ChildItem C:\Temp -Filter *.txt | Remove-Item
Deleting files that match a particular pattern

You can use the “Get-ChildItem” command to gather all files matching the pattern (e.g., files that contain the word “test” in the file name) with the “-Path” parameter and then by using the “Remove-Item” command to delete them.
Get-ChildItem C:\Temp -Path "*test*" | Remove-Item
Deleting all files in a folder
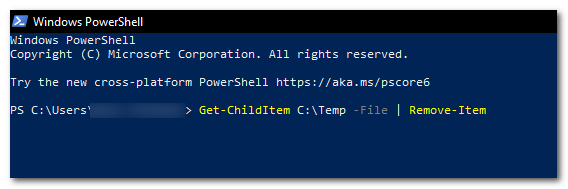
To delete all files in a folder (but not the folder itself), use the “Get-ChildItem” command with the “-File” parameter to retrieve a list of files, and then delete the results using the “Remove-Item” command.
Get-ChildItem C:\Temp -File | Remove-Item
Deleting a file only if it exists
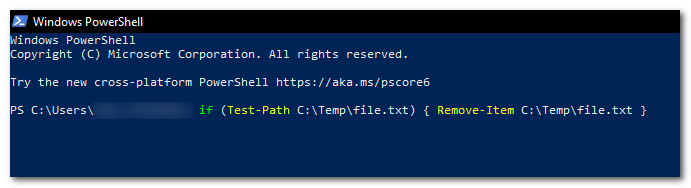
To delete a file only if it exists (to avoid an error if the file does not exist), use the “Test-Path” command to check if the file exists, and then use the “Remove-Item” command to delete it.
if (Test-Path C:\Temp\file.txt) { Remove-Item C:\Temp\file.txt }
Deleting files older than a specified date
To delete files that are older than a specified date, use the “Get-ChildItem” command with the “-Path” parameter and a wildcard character (*) to retrieve a list of files, and then pipe the results to the “Where-Object” command to filter the files based on their creation date, and then further pipe the results to the “Remove-Item” command to delete them.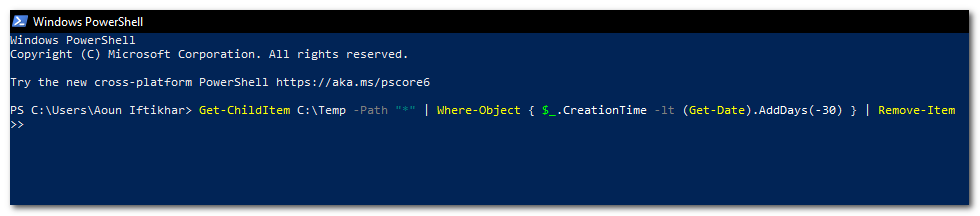
Get-ChildItem C:\Temp -Path "*" | Where-Object { $_.CreationTime -lt (Get-Date).AddDays(-30) } | Remove-Item
I hope this article has helped you in deleting files using Windows PowerShell and always, be careful when using these commands, especially when using the “-Force” or “-Recurse” parameters in particular, as they can potentially delete important files or folders. Make sure to double check your commands before running them to ensure that you are deleting the correct files.
The post Delete a File or Folder using PowerShell (Detailed Guide) appeared first on Appuals.com.


0 Commentaires