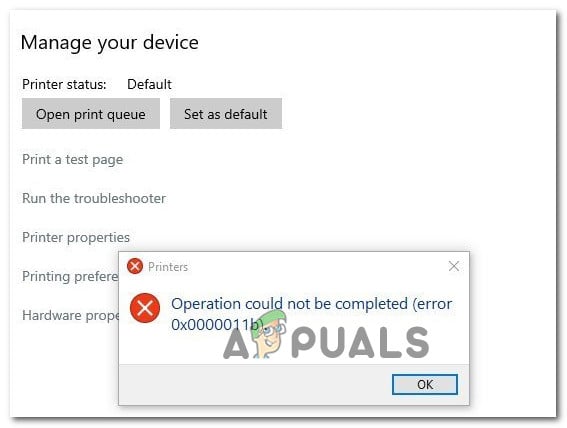
Some Windows users are experiencing the 0x0000011b error whenever they attempt to print something using their network-shared printer. This problem started to occur after Microsoft pushed the latest security update. The issue is ongoing on Windows 10 and Windows 11.
After investigating this issue thoroughly, it turns out that the issue is occurring due to a series of security patches that Microsoft pushed in order to protect Windows 10 and Windows 11 users from a vulnerability involving the Windows Print Spooler Spoofing.
However, when Microsoft released the final patch to put a nail in the coffin of this vulnerability (on September 14th), it also produced a different issue by interfering with the TPC authentication level for network printers.
As of now, affected users have been able to get to the root of this issue. It’s actually a registry value called RpcAuthnLevelPrivacyEnabled that will be found in the following location:
HKEY_LOCAL_MACHINE\System\CurrentControlSet\Control\Print
After this change has been enforced as the default behavior for every Windows device, this printing error started affected mainly small businesses and home networks that are not set up to use a Kerberos setup on a Windows domain.
If you or your organization are affected by the 0x0000011b error, there are several different ways that you can use to deal with the issue:
- Install the Microsoft-supplied hotfix – Although a proper fix is not currently available, by the time you’re reading this article Microsoft might release a hotfix that will patch these two vulnerabilities without producing unintended consequences. With this in mind, we recommend you start by installing every pending update.
- Uninstall the problematic security update – Uninstalling the Windows security update that caused the issue in the first place will deal with the 0x0000011b error, but it’s not the ideal way to fix the issue since your network will still be vulnerable to PrintNightmare and MSHTML – the two vulnerabilities that Microsoft wants you to guard you against.
- Disable the Migration for CVE-2021-1678 – The best method to deal with this particular issue (at least until Microsoft fixes the effects of the security patch) is to disable the migration for CVE-2021-1678. This will ensure that your network is not exposed to the two vulnerabilities while resolving the 0x0000011b error.
Now that you are familiar with the cause and the fixes for the 0x0000011b, let’s get our hands dirty and apply them in order to resolve the issue for good.
Note: All the fixes below will work for both Windows 10 and Windows 11.
Install every pending update
If there are still pending updates on your Windows 10 or Windows 11 computer that are waiting to get installed, our recommendation is to start by making sure that you’re taking advantage of the latest hotfixes.
Microsoft has already confirmed that they’re working on a hotfix that will put a stop to the 0x0000011b, but that fix has not arrived yet for Windows 10 or Windows 11.
But when it comes, it will likely arrive through a WU Cumulative update. And in their usual fashion, Microsoft will likely start deploying it unannounced to certain segments of Windows users – when this happens, we’ll likely not be able to update this article fast enough.
With this in mind, follow the instructions below to install every pending update in order to install the hotfix for the 0x0000011b:
- Press Windows key + R to open up the Run dialog box. Inside the text box, type ‘ms-settings:windowsupdate’ and press Enter to open up the Windows Update page of the Settings menu.
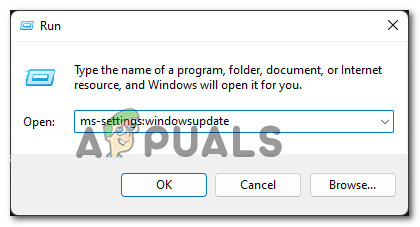
Opening the Windows Update screen Note: This command works on Windows 10 and Windows 11.
- Once you’re inside the Windows Update screen, move over to the right-hand side menu and click on Download Now if new updates are available.
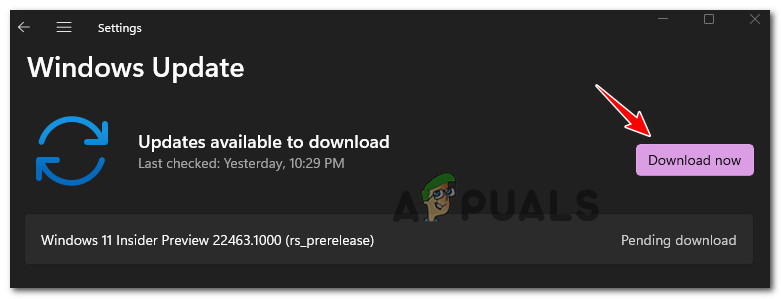
Downloading the Windows Update Note: If no updates are pending to be installed, click on the Check for updates to trigger a scan.
- Wait until every pending update is installed, then reboot your PC and wait until the next startup is complete.
- After your Windows 10 or Windows 11 computer boots back up, simply repeat the action that was previously causing the 0x0000011b.
If the problem is still not fixed or the Microsoft fix has still not arrived, move down to the next potential fix below.
Disable CVE-2021-1678 mitigation
As of now (assuming that Microsoft has not yet rectified the issue via a hotfix) is to disable the CVE-2021-1678 mitigation, reverting the change that produced the 0x0000011b error in the first place.
This method is the best of both worlds since it will fix the issue when attempting to use a network-connected printer and it will also ensure that you are not left exposed to the PrintNightmare and MSHTML vulnerabilities.
What you’ll need to do is use the Registry Editor (present on Windows 10 and Windows 11) to create a new 32-bit DWORD named RpcAuthnLevelPrivacyEnabled and set its value to 0 (this will completely disable the CVE-2021-1678 mitigation).
If you’re looking for specific step by step instructions on how to do this, follow the instructions below:
Note: The instructions below are identical regardless if you’re on Windows 10 or Windows 11.
- Press Windows key + R to open up a Run dialog box. Next, type ‘regedit’ inside the text box and press Ctrl + Shift + Enter to open up the Registry Editor with administrative privileges.
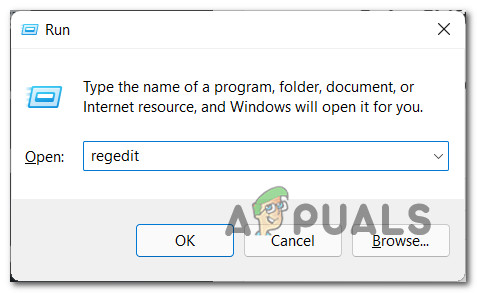
Opening a new Registry Editor window - Once you’re prompted by the User Account Control prompt, click Yes to grant administrative privileges.
- After you’re inside the Registry Editor, use the menu on the left to navigate to the following location:
HKEY_LOCAL_MACHINE\System\CurrentControlSet\Control\Print
Note: You can either navigate to this location manually (by clicking on every key) or you can paste the full path into the navigation bar at the top and press Enter to get there instantly.
- Once you’re inside the correct location, ensure that the Print key is selected, then move over to the right-hand section, right-click on an empty space and select New > 32-bit) DWORD Value.
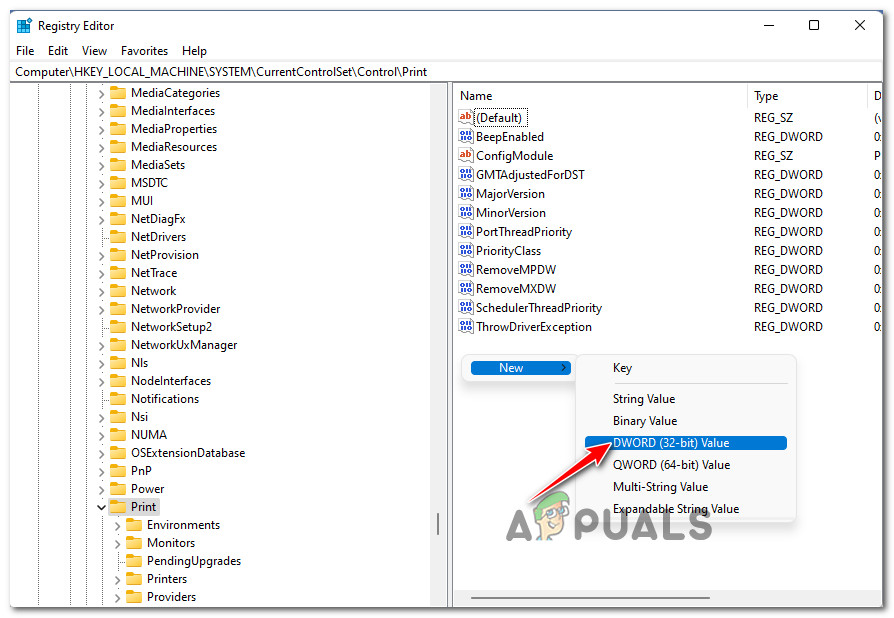
Creating a new DWORD value - Next, name the newly created registry value as RpcAuthnLevelPrivacyEnabled and press Enter to save the changes.
- Finally, double-click on the newly created RpcAuthnLevelPrivacyEnabled value.
- Once you’re inside the Edit menu, set the Base to Hexadecimal and the Value data to 0 before clicking Ok to save the changes.
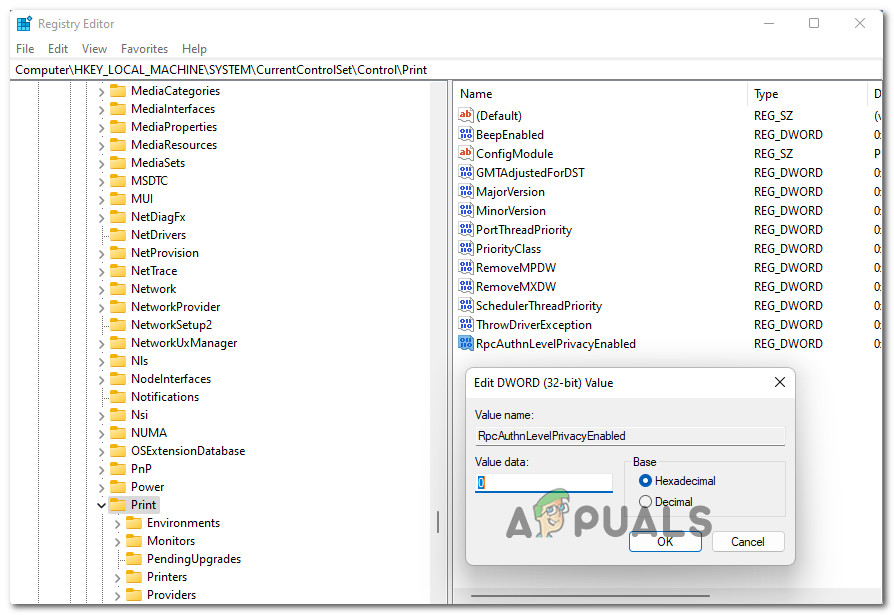
Editing the RpcAuthnLevelPrivacyEnabled key - Once this modification has been complete, restart your PC and repeat the action that was previously causing the 0x0000011b.
If the problem is still not fixed, move down to the final potential fix below.
Uninstall the problematic update (KB5005565)
If you want to cut the root of the issue, the only way to do it is by uninstalling the problematic update that brought the issue in the first place KB5005565.
However, our recommendation is to avoid this resolution (if possible), since uninstalling the KB5005565 will also mean that your PC will still be vulnerable to the two vulnerabilities that this security update was meant to protect you from (PrintNightmare and MSHTML).
If you decide to go for this method, think of this fix as transitory – most likely, the issue will be rectified by a cumulative update for Windows 10 or Windows 11.
But until then, you can ensure that the 0x0000011b error stops occurring when you attempt to use your home or network printer by accessing the Windows Update history and uninstall the Security Update for Microsoft Windows (KB5005565) for the entire workgroup.
Follow the instructions below for step by step instructions on how to do so:
Note: The instructions below are universal and will work regardless if you’re using Windows 10 and Windows 11.
- Press Windows key + R to open up a Run dialog box. Next, type ‘appwiz.cpl’ inside the text box and press Enter to open up the Programs and Features menu.
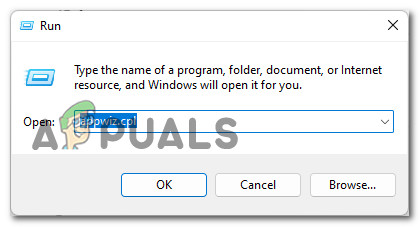
Opening up the Programs and Features menu Note: If you’re prompted by the User Account Control prompt, click Yes to grant administrative privileges.
- Once you’re inside the Programs and Features menu, click on View Installed Updates from the menu on the left.
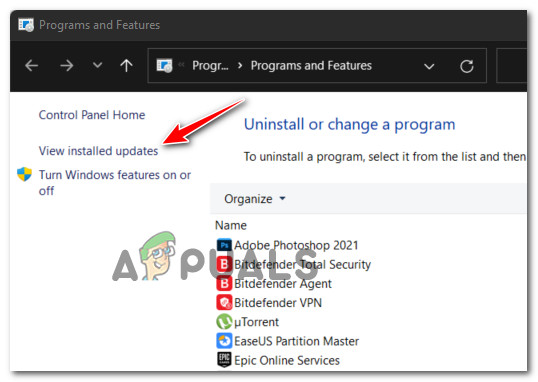
View Installed updates - If you’re prompted to grant administrative privileges once again, do so by clicking on the Yes button.
- Once you’re inside the Installed updates tab, look through all the installed updates and locate the KB5005565 update.
- After you manage to locate it, right-click on it and choose Uninstall from the context menu that just appeared.
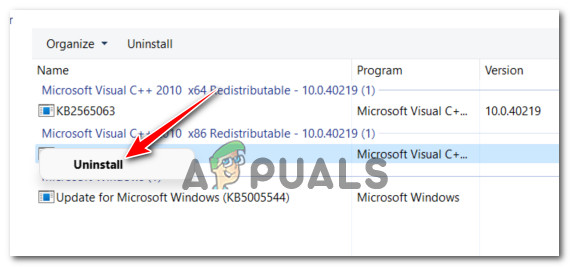
Uninstall the problematic update - At the next prompt, click Yes to confirm the uninstallation of the problematic security update.
- After the uninstallation is complete, reboot your PC and see if the problem is fixed once the next startup is complete.
The post How to Fix “0x0000011B” Windows Error When Using Network Printers appeared first on Appuals.com.


0 Commentaires