Some Windows users are discovering that their Event Viewer is always filled with 0XC0000035 errors pointing towards a Kernel Event Tracing Error. This problem is confirmed to occur on every recent Windows version including Windows 7, Windows 8.1, Windows 10, and Windows 11.
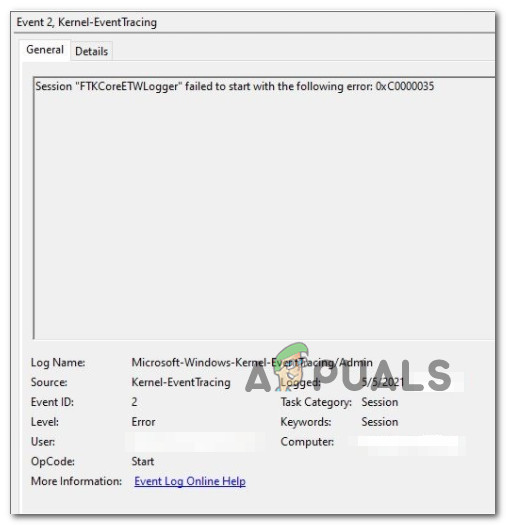
After investigating this particular issue, it turns out that there are a few different causes with the potential of triggering this particular error. Here’s a shortlist of culprits that might be responsible for filling your Event Viewer with 0XC0000035 errors:
- Perfdiag is modifying the Event Tracing of Windows session – The ETW session is normally for private use only by the operating system. However, various factors might have it stuck into a retry look due to some async activity. In this case, the system interprets this as an attempt to modify the Event Tracing of Windows which is why the error is thrown. In the vast majority of these cases, the error should be considered completely benign and no action should be taken to resolve it. In this case, you can hide these benign errors by modifying a few registry values using Registry Editor.
- 3rd party AV interference – As it turns out, certain 3rd party AV suites are known to cause this issue due to an overprotective active shield feature. As it turns out, this particular issue can only be resolved by disabling the real-time protection or uninstalling the 3rd party suite and replacing it with a more permissive 3rd party equivalent.
- Outdated Intel Network drivers – If you’re using the network drivers fleet for Windows, chances are this issue is being caused by some kind of interference between the Intel WI-FI driver with a sensitive kernel process. In this case, you should be able to fix the issue by using the Intel Driver & Support Assistant to update your network driver’s feet with the latest driver equivalents.
- A network issue caused by Bad IP Range or DNS Cache – Under certain circumstances, you can expect to see this issue occurring due to a bad DNS cache or in a situation where you’ve been assigned a bad IP range. In this case, you should be able to fix the issue (at least temporarily) by flushing the IP and DNS cache from an elevated Command Prompt.
Now that you are aware of every scenario that might trigger this error, let’s get over some of the methods that other affected users have used so far to fix this issue completely.
Modify the Autologg Registry key
If the error is benign and you notice that it doesn’t affect the performance or behavior of your system, you can simply prevent the 0XC0000035 error from appearing inside your Event Viewer interface.
You can do this by navigating to the registry key used by the Autologg functionality and modifying the values of Enable and EnablePropertly.
Important: While this is generally harmless and will have no effect on your computer, it might hinder you from discovering a different issue that the Event Viewer might give you clues about. If you go through with this change, remember to undo this modification whenever you need to investigate something using Event Viewer.
If you are ready to apply this fix, follow the instructions below to ensure that your Event Viewer is no longer flooded with benign 0XC0000035 errors:
- Press Windows key + R to open up a Run dialog box. Inside the Run dialog box, type ‘regedit’ and press Ctrl + Shift + Enter to open up Registry Editor with admin access.
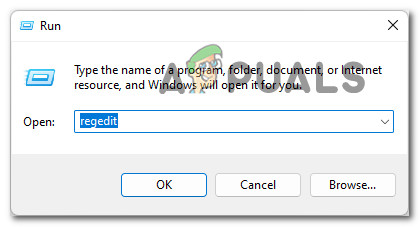
Opening the Regedit Editor with admin access - When you’re prompted by the User Account Control, click Yes to grant admin access.
- Once you’re inside the Registry Editor utility, use the menu on the left-hand side to navigate to the following location:
Computer\HKEY_LOCAL_MACHINE\SYSTEM\CurrentControlSet\Control\WMI\Autologger\EventLog-System\{b675ec37-bdb6-4648-bc92-f3fdc74d3ca2}Note: You can either get here manually by clicking on each key individually or you can paste the full location path inside the nav bar at the top and press Enter to get there instantly.
- Once you’re inside the correct location, move over to the right-hand pane and double-click on the Enabled key.
- Inside the Edit DWORD (32-bit) Value, set the Base to Hexadecimal, then change the Value data to 0.
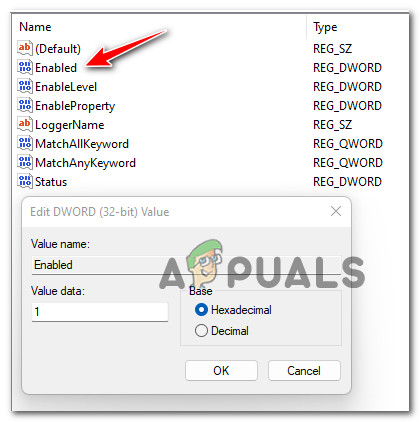
Disable the Enabled value of Event Log - Next, double-click on EnableProperly from the same key. Next, set the Base to Hexadecimal and Value data to 0. Click OK to save the changes.
- After both registry values have been interfered with, reboot your PC to make the changes permanent, then make sure to return to the same Event Viewer and see if you notice any new instances of the 0XC0000035.
If you followed the steps above and you’re still dealing with the same consistent 0XC0000035 kernel errors, move down to the next potential fix below.
Disable or Uninstall 3rd party antivirus
As it turns out, a lot of affected users are blaming their 3rd party antivirus because of the constant 0XC0000035 kernel errors.
You can test out this theory by temporarily disabling the antivirus shield and seeing if the apparition of the kernel errors stops.
Test out this theory by accessing your antivirus settings and disabling the real-time protection and see if the 0XC0000035 error stops occurring.
Of course, doing this will be different from one AV tool to another, but typically you can disable the real-time virus protection directly by right-clicking ok the taskbar icon.
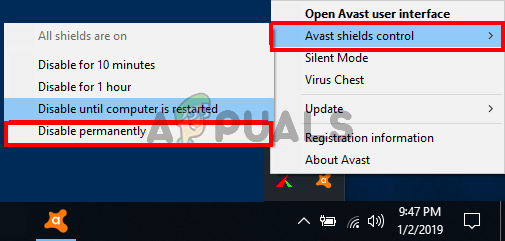
Unfortunately, if you discover that your 3rd party antivirus is indeed to blame, there is nothing else you can do other than uninstalling it.
Note: After you get rid of the interfering antivirus suite, the Windows Defender will take over automatically (unless you install a different 3rd party equivalent).
Follow the instructions below to get rid of the interfering 3rd party antivirus suite:
- Press Windows key + R to open up a Run dialog box. Inside the text box, type ‘appwiz.cpl’ and press Enter to open up the Programs and Features menu.
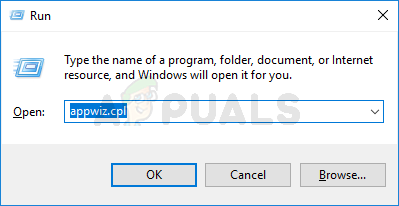
Accessing the Programs and Features menu Note: If you’re prompted by the User Account Control, click Yes to grant admin access.
- Once you’re inside the Programs and Features menu, scroll down through the list of installed programs and look for the 3rd party antivirus suite that you feel is interfering with your kernel processes.
- After you locate the problematic antivirus, right-click on it and choose Uninstall from the context menu.
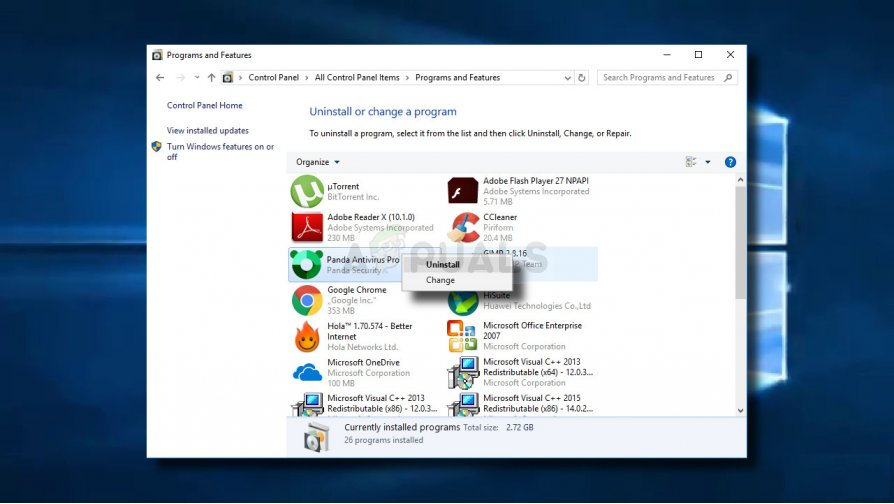
Uninstalling the antivirus suite - Inside the uninstallation screen, follow the on-screen instructions to complete the uninstallation process.
- After the problematic antivirus is uninstalled, reboot your PC one final time and see if the problem is now fixed.
If this problem is still not resolved as you’re still seeing new instances of the 0XC0000035 error, move down to the next potential fix below.
Update your Intel Drivers
As it turns out, the 0XC0000035 error can also be caused by a severely outdated Intel Wi-Fi driver that’s interfering with a Kernel process. As it turns out, this is typically occurring if you recently upgraded from an older Windows version to Windows 11.
If the Event Viewer error references one of the following locations, it’s clear that the problem is surfacing due to an issue produced by an Intel driver issue:
- C:\Program Files\Intel\WiFi\bin\MurocApi.dll
- C:\Program Files\Intel\WiFi\UnifiedLogging\MurocLog.log
In this case, the only solution that is confirmed to fix this issue completely is to use Intel’s driver utility (Intel Driver & Support Assistant) to ensure that you’re using the latest driver version compatible with your Windows version.
Follow the instructions below to use the Intel Driver & Support Assistant utility to update your Intel’s Driver fleet to the latest versions available:
- First things first, close any non-essential application from running and see that no resource-intensive process is running in the background.
- Open your default browser and access the home page of the Intel Driver & Support assistant web utility.
- Once you’re inside the Intel Driver & Support assistant utility, wait until the initial scan is complete, then click on the Download All button at the top to download the updated driver signatures locally.
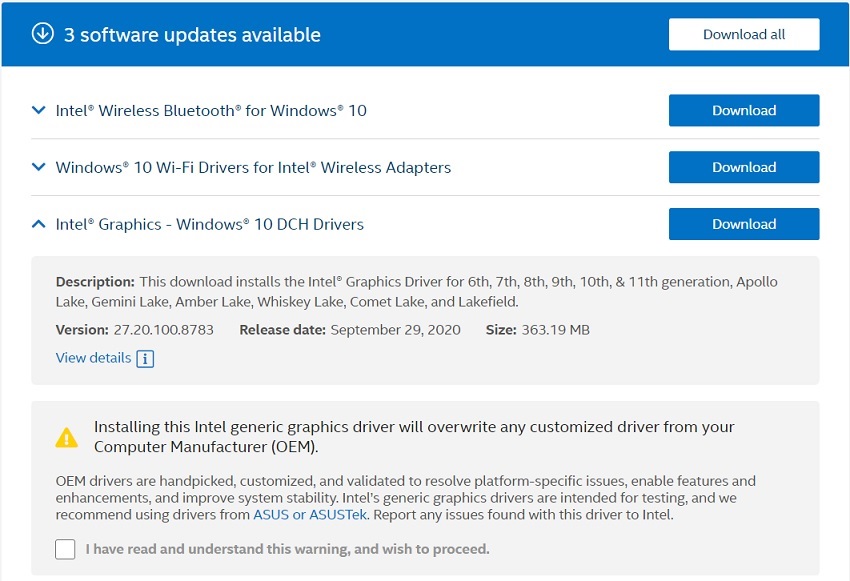
D0wnloading the latest available Intel drivers - After the download is complete, click on the Install All button (in the same place where the Download All button was previously) and wait until every driver is installed.
- Depending on the drivers that need to be updated, you might be required to follow an additional set of instructions to get these drivers installed.
- Once every driver installation is complete, reboot your computer one final time and see if the problem is now fixed.
If your Intel drivers we’re already updated to the latest or this scenario was not applicable in your particular scenario, move down to the next potential fix below.
Flush IP & DNS Cache
As it turns out, this particular issue can also be associated with an underlying network issue coming from a bad IP range or corrupted DNS cache data.
Several affected users going through the same problems and experiencing constant Kernel Event Tracing (0XC0000035) events have managed to get it fixed by using elevated CMD prompts to flush both the temporary data related to the IP and DNS.
For step-by-step instructions on how to do this, follow the guide below:
- Press Windows key + R to open up a Run dialog box. Next, type ‘cmd’ inside the text box, then press Ctrl + Shift + Enter to open up an elevated Command Prompt.

Open un an elevated Command Prompt - When you’re prompted by the User Account Control, click Yes to grant administrative privileges.
- Once you’re inside the elevated Command Prompt, type the following command in the same order and press Enter after each one to flush the IP and DNS cache of your PC:
ipconfig /all
ipconfig /Flushdns
ipconfig /release /all
- Wait until the operation is complete, then close the elevated CMD prompt and restart your computer.
- Once your PC boots back up, make sure DCHP is enabled before checking if any instances of the 0XC0000035 error.
The post How to Fix “Error Code: 0XC0000035” Kernel Event Tracing on Windows? appeared first on Appuals.com.

0 Commentaires