Multiple users have been reporting issues with the Your Phone app in Windows 11. This includes scenarios where the application does not show you the notifications or in some cases even refuses to open. Some users even reported that the voice quality is bad and choppy which is something you certainly would not want. Now, depending on your specific case, the problem can be caused by a few reasons which include the app not being allowed in the background and much more. In this article, we will take you through the process and show you how to fix this frustrating problem pretty easily so just follow through.
As it turns out, Your Phone application has been recently gaining popularity due to which more and more users are trying to test out the application. As obvious from the name of the application itself, it essentially lets you integrate your smartphone with your computer so you can receive all of your notifications and calls on the computer instead of having to pick up the phone from time to time. While the application has recently received updates and is a lot better, especially if you have upgraded to Windows 11, the user interface has received an overhaul. In case the application is not working properly, it can usually be due to the following reasons that may trigger the problem.
- Disabled Sharing — In some cases, the problem may arise when the devices that you have linked with your computer, such as your mobile phone, may not be allowed to share data with each other. When this happens, you will not be able to open messages or anything else that you may receive on your phone. In such a case, to resolve the issue, you will have to enable the share across devices feature on your Windows 11.
- Not allowed in the background — As it turns out, one of the reasons the phone app on your computer may not be working is when it is not allowed to run in the background. If the application is not allowed to run in the background, it will not be able to sync with your phone and thus the application won’t work properly. If this case is applicable, you will have to allow it to run in the background to fix the issue.
- Third-Party Antivirus — Another reason that the problem in question may appear is due to the interference of a third-party security program that is installed on your computer. Such cases are pretty common and can happen every now and then. In such a scenario, you will have to disable your antivirus program to see resolve the problem.
- Damaged Files — Finally, another reason that the issue in question may arise is when the application’s files on your computer are damaged or corrupted. This can include the app’s cache or the installation files in some cases. In such a scenario, you will have to reinstall the application on your system to fix the problem.
Now that we have gone through the possible list of causes of the problem in question, we can get started with the different methods that are available to you in order to resolve the issue. So, with that said, let us get started without any further ado.
Allow Your Phone App in the Background
As it turns out, the first thing that you should do when the application is not working properly is to make sure that the app is allowed to run in the background. Windows has a feature that lets you control which apps can run in the background. When an app is not allowed to run in the background, it won’t be able to operate properly when you are using it. This highly affects the functionality of the application especially for an app like Your Phone which constantly needs to check for updates and sync with your phone in order to show you whatever notifications you receive on the phone.
If this case is applicable, you can easily resolve the problem by allowing the application to run in the background. This way, the app will be allowed to perform its tasks without any blockage. To do this, follow the instructions given down below:
- First of all, open up the Run dialog box by pressing Windows key + R on your keyboard.
- In the Run dialog box, type in gpedit.msc and hit the Enter key.
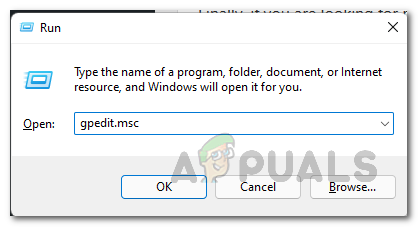
Opening up Local Group Policy Editor - This will open up the Local Group Policy Editor.
- There, navigate to the following path:
Computer Configuration\Administrative Templates\Windows Components\App Privacy
- After that, on the right-hand side, double click the Let Windows apps run in the background policy.
- Choose the Enabled option.
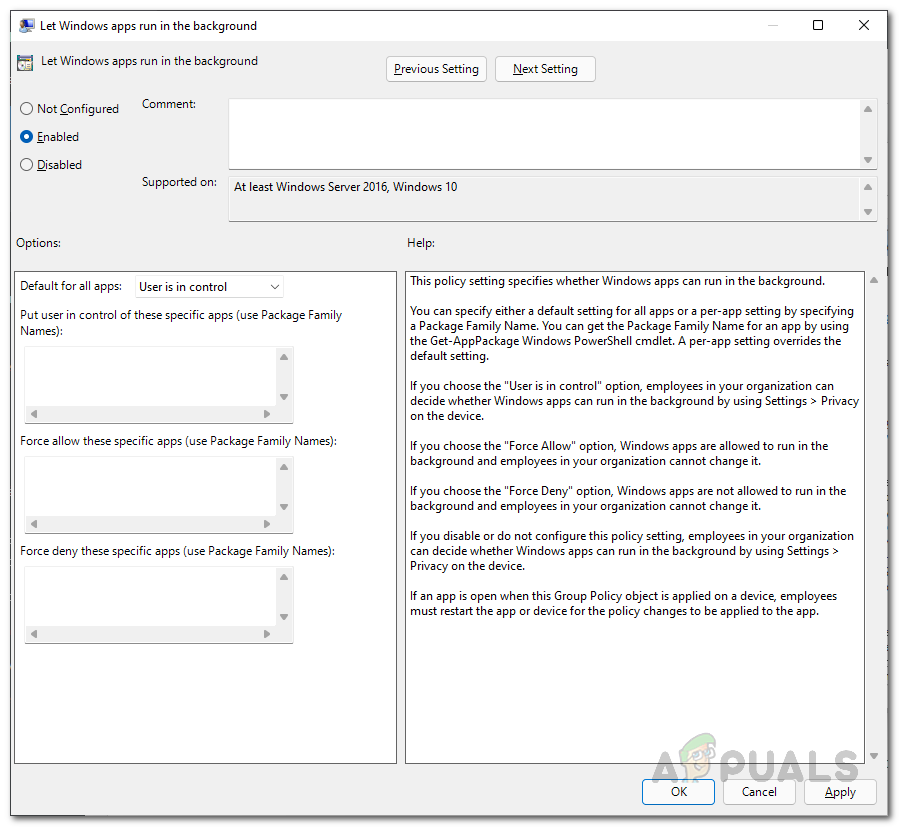
Enabling Windows Apps in the Background - After that, under Options, you can choose Force Allow from the Default for all apps drop down menu.
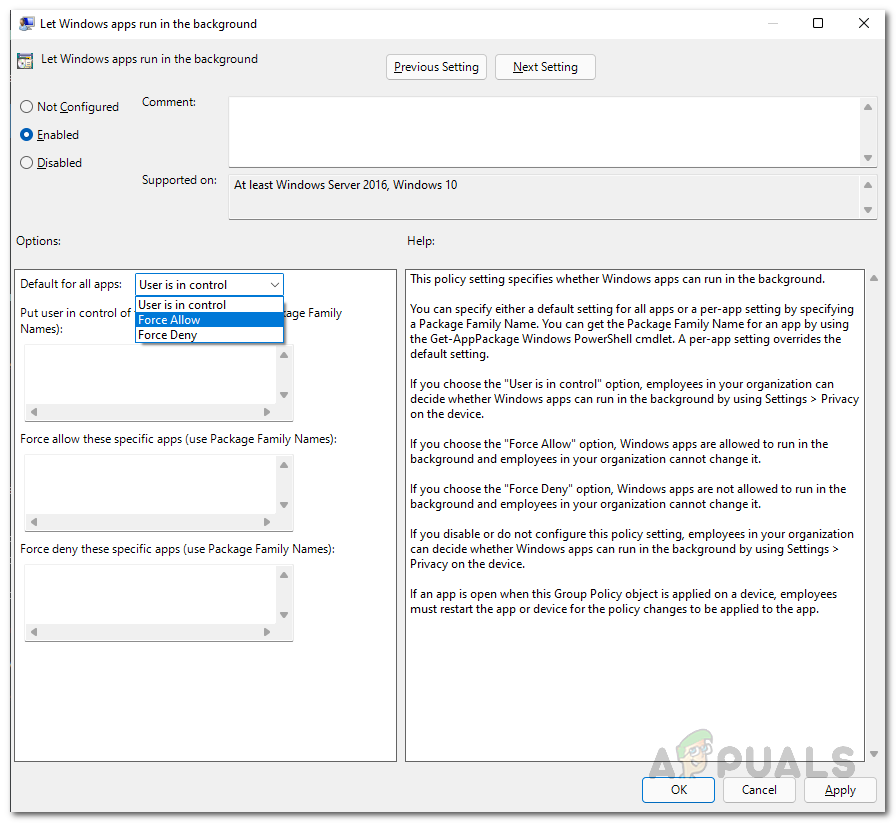
Allowing all Apps in the Background - Alternatively, you can also choose the User is in control option, and then in the first box, provide the following family package name:
YourPhone_8wekyb3d8bbwe
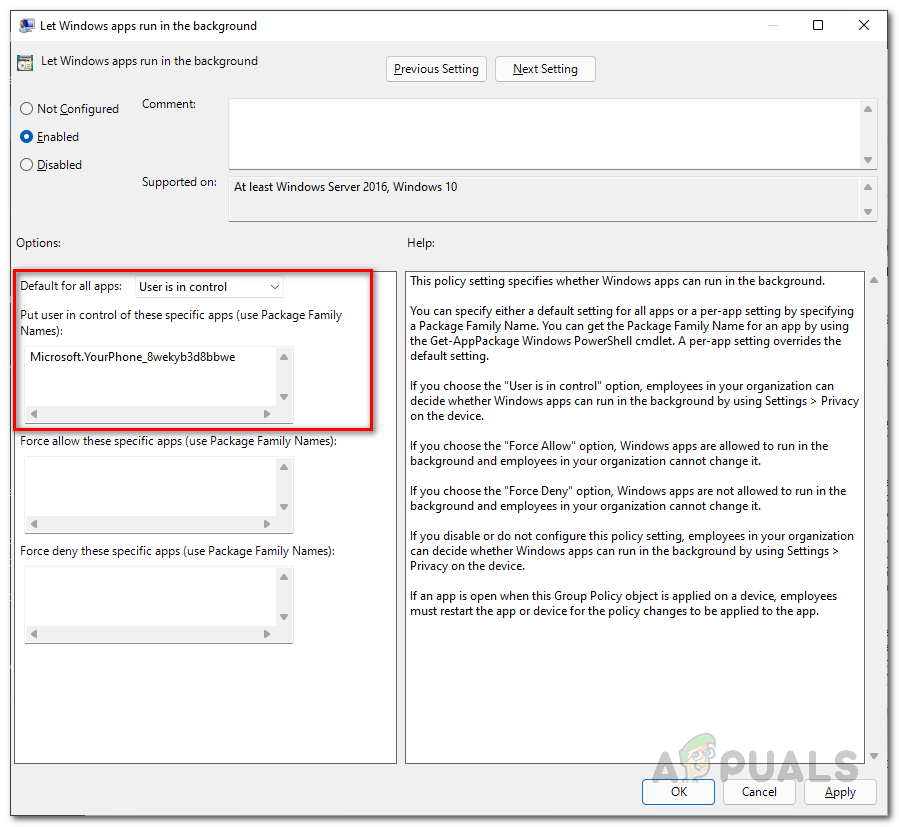
Allowing Your Phone App in the Background - This is the family package name for the Your Phone app. Doing this will allow the Your Phone app only instead of all of the applications.
- Once you have done that, click Apply and then hit OK.
- After that, see if the problem persists.
Allow Sharing Across Devices
Like we have mentioned, another reason that the problem in question may appear is when your computer is not allowed to share data across other devices that it is linked to.
If this case is applicable, you will be able to resolve the problem by simply enabling the share across devices feature. This will allow your computer to share data that you have linked to your PC via the Microsoft account. To do this, follow the instructions given down below:
- First of all, open up the Windows Settings window by pressing Windows key + I on your keyboard.
- On the left hand side of the Settings app, click the Apps option.
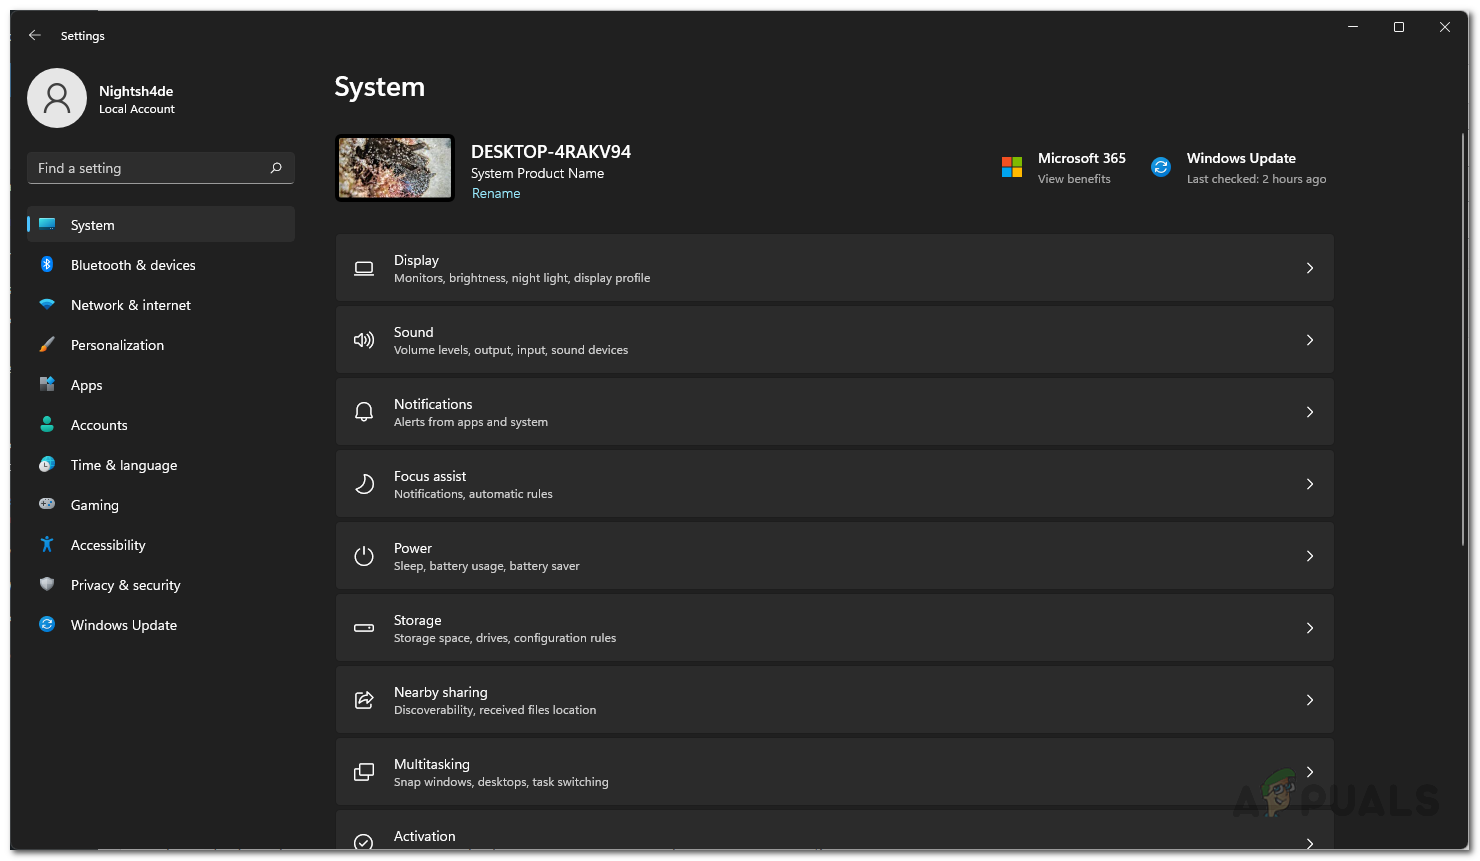
Windows Settings - Now, make your way to the Apps and features option provided at the top.
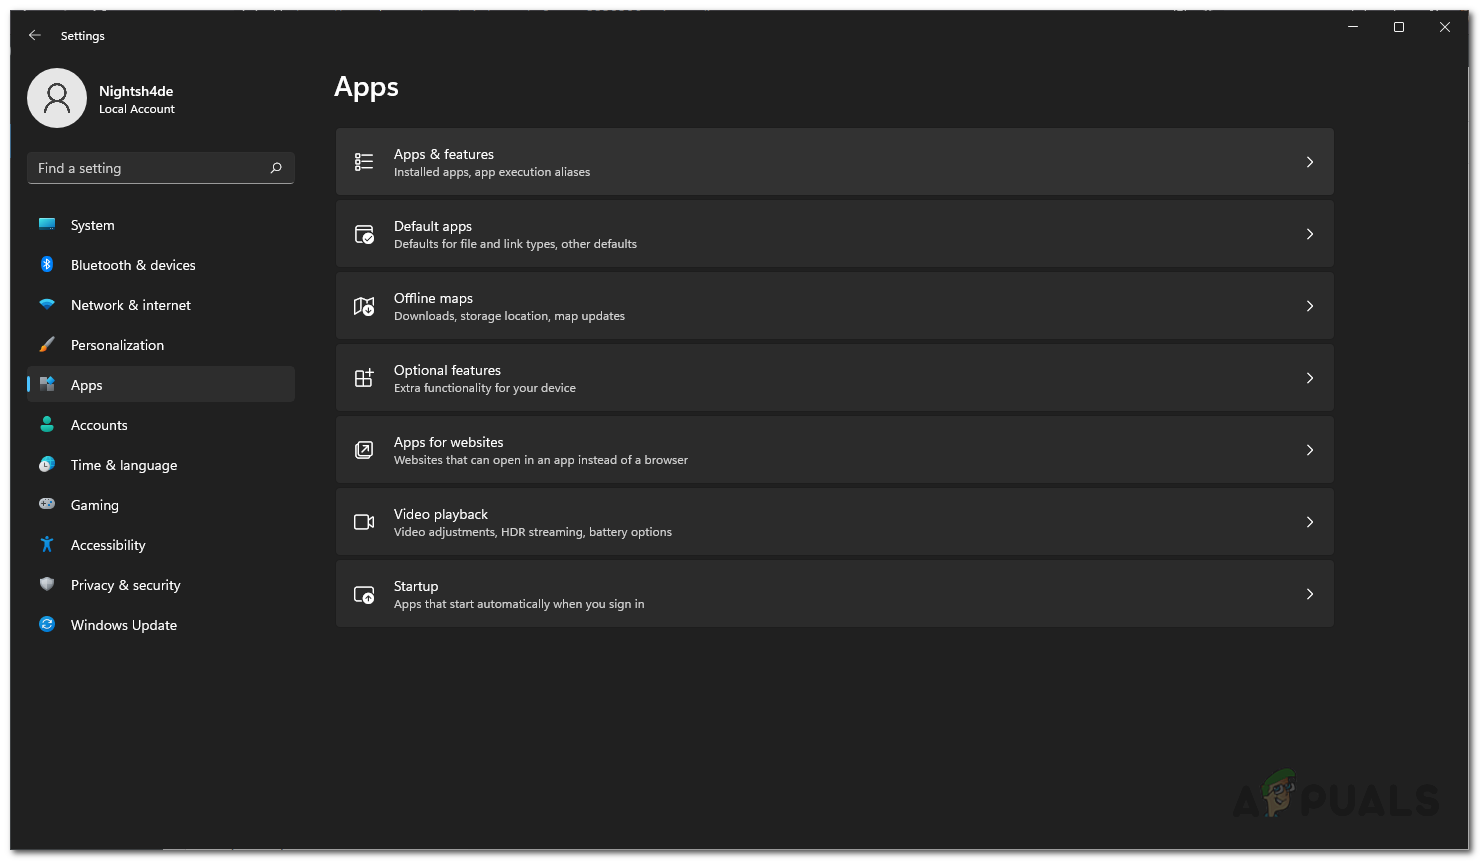
Apps Settings - After that, click on the Share across devices drop-down menu.
- From there, make sure that you have selected the My devices only option.
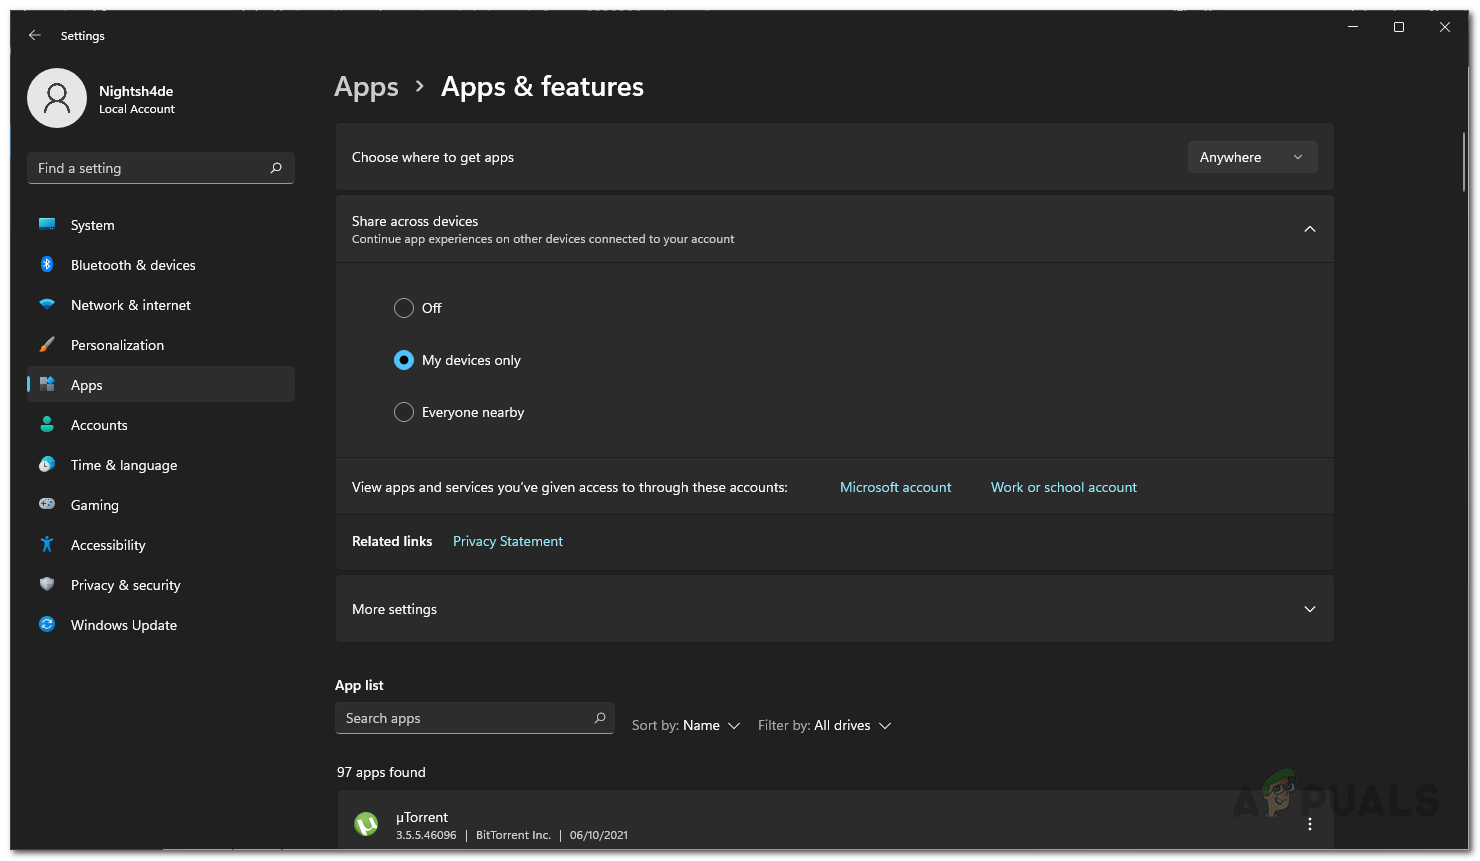
Enabling Share Across Devices - Once you have done that, double-check that you are using the same Microsoft account on your computer as well as the mobile phone. After that, see if the problem still persists.
Disable Third-Party Antivirus
As it turns out, in some cases, the problem can also surface due to the presence of a third-party security program on your computer. This happens when the antivirus program is not allowing your phone app to sync with your mobile phone. This generally occurs due to a false positive which is pretty common when it comes down to third-party security programs.
Therefore, if you have a security program installed on your computer, go ahead and disable the antivirus temporarily and see if the problem still persists. In case it goes away, we would recommend uninstalling the security program and sticking to Windows Defender which has gotten a lot better over the years and receives frequent updates.

Reset Your Phone App
In some cases, the problem can be due to the application’s data that is stored on your computer. This usually contains general information regarding your mobile phone so that it automatically connects and doesn’t require you to go through the setup all the time.
If this case is applicable, you can try to fix the problem by simply resetting the application which will get rid of the app’s data on your computer. To do this, follow the instructions given down below:
- First of all, open up the Settings app by pressing Windows key + I on your keyboard.
- On the left hand side, click the Apps option.

Windows Settings - Then, navigate to the Apps and features option.

Apps Settings - Now, from the list of applications, search for Your Phone app.
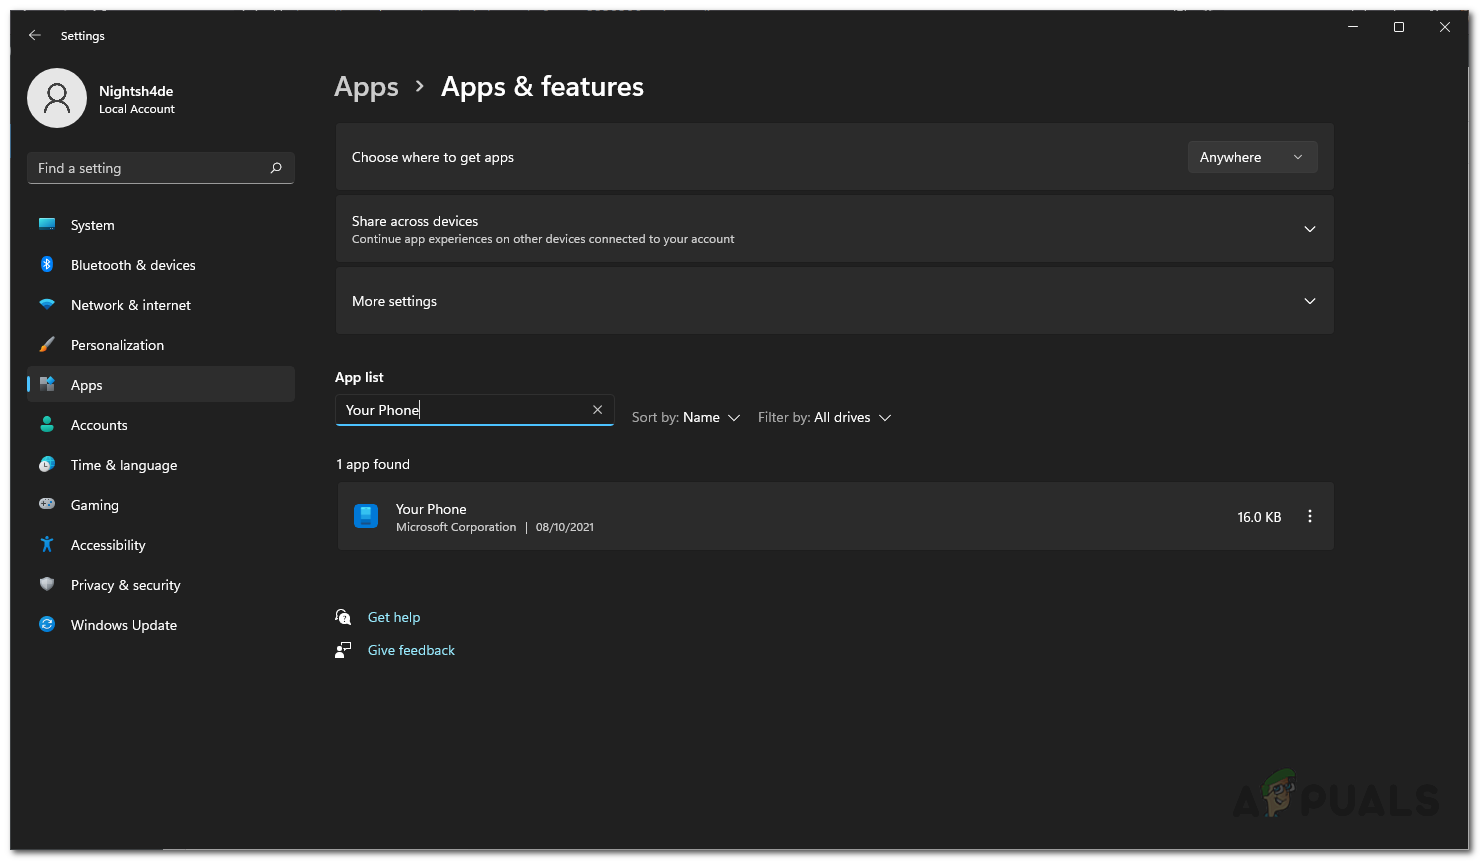
Searching for Your Phone App - Click on the three dots next to the application and choose Advanced options from the drop down menu.
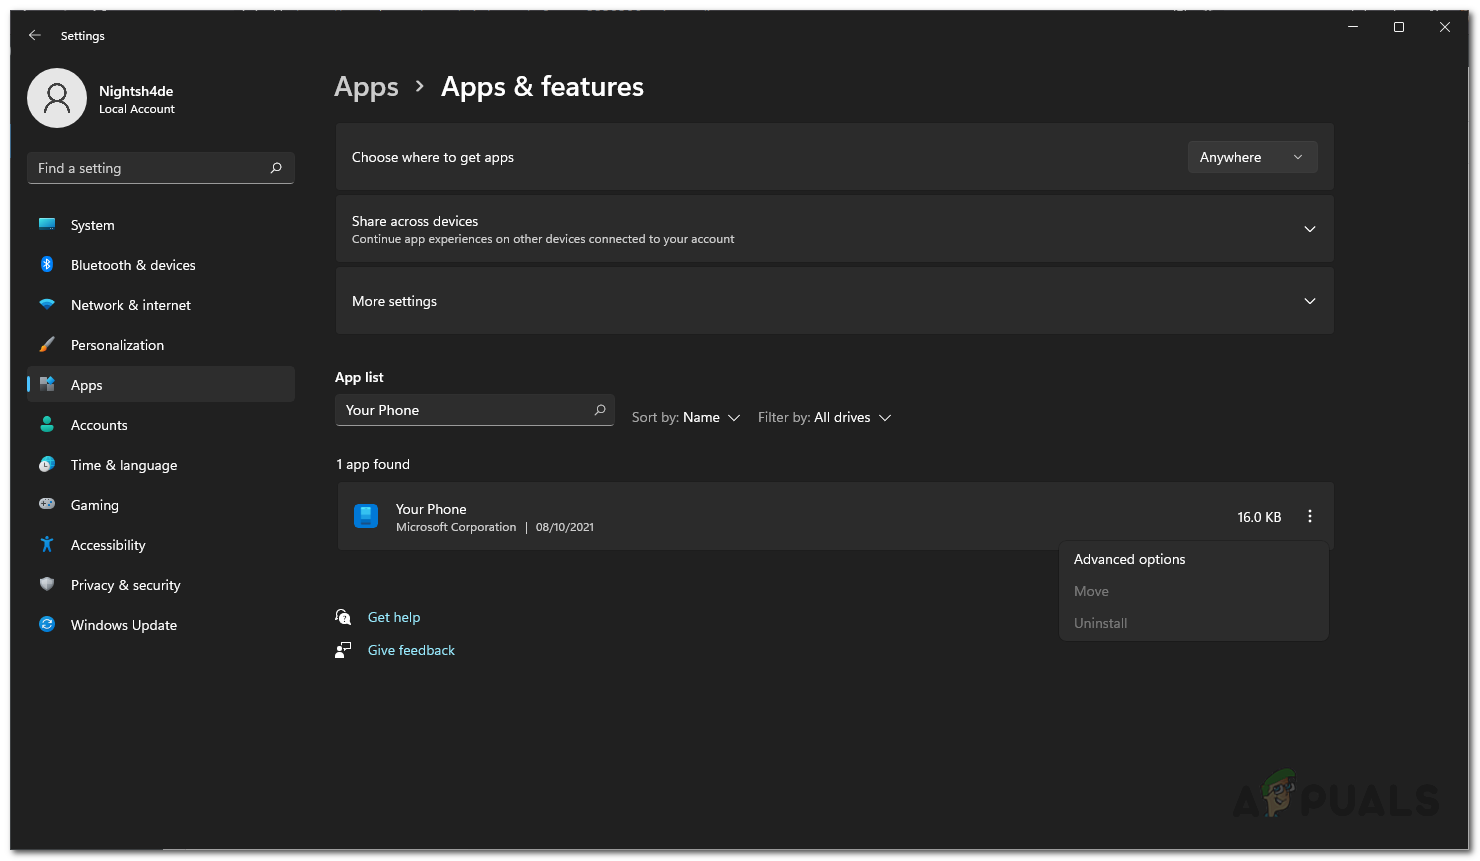
Navigating to Your Phone Advanced Options - There, simply scroll down and then click the Reset button provided.
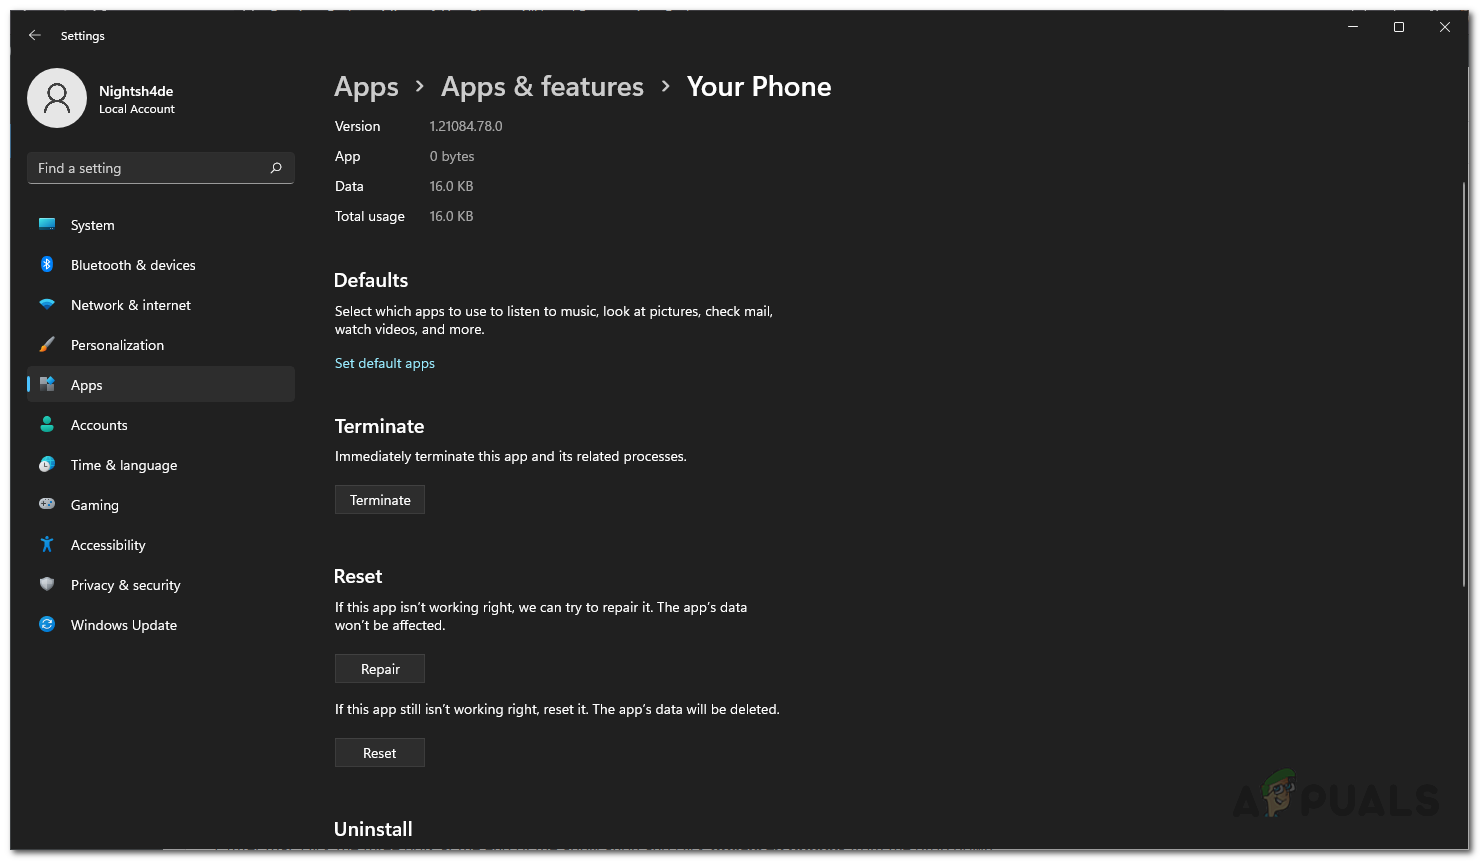
Resetting Your Phone App - Once you have done that, see if that resolves the problem.
Reinstall Your Phone App
Finally, if none of the above methods have fixed the problem for you, then the issue may be related to the application’s installation files. This can happen when the app’s files are damaged or corrupted in which case you will have to reinstall the application. This is pretty easy to do, so just follow the instructions that are given down below:
- First of all, open up the Settings app by pressing Windows key + I.
- Then, in the Settings app, click the Apps option on the left hand side.

Windows Settings - There, make your way to the Apps and features option.

Apps Settings - Now, search for the Your Phone app via the search bar.

Searching for Your Phone App - After that, click the three dots at the end of the application and click Advanced options from the drop down menu.

Navigating to Your Phone Advanced Options - Then, scroll down and then click the Uninstall button provided.
- In case the uninstall option is greyed, do not worry as there is another way to uninstall it as well.
- Open up the Start Menu and search for Powershell. Right-click on the result shown and click on the Run as administrator option. Alternatively, you can also click the Run as administrator on the right hand side.
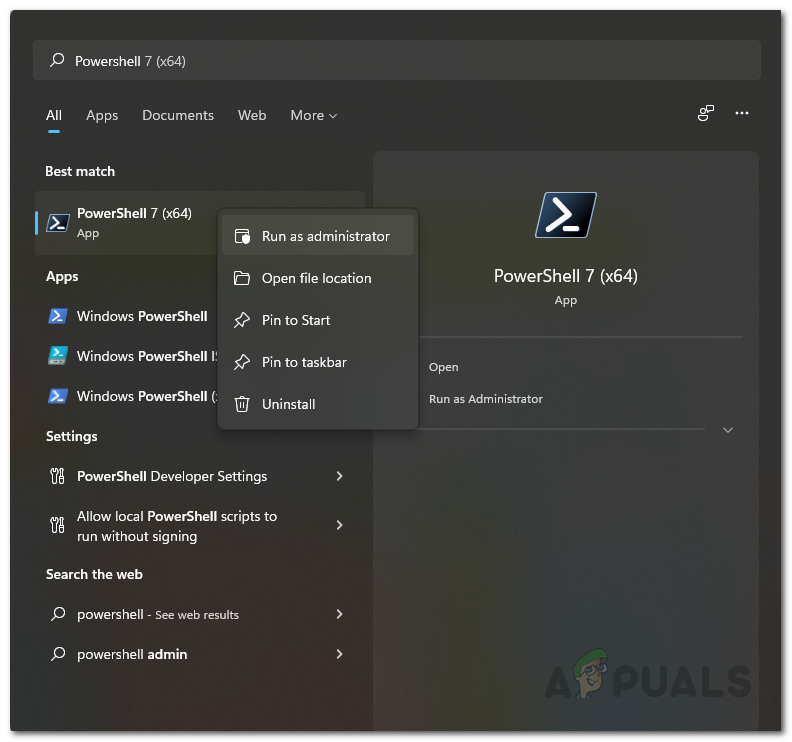
Opening Powershell as an Admin - After that, in the Powershell window, type in the following command and hit Enter:
Get-AppxPackage Microsoft.YourPhone -AllUsers | Remove-AppxPackage
- Once the application has been uninstalled, open up the Microsoft Store by searching for it in the Start Menu.
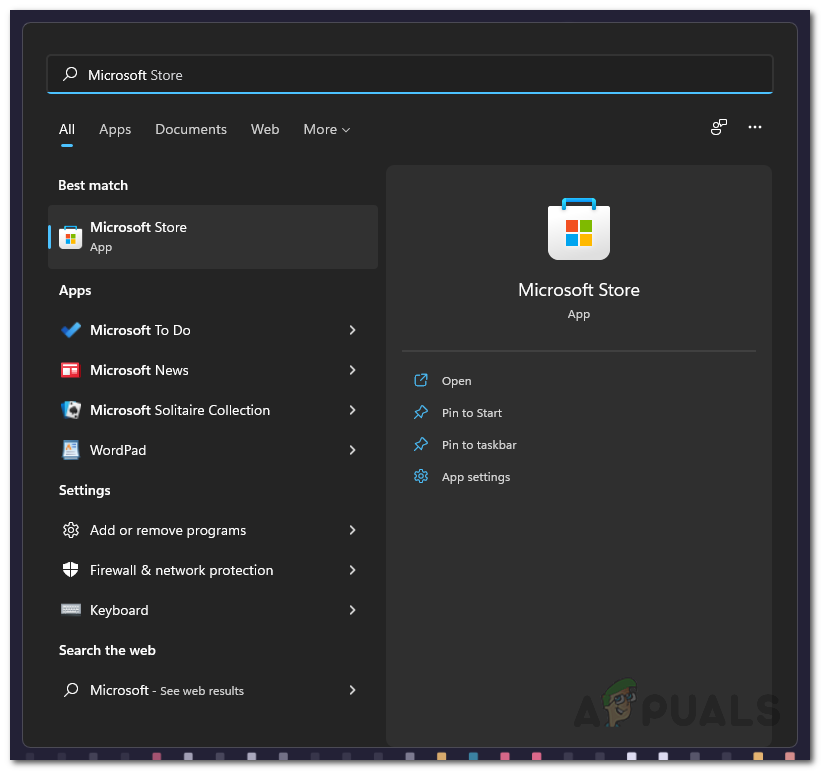
Opening up Microsoft Store - After that, search for the Your Phone app and install it.
- Once you are done with that, use the application again to see if the problem is still there or not.
The post Your Phone App not Working on Windows 11? Try these fixes appeared first on Appuals.com.


0 Commentaires