Some Windows 11 users are reporting a weird issue when they constantly end up hearing cracking hounds when playing different types of audio on their PC, laptop, or ultrabook. This type of problem is confirmed to occur with both speakers and headsets.

After diving deep into this issue, we’re pleased to inform you that we’ve managed to identify several potential causes that are most likely causing this type of issue. Here’s a list of potential culprits that are most likely responsible for this problem:
- Corrupted or Incompatible audio driver – One of the most common causes of this particular issue is an improper or partially corrupted audio driver. This type of problem is typically reported in those scenarios where Windows 11 was obtained from an upgrade rather than from a clean install. In this case, you should be able to fix the problem by updating or reinstalling the audio driver using Device Manager.
- The playback device is not set as the default – As it turns out, you can expect to deal with this type of issue if you’re using a headset that is built to switch between mono and stereo channels depending on what you’re doing. This type of channel switching is known to cause issues on Windows 11. Fortunately, you should be able to fix the problem by setting the headset as the default playback device from the Sound settings.
- Sound enhancement interference – Another potential cause that is known to cause this type of issue is a software enhancement glitch that ends up producing popping or cracking issues as the audio output is being ‘enhanced’. In this case, you can resolve the sound cracking issues by disabling every sound enhancement.
- Format stream quality is insufficient – If you’re using a high-end sound system to the headset, you might experience these sound cracking issues when attempting to play audio content of superior quality in situations where the format stream is set to a value lower than what your playback device is capable of outputting. To fix this problem, you’ll need to access the Properties screen of your playback divide and boost the stream format to Studio Quality.
- 3.5 Mini Jack glitch – If you’re only experiencing this issue while you connect a headset or speaker system via a 3.5 mini-jack, you might be able to contain the distortion by accessing the Sound settings on Windows 11 and enabling audio enhancement.
- Voicemeter is using MME instead of WDM – If you’re actively using Voicemetrer or similar software that uses Virtual Audio I/O, chances are you’ll experience these audio artifacts if you’re using MME or ASIA audio driver by default. You can fix this type of problem by changing the preferred audio driver of Voicemeter (or similar software) to WDM.
- The Transmit Power frequency of Wi-Fi is interfering with Bluetooth audio stream – If you’re using a BT headset while your Wi-Fi connectivity is powered by Intel (R) Wi-Fi driver, it’s possible that the transmission frequency is causing the sound artifacts. To fix it, you’ll need to adjust the transmission frequency from the Properties settings of the Wi-Fi driver.
- Outdated BIOS or UEFI firmware – In certain situations, you can expect to deal with this issue if you’re using an outdated BIOS or UEFI version that inhibits your PC’s ability to output quality audio streams. In this case, updating your BIOS or UEFI version to the latest should fix the issue in your case.
- System File corruption – You can also expect to deal with this issue in scenarios where some key sound dependencies are being affected by system file corruption. Since there’s no way to identify the exact culprits (unless you’re an expert at looking through dump files), the best way to fix this problem is to perform a clean install or repair install operation.
Now that we went over every potential culprit that might be responsible for this issue, let’s go over all the potential fixes that other affected users have successfully used to resolve the sound cracking/popping issues on Windows 11.
Update or Reinstall the audio driver
When troubleshooting for this issue, the first thing you need to investigate is an improper or partially corrupted audio driver. This type of problem is typically reported in scenarios where you’ve just migrated to Windows 11 from an older Windows version – depending on the upgrade path that you choose, chances are the audio driver from your older Windows version was migrated too instead of being replaced by an audio driver adapter for Windows 11.
If you find yourself in this scenario, you should start by using Device Manager to force Windows 11 to update your current audio driver.
Note: In case the scan for a new audio driver version turns out cold, you should effectively uninstall the active audio driver – this will force your operating system to recognize that your audio driver is missing and replace it with a generic equivalent that’s fully compatible.
Follow the instructions below to update or reinstall the current audio driver on Windows 11:
- Press Windows key + R to open up a Run dialog box. Inside the text box, type ‘devmgmt.msc’ and press Enter to open up Device Manager.

Opening up Device Manager - In case you’re using more aggressive UAC settings and you’re prompted by the User Account Control window, click Yes to grant admin access.
- Once you’re finally inside Device Manager, scroll down through the list of different devices and expand the Sound, video, and game controllers drop-down menu.
- Inside the Sound, video, and game controllers drop-down menu, right-click on the audio driver and choose Properties from the context menu that just appeared.

Accessing the Properties screen - Once you’re inside the Properties screen, select the Driver tab from the horizontal menu at the top, then click on the Update Driver button at the top.

Updating the sound driver - At the next screen click on Search automatically for drivers to force the Device Manager component to search for a new driver equivalent.
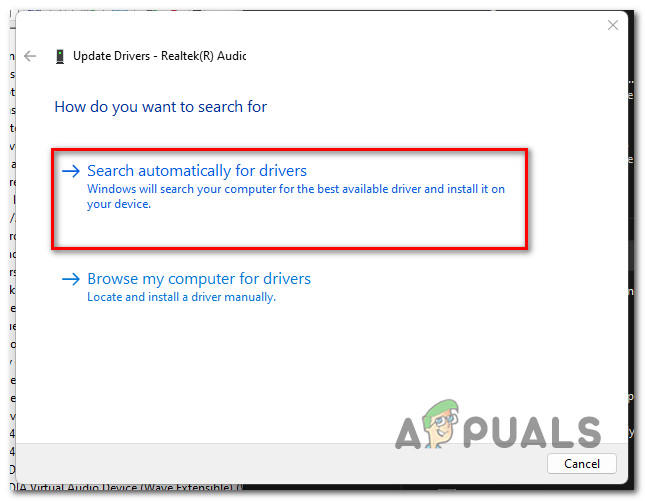
Search automatically for new drivers - Wait to see if a new driver version is identified. If a new driver is found, follow the on-screen instructions to complete the installation. If Device Manager is not able to find a new driver, you can also click on Search for updated drivers on Windows Update to see if the WU component is able to find a new driver.

Search via Windows Update - If a new driver version is installed, reboot your PC and see if the cracking sound problem is fixed once the next startup is complete.
In case neither Windows Update and Device Manager are able to find a new driver equivalent, the next thing you should do is uninstall your current driver. Doing this will force your Windows installation to detect that it’s missing a key audio driver and install a generic equivalent the next time you boot up your computer.
Note: This will be effective in those scenarios where the problem is actually occurring due to a partially incompatible or corrupted audio driver.
Here’s how to uninstall your current audio driver to force Windows to install a generic equivalent:
- Press Windows key + R to open up a Run dialog box. Next, type ‘devmgmt.msc’ and press Enter to open up Device Manager.

Open up Device Manager - At the User Account Control, click Yes to grant admin access.
- Once you’re inside Device Manager, expand the drop-down menu associated with Sound, video, and game controllers.
- Next, right-click on your audio driver and choose Uninstall device from the context menu that just appeared.
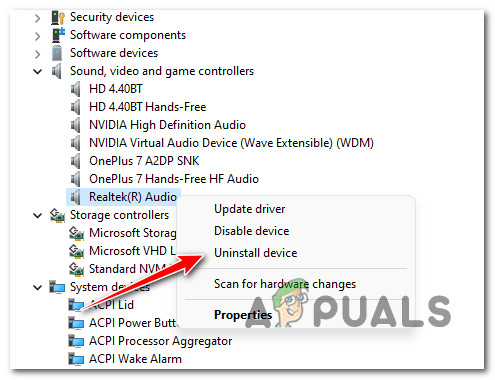
Uninstall audio the device - Reboot your PC. At the next startup, your PC will detect that it’s missing the audio driver and install a generic equivalent.
If this method was not effective in your case as you’re still experiencing cracking sounds even after updating the audio driver on Windows 11, move down to the next method below.
Set the active playback device as the default
If you’re experiencing this issue when using a headset that switches between Mono and Stereo channels, you can expect to deal with this problem due to a playback glitch that seems to be affecting certain Windows 11 builds.
Fortunately, you can resolve this problem swiftly by accessing the Sound settings and ensuring that the active audio device is also set as the default device and as the default communication device. Several affected users have confirmed that this minor change is what ultimately allowed them to resolve the sound cracking issue once and for all.
Follow the guide below for specific instructions on setting the active playback device as the default in order to fix the sound popping issues on Windows 11:
- Press Windows key + R to open up a Run dialog box. Next, type ‘mmsys.cpl’ and press Enter to open up the Sound menu from the classic Control Panel menu.

Open up the Sound menu on Windows 11 Note: If you’re prompted by the User Account Control (UAC), click Yes to grant admin access.
- Once you’re inside the Sound menu, select the Playback tab from the menu at the top, then right-click on the playback device that you’re experiencing the cracking sounds on and choose Set as default device.
- Next, right-click on the same playback device and choose Set as the default communication device.
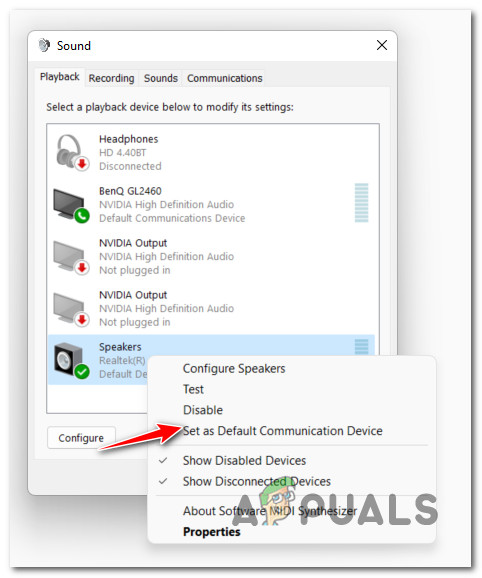
Set as the default communication device - Once you’ve made these modifications, reboot your PC and see if the problem is fixed once the next startup is complete.
If the problem is still not fixed, move down to the next potential fix below.
Disable all Enhancements
If none of the methods so far have allowed you to get to the bottom of this issue and fix it, another thing that you can do is to ensure that Windows is not applying any sort of enhancements to your audio output.
As it’s been demonstrated by other users that we’re also dealing with this problem, you can expect to deal with this problem because your sound is actually being ‘enhanced’ by a series of enhancements Windows-applied.
If this scenario is applicable, you should be able to fix the problem promptly by accessing the Sound menu and disabling every software enhancement that is currently applied to your audio stream.
Note: Keep in mind that not every playback device is compatible with sound enhancements available on Windows 11. If the audio playback device that you’re using doesn’t support enhancements, the Enhancements menu will be missing from the Sound Properties menu.
Follow the instructions below to get step-by-step guidance on how to do this:
- Press Windows key + R to open up a Run dialog box. Next, type ‘mmsys.cpl’ inside the text box and press Enter to open up the Sound settings.
Open up the Sound menu on Windows 11 - If you’re prompted by the User Account Control, click Yes to grant admin access.
- Once you’re inside the Sound settings, use the menu at the top to select the Playback menu. Next, right-click on the active sound device and choose Properties from the context menu.

Accessing the Properties screen - Once you’re inside the Properties screen of the active audio device, click on the Enhancements tab from the menu at the top.
- Next, check the box associated with Disable all enhancements, then click on Apply to save the changes.

Disabling the sound Enhancements on Windows 11 - Once every enhancement has been disabled, reboot your PC and see if the problem is now resolved.
In case you’re still experiencing cracking sound issues even after disabling the active enhancements (or this method was not applicable), move down to the next potential fix below.
Boost the stream format to Studio Quality
If you’re using a high-end sound system or headset, the cracking sounds you’re hearing during the playback of certain audio streams might be related to the fact that your Windows settings in regards to the stream format quality are insufficient to the active playback device.
If this scenario is applicable, you should be able to fix the problem by accessing the Sound settings and modifying the Default format so that it uses the biggest sample rate available (24 bit – 48000 Hz).
Several affected users have confirmed that the cracking/popping sound issues were finally resolved after they boosted the default stream format to Studio Quality.
If you want to try the same kind of fix, follow the instructions below for specific instructions on how to do this:
- Press Windows key + R to open up a Run dialog box. Next, type ‘mmsys.cpl’ inside the text box and press Enter to open the Sound settings.
Open up the Sound menu on Windows 11 Note: If you’re prompted by the User Account Control, click Yes to grant admin access.
- Once you’re inside the Sound settings, access the Playback device from the horizontal menu at the top.
- Next, right-click on the audio device that you’re currently using and click on Properties from the context menu.
Accessing the Properties screen - Once you’re inside the Speaker Properties menu, click on the Advanced tab from the ribbon menu at the top.
- Next, go under Default format and change the drop-down menu to 24 bit, 48000 Hz (Studio Quality) and hit Apply to save the changes.

Changing the default format stream - Once the default audio stream has been changed, reboot your PC and see if the cracking sound issues on Windows 11 are now fixed.
If the same kind of issue is still occurring, move down to the next method below.
Enable Enhance Audio from Sound Settings
If you’re using an early Windows 11 build and you’re only experiencing this distortion issue while the audio output comes from the 3.5 mini jack, chances are you’re dealing with a glitch that only affects early Windows 11 builds.
If you’re experiencing this issue, the best way to take care of the issue is to install the latest available Windows 11 updates.
If you have no desire to upgrade to the latest available Windows 11 build, you might be able to resolve the sound distortion issue by accessing the Sound settings menu and enabling Enhanced Audio.
Note: This issue is only confirmed to be effective in those scenarios where the problem only occurs with devices connected through a jack or mini-jack port (while Bluetooth audio playback is just fine).
Follow the instructions below for specific instructions on enabling Enhanced Audio via the Settings menu on Windows 11:
- Press Windows key + I to open up the Settings menu on Windows 11.
- Once you’re inside the Settings menu, click on System from the vertical menu on the left.

Accessing the system menu Note: If the vertical menu is not visible by default, click on the action button (top-left screen) to make it visible.
- From the System tab, move over to the right-hand pane and click on Sound from the list of available options.
- Once you’re inside the Sound settings, scroll all the way down to the Advanced tab, then click on All sound devices.

Accessing the All sound menu - From the All sound devices menu, scroll down through the list of options and click on the audio playback device that is giving you trouble from under the Output devices menu.

Accessing the output settings of the active playback device - Once you’re finally inside the Properties screen of the active output device, scroll down to the Audio effects section and switch the Audio enhancements to On.
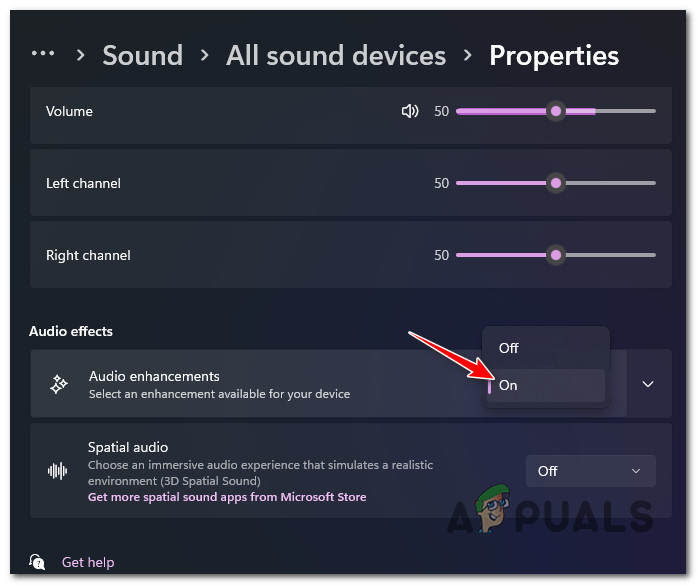
Enable the audio enhancement - Once this change has been enforced, reboot your Windows 11 computer normally and see if the problem is fixed once the next startup is complete.
If you’re still experiencing the same kind of sound distortion even after you enabled audio enhancement for your active playback device, move down to the next potential fix below.
Set Voicemeter Output to WDM (if applicable)
Keep in mind that this type of audio distortion can also be caused by software like Voicemeter. As it turns out, any type of program that uses Virtual Audio I/O can ultimately be responsible for creating audio artifacts with certain audio streams.
If this scenario is applicable and you’re using Voicemeter or similar software, you should set your configured outputs to WDM (Windows Driver Model) instead of MME (Microsoft Multimedia Environment).

Once you have successfully made this type of change, reboot your PC and see if the problem is fixed once the next startup is complete.
If this method was not applicable in your case or it didn’t improve the sound cracking issue on Windows 11, move down to the next potential fix below.
Change the Transmit Power level of Intel (R) Wifi
As it turns out, this sound cracking issue might also be facilitated by a power inconsistency rooted in your Wi-Fi card driver. In certain scenarios, you can expect to hear these sound artifacts because the current power transmission level is causing interference with the audio content delivery.
Several affected users that we’re also dealing with this exact issue have reported that they finally go the issue fixed after they used Device Manager to access the advanced properties menu of their Intel (R) Wi-Fi drivers and modify the default power level. In most cases, changing the level to 3 seems to produce the most stable result.
Follow the instructions below for specific steps on changing the transmit power level in a way that will prevent interference with the audio content delivery:
- Press Windows key + R to open up a Run dialog box. Next, type ‘devmgmt.msc’ and press Enter to open up Device Manager. If you’re prompted by the User Account Control (UAC), click Yes to grant admin access. |

Opening device manager - Once you’re inside Device Manager, scroll down and expand the drop-down menu associated with Network Adapters.
- Next, right-click on the Intel Wi-Fi driver and then click on Properties from the context menu that just appeared.

Accessing the properties screen of the Intel Wi-Fi driver - Once you’re inside the Properties screen, click on the Advanced tab, then scroll down under Property and select the Transmit Power entry.
Next, with the Transmit Power entry selected, change its value to 3 before clicking Ok to save the changes.
Changing the Transmit Power attribute for the Wi-Fi component - After this change has been operated, reboot your PC in order to allow it to take effect.
- At the next system startup, see if the audio cracking sound has been resolved.
If the same kind of issue is still occurring, move down to the next potential fix below.
Update BIOS / UEFI version
Another reason why you might end up hearing these audio artifacts when you play audio content from your Windows 11 PC is due to an outdated BIOS or UEFI version.
This was an especially common occurrence on early Dev Preview builds of Windows 11, but the issue has alleviated a lot as Microsoft released a couple of hotfixes to deal with these issues.
If you haven’t done this already, you should start by ensuring that every pending Windows update that’s compatible with your Windows installation is installed.

If you’ve already ensured that you have the latest Windows 11 build, the next thing you should do is ensure that you have the latest BIOS / UEFI firmware.
Note: Most of the major motherboard manufacturers have already released an updated firmware version that accommodates the new protocols featured on Windows 11.
Keep in mind that the process of updating your BIOS or UEFI firmware will be different across various motherboard manufacturers, so we can’t provide you with a step-by-step guide that will guide you through the entire process.

However, we can provide you with a series of generic steps that will guide you through the process of updating your current BIOS firmware.
If you’re using a laptop, you should take the time to read the official documentation associated with your manufacturer before you start following the instructions below:
Note: In case your manufacturer is not on the list above, do an online search with ‘BIOS Update + *your motherboard model*‘ to find the official documentation.
Here is a general guide on updating your current BIOS version to the latest:
- Prepare a blank USB flash drive. If it’s filled with data, back up the files inside, then right-click on it and choose Format from the context menu that just appeared.

Format the drive - Inside the Format screen, select FAT32 as the file system, then click on Quick Format and hit Start to format the drive.

Format32 - Once the formatting operation is complete, open your default browser and visit the website of your motherboard or laptop / ultrabook manufacturer and consult the official BIOS update documentation before downloading the latest available BIOS version.

Downloading the latest BIOS version Note: In most cases, you’ll need to download the latest firmware version, then copy the file to the USB flash drive that you’ve just formatted. Depending on the manufacturer, you might also need to make additional changes to the files used for the BIOS upgrade.
- Once the download of the BIOS update is complete, paste the files on the recently formatted USB flash drive following the instructions provided by your manufacturer.
- Reboot your PC and hit the Setup key once you see the initial screen to access your BIOS settings.

Access the Setup screen - Once you’re inside the BIOS settings menu, look for the Advanced (Expert) settings and look for an option named Update System’s BIOS (or something similar).

Update System BIOS - Follow the remaining instructions to complete the BIOS update, then reboot your PC one final time and see if the sound cracking issue is now fixed.
If the sound issues on Windows 11 are still not resolved, move down to the final potential fix below.
Perform DISM and SFC scans
If you’ve come this far without a viable fix, you should start troubleshooting for a potential system corruption issue that is affecting your PC’s ability to carry sound data streams.
When it comes to scanning your system for corrupted system files, the easiest way to do it is by using a couple of built-in utilities that are capable of scanning the system files for corruption – SFC (System File Checker) and DISM (Deployment Image Servicing and Deployment).
We recommend that you sign with a Windows account with admin access and start by deploying an SFC scan from an elevated CMD prompt.
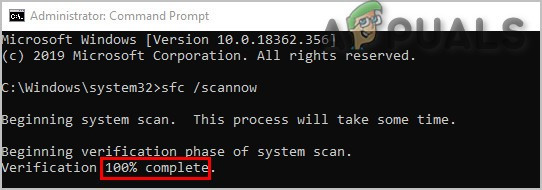
Note: This type of scan will compare your active fleet of Windows files against an archive of healthy equivalents that are stored locally. If any kind of system file corruption is found, the corrupted files will e replaced with equivalents that are not corrupted.
After the SFC scan is complete, reboot your PC and see if the problem is resolved at the next startup.
If the same sound artifacts are still contaminating your audio stream, proceed by deploying a DISM scan from an elevated Command prompt.

Note: Keep in mind that DISM uses a sub-component of Windows Update to replace corrupted system files with healthy equivalents. Before deploying this scan, ensure that you have a stable Internet connection.
Once the DISM scan is complete, restart your PC and see if the problem is fixed once the next startup is complete.
If you’re still experiencing audio cracking issues even after running SFC and DISM scans, move down to the next potential fix below.
Repair install / Clean install
If none of the other methods featured in this article have allowed you to fix this issue, you should seriously think about the possibility of some corrupted sound dependencies that actually end up causing these sound artifacts that you’re hearing.
Since there are a lot of system files that fit the culprit’s shoes in this case, the best action you can take at this point is to simply replace every system file with an equivalent that you know it’s healthy and not affected by corruption.
When it comes to achieving this, there are two methods that you can follow:
- Clean install – If you’re looking for the quickest type of fix, this is it. Clean installing your Windows installation will allow you to replace every system file without the need to insert a compatible installation media, but the major downside is that unless you back up your data in advance, the operation will end up deleting every personal file and application that is currently stored on the same partition as your OS.
- Repair install – If you have a little bit of time on your hands, we recommend going for a repair install (in-place repair) instead. This operation will require you to use compatible Windows 11 installation media and it’s a bit more tedious, but the major advantage is that you get to keep all your personal files, games, and applications.
The post How to Fix Sound Cracking Issue on Windows 11? appeared first on Appuals.com.


0 Commentaires