A lot of Windows users have encountered some problems while trying to play games on Windows 11. One of them is that the ping is too high. This issue is making the PC really slow when it comes to exchanging network data, affecting their in-game ping and facilitating disconnects and matchmaking.
After we’ve looked closely into to problem, we’ve come up with a shortlist of culprits that might cause this issue. Here’s the list:
- Registry Editor uses hardcoded network values – As it turns out, this issue often occurs on Windows 11 due to some conflicting values related to Network Throttling, TC Pack Frequency, and TCP No Delay. Modifying these values accordingly should resolve the issue in your case.
- Incompatible Power Automate – Some affected players have reported that the issue was caused by the Power Automate application. They have managed to fix this issue by deleting the application from their PC.
- Problematic Windows update – Another cause that might make the high ping is the newest update that was installed by Windows. You can check if this is the cause by deleting the update.
- Incompatible energy-saving option – This issue could be caused by the energy-saving option that is activated by default. This can be fixed by disabling the option from the properties of your network connection.
- Disabled IPv6 – The high ping issue could be also caused by the IPv6 protocol if it’s forcibly disabled. You can fix this by going to the settings of your network connection and enabling the IPv6 protocol.
- Hindered network connection – There might be a bug that is interfering with your internet connection, causing the high ping. To fix this, you need to remove the network connection from your PC, then reboot your PC and connect to it again.
Now that you are aware of all the causes that might make your ping be too high, here’s a list of possible fixes that might help you get rid of this:
1. Fix using Registry Editor
The first thing you can try in order to fix your ping is to fix it using Registry Editor. This is how a lot of people have managed to get rid of the high ping problem.
This method involves using the Registry editor to modify the value of NetworkThrottlingIndex to FFFFFFFF so that your PC always uses the recommended threshold for Network Throttling. Then you’ll need to make some extra adjustments to the TCPackFrequency and the TCPNoDelay values before creating a new key called MSMQ.
Note: Before deploying this fix, our recommendation is to take the time to back up your Registry values in advance. This will save you in a scenario where you make a mistake during the procedure before and you need to restore your Registry to the previous state.
Follow the instructions below to modify the value of NetworkThrottlingIndex to FFFFFFFF:
- Open a Run dialog box by pressing the Windows key + R buttons, then type ‘regedit’ inside the search bar and press the Enter button to open the Registry Editor.

Open up the Registry Editor - If you’re prompted by the User Account Control, click Yes to grant admin access.
- Once you are inside the Registry Editor, the first thing you should do is create a backup of it. Click on File in the top left corner, then click on Export. Save the file wherever you want. Click on Import and select the file in case you want to.
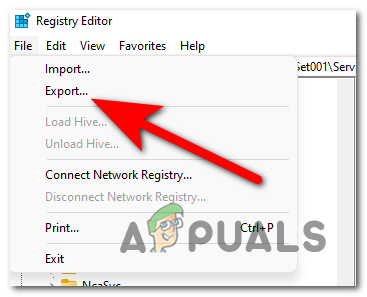
Exporting your Registry - Now you need to go to the location from the photo. You can manually go by accessing the HKEY_LOCAL_MACHINE folder, then click on the SOFTWARE folder, Microsoft, Windows NT, Current Version, Multimedia, and SystemProfile. The other alternative is to copy the following address and paste it inside the search option:
Computer\HKEY_LOCAL_MACHINE\SOFTWARE\Microsoft\Windows NT\CurrentVersion\Multimedia\SystemProfile
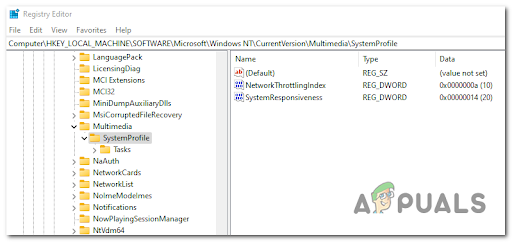
Navigating to the correct location - After that, double-click on the NetworkThrottlingIndex file and edit the Value date from whatever it is to ‘FFFFFFFF’, then click on OK.
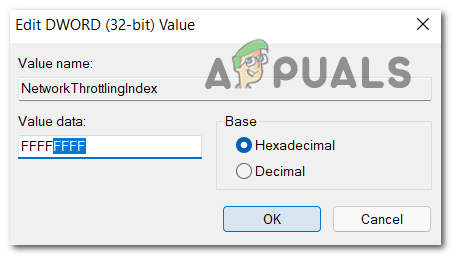
Modifying the value of NetworkThrottlingIndex - Once you’ve done that, you need to go to another folder. Click on HKEY_LOCAL_MACHINE, then click on SYSTEM, CurrentControlSet, Services, Tcpip, Parameters, and Interfaces. Or you can copy and paste the following address inside the search bar:
Computer\HKEY_LOCAL_MACHINE\SYSTEM\CurrentControlSet\Services\Tcpip\Parameters\Interfaces
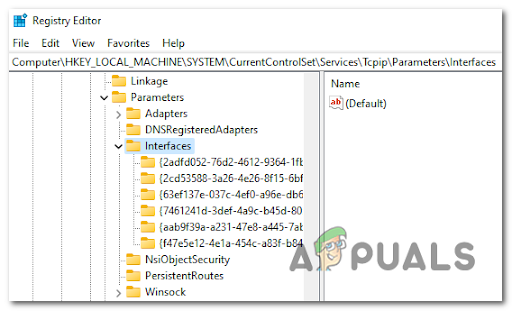
Navigating to the Interfaces location - Now you have to look through the folders located inside the Interfaces folder and choose the one that shows the most entities when you click on it. On the right side are all the files inside the folder.
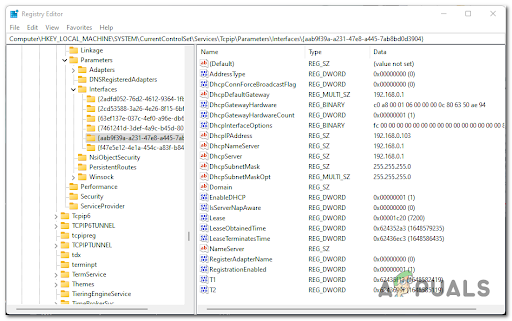
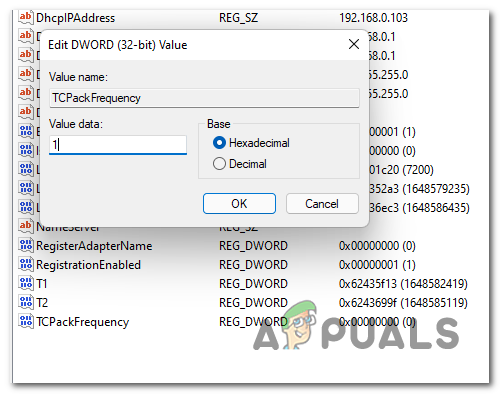
Choose the key with the most entities - After that, right-click on the right side inside the folder and click on New, then create a DWORD (32-bit) Value with the name ‘TCPackFrequency’. Double click on the value and edit the Value date to 1.
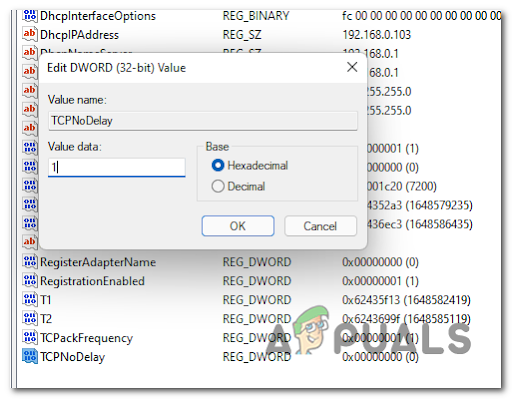
Editing the TCPackFrequency - Now you need to repeat the process and create another DWORD (32-bit) Value, then name it ‘TCPNoDelay’. Change the Value date to 1 as well.
Editing the TCPNoDelay value - Once you’ve done that, go back to the HKEY_LOCAL_MACHINE folder, then click on SOFTWARE and Microsoft. Right-click on Microsoft and click on New, then click on Key and name it ‘MSMQ’.
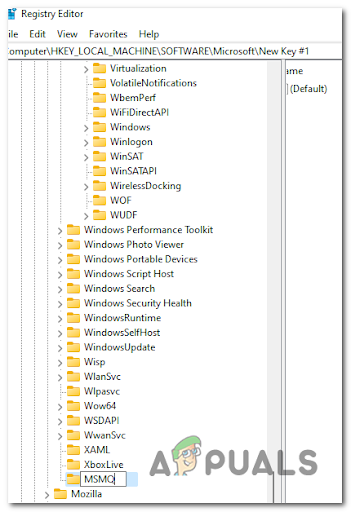
Create the MSMQ key Note: In case the folder already exists, delete the newly made one and click on the one on your PC.
- Inside the MSMQ folder, create a DWORD (32-bit) Value and name it ‘TCPNoDelay’. After that, double click on it and change the Value date to 1.
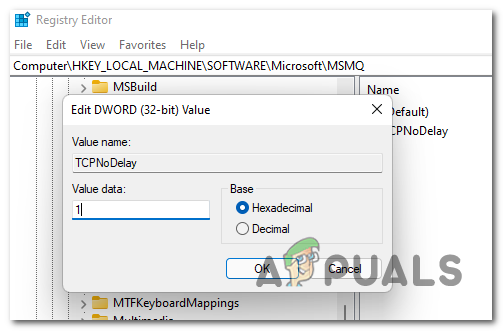
Editing the TCPNoDelay value - Once you’ve done that, you can close the Registry Editor and reboot your PC. After the computer boots back, you should be able to use it without encountering any problems with the ping while playing games.
In case you’ve tried this method and it didn’t help you fix your ping problem, go below and check the next one.
2. Delete Power Automate (if applicable)
If you’re using the Power Automate app, you should stop using it immediately if you’re on Windows 11. As we’re writing this, Power Automate is still not updated to Windows 11 and seems to produce a consistent high ping if you keep it enabled while launching a game with a multiplayer component.
A way that has helped people fix their ping issue is to delete the Power Automate application. As some people report, this is the cause for the ping being too high.
Note: You can also force stopping the app prior to launching the game that you’re experiencing a high ping in, but this fix is only temporary.
In case you don’t know how to delete the Power Automate, here are the steps you need to follow:
- Press the Windows key + R buttons to open a Run dialog box, then type ‘appwiz.cpl’ inside the search box and press Enter to open the Programs and Features.
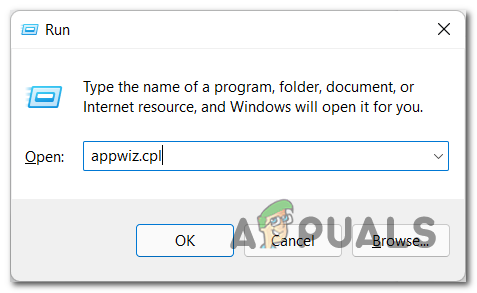
Open the Programs and Features menu - Once you are inside the Programs and Features menu, search for the Power Automate app and right-click on it, then click on Uninstall.
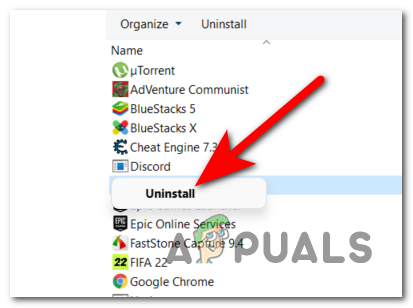
Uninstall the Power Automate app - Follow the on-screen instructions on how to uninstall the app. Once the process is complete, restart your PC. After the PC boots back, test any games to see if the ping is still high.
In case this method wasn’t helpful, go check the next one below.
3. Uninstall the latest Windows update
You can try to uninstall the latest update that your Windows has installed in order to fix this ping issue. Some players have managed to get rid of the high ping by uninstalling the latest update.
Note: On Windows 11, there is one feature update released at the beginning of March 2022 that’s known to cause high ping for certain games played through the Game Pass functionality. As of now, there is no official fix widely accepted by the community despite the fact that Microsoft hot-fixed the issue.
This problematic update was causing the games to not work properly in online matchmaking and facilitating disconnects.
One way to attempt to fix it is to simply uninstall the latest update that was installed prior to when the issue started occurring. After you do this, you need to test the games to see if this was the cause of the problem.
In case you don’t know how to uninstall the latest available update, here are the steps you need to follow:
- Press the Windows key + R to open a Run dialog box and type inside the search bar ‘control update’ to open the Windows Update.
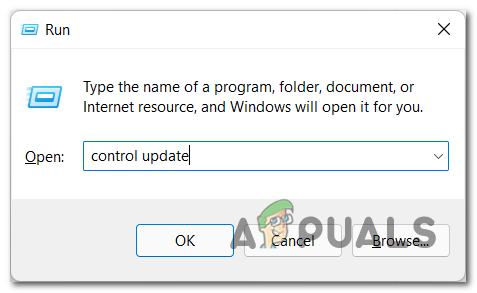
Accessing the Control Update menu - Now that you are inside the Windows Update, you need to click on Update history.

Access the Update History menu - After that, you need to scroll down and click on Uninstall updates. This link will open the Installed Updates.
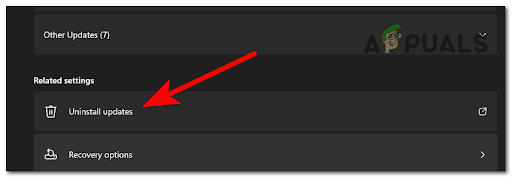
Uninstall the update - After you are inside the Installed Updates, locate the newest update and right-click on it, then click on Uninstall.
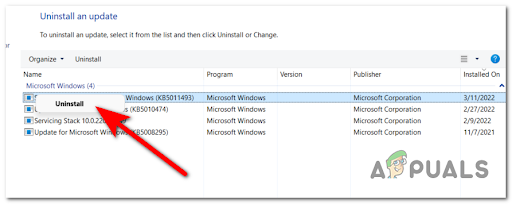
Uninstall the problematic update - Once you’ve done that, launch the game that you’ve experienced the high ping on and test it to see if it happens again.
In case you still encounter the problem, check below the next method.
4. Disable any energy-saving option
As it turns out, another reason why you might experience high ping when playing games on Windows 11 is a scenario in which you’re playing with the energy-saving functionality.
On most PCs, energy-saving modes will limit the capabilities of the computer – this includes the speed at which packet requests are processed (in and out).
People have managed to fix this issue by accessing the Network Adapters through Device Manager and disabling two options that might cause the high ping.
Follow the next instructions to see how to do it:
- Open a Run dialog box by pressing the Windows key + R and type ‘devmgmt.msc’ inside the search bar. Press Enter to open the Device Manager.

Open Device Manager - Once you are inside the Device Manager, locate Network adapters and extend the drop-down menu. Double click on the network adapter you are using.
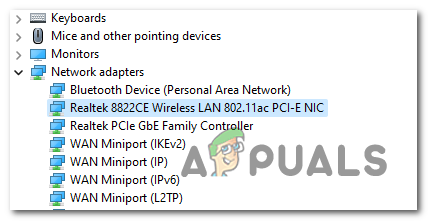
Open the Network adapter tab - After that, go to Power Management and uncheck the box where it says Allow the computer to turn off this device to save power.
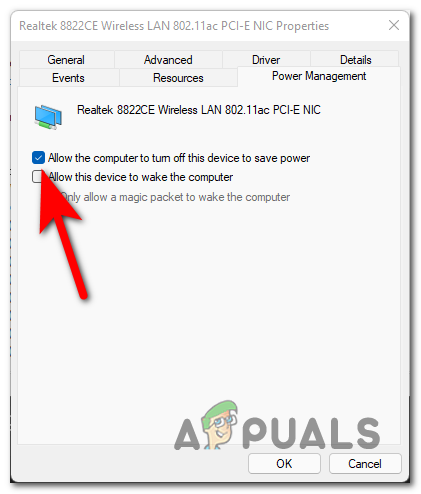
Prevent the computer to turn off the device - Once you’ve done that, go to the Advanced tab and Disable any energy-saving options.
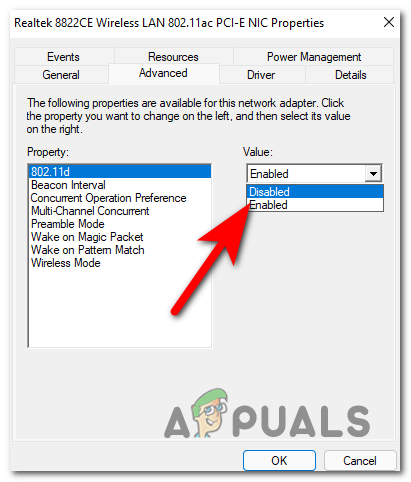
Disable the Energy Saving option - After doing that, close the tab and test to see if the ping is still high.
Check the next possible fix in case this one wasn’t helpful.
5. Enable the IPv6 in the network adapter settings
If none of the methods so far have worked for you, another fix you can try is to enable the IPv6 (Internet Protocol Version 6) from the settings of the network connection you’re using.
You can manually access the network settings from the Control Panel or you can go straight to the settings using the Run dialog box.
Note: IPv6 (Internet Protocol version 6) is the most recent version of IPv and it facilitates the communication protocol that governs the identification and location system for computers on networks. The main purpose of this protocol is to route traffic across the Internet.
In case you don’t know how to access the Network Connections to enable IPv6, here’s how you can do it:
- Open a Run dialog box by pressing the Windows key + R and type inside the search box ‘ncpa.cpl’ to open the Network Connections.
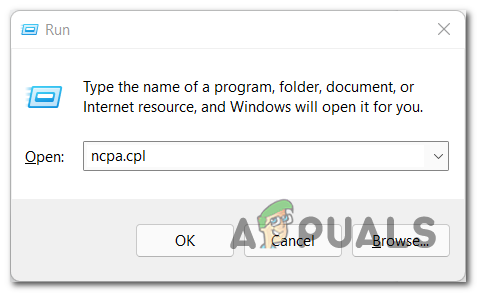
Open up the Network Connections menu - Once you are inside the Network Connections, right-click on the network connection you are using and click on Properties.
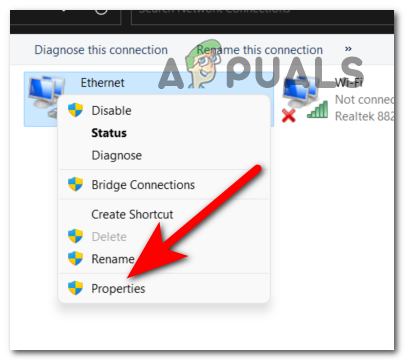
Accessing the Properties screen of Network Connections - Now that you are inside the Properties, scroll through the list until you find Internet Protocol Version 6 (TCP/IPv6) and check the box to enable it.
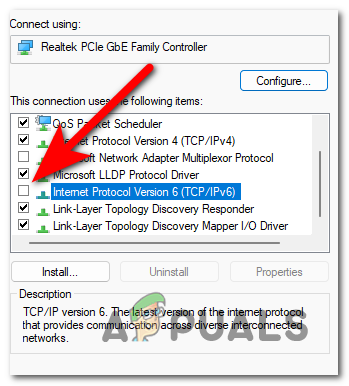
Enabling IPv6 - After that, apply the changes and test the games to see if the high ping problems persist.
In case this error is still there, try the next method.
6. Remove the network with problems
It was reported by some players that have managed to fix their ping issue that you can try to remove the network connection that you are encountering the issues on. After you do that, reboot your PC to see if the error still appears when you use that internet connection.
Note: This method is only applicable if you are using a Wi-Fi connection.
Here is the guide that will show you how to remove the network connection:
- Press the Windows key + R to open a Run dialog box and type inside the search bar ‘ms-settings:’, then press Enter to open the Settings.
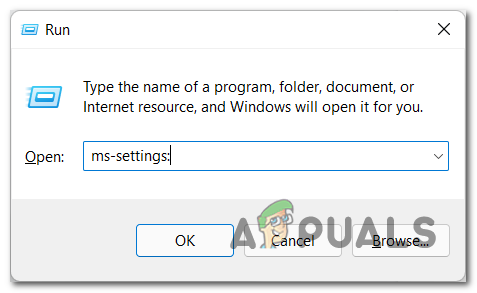
Accessing the Microsoft Settings menu - Now that you are inside the Settings, search for the Network & internet section and click on Wi-Fi.
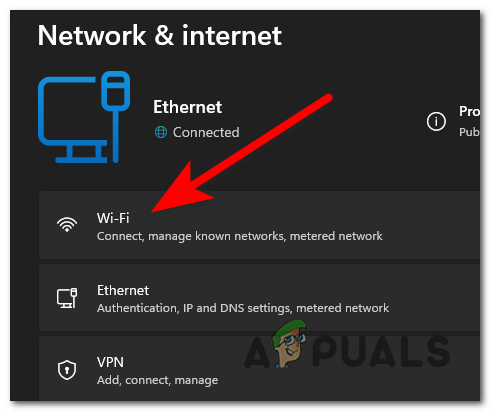
Accessing the Wi-Fi settings - Then you need to click on Manage known networks.
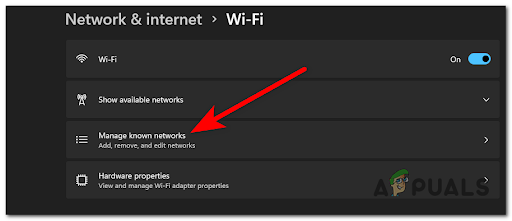
Accessing the Manage known networks - Now through the list of known networks, search for the one in use and click on Forget.
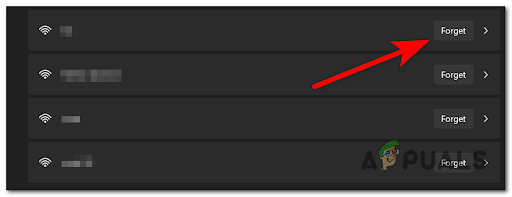
Forgetting the network - After that, restart your PC and wait until it boots back. When the computer is back on, search for the connection that you were previously using and connect to it, then test it to see if the ping is still high.
In case neither of the methods before has fixed your high ping issue, check the last possible method below.
The post How to Fix High Ping in Games in Windows 11? appeared first on Appuals.com.

0 Commentaires