Windows, just like most Linux distributions, offers an option to create a bootable Windows installation on USB drives. This has several benefits, including testing Windows 11 without touching the underlying system or accessing files and apps on the go.
Good news is that the entire process is free. You do need a USB drive or stick with a capacity of at least 16 gigabytes, preferably more, but that is the only requirement that costs money. Other than that, you will be using the free, open source tool Rufus to create the portable installation of Windows 11 and the download is free from Microsoft (you may need a license though at one point).
Preparations are key
The very first thing you need to do is download the latest ISO of Windows 11. Microsoft has a download website that offers the download. Just hit this link, scroll down on the page that opens to the "Download Windows 11 Disk Image (ISO) for x64 devices" section, and activate the confirm button to get started.
Microsoft will do some testing and verifying, after which you are asked to select a product language before the verification step ends. Click on the download button afterwards and select a save location for the ISO image of Windows 11 on your PC.
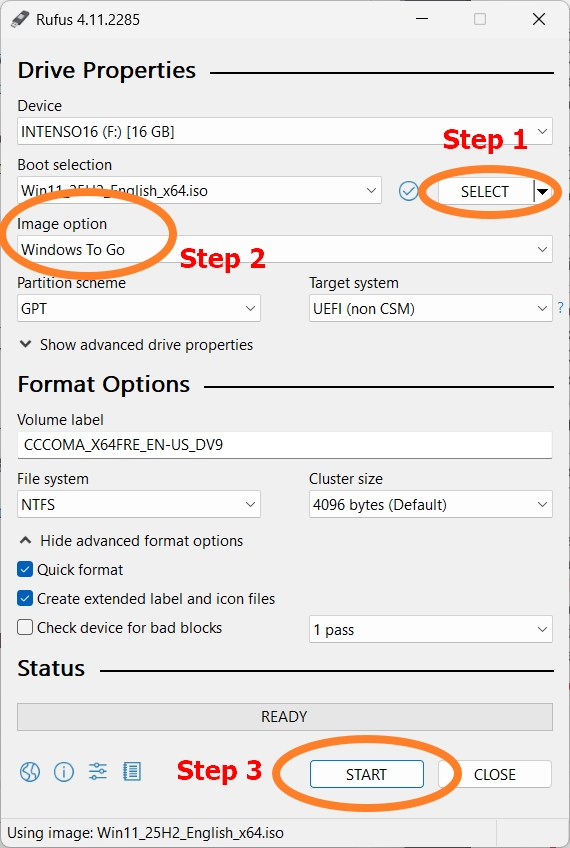
Download Rufus next. It is a small download and should not take longer than a second or two. Run Rufus right after the download. This displays the main interface of Rufus.
Here you need to make the following changes:
- Click on the Select-button near the top and use the file browser that opens to pick the downloaded Windows 11 ISO image.
- Select "Windows To Go" under "Image option".
- Activate the Start-button to start the process.
- When asked, select the Windows edition that you want to install. When in doubt, either pick Windows 11 Home or Pro.
- Make sure that "Prevent Windows To Go from accessing internal disks" is checked. This ensures that the bootable Windows installation won't interfere with operating systems on internal disks.
- Check "Remove requirement for an online Microsoft account", if you want to use a local account from the get-go.
- Check "Create a local account with username" and type the username you want to use, to create this account automatically.
- Click OK to continue.
- Confirm the warning that all data will be destroyed on the USB drive.
Rufus will write the Windows 11 files on the USB device, which may take some time to complete. You may then boot from into Windows using the USB device.
Booting

Now that the USB drive with Windows 11 on it is ready, all that is left is to boot from it. You may need to adjust the boot sequence of the PC in the BIOS. Make sure that USB has a higher priority than the actual operating system, that is probably on one of the internal hard drives.
If you do not know how to get into BIOS or UEFI, monitor the first screens that appear when you start the PC. You might catch a glimpse of the key that you need to press to access it. You could also try pressing the usual keys, such as F1 for that.
Another option that you have is to enable Advanced Startup, if you run Windows on the PC. In Windows 10, you'd open Settings > Update & Security > Recovery. From there, activate the Restart now button under "Advanced startup".
When Windows boots into the recovery environment, select "Use a device" and activate the USB option there. Windows should then boot from the inserted USB device.
Next time you want to boot into the regular systems, simply unplug the USB device and everything should be back to normal.
Thank you for being a Ghacks reader. The post How to create a bootable Windows 11 installation for testing appeared first on gHacks Technology News.


0 Commentaires