Some Windows 11 users report that after upgrading to Windows 11, they’ve noticed that the Bluetooth component is not working. If you’re one of them, this article should help you troubleshoot the issue away regardless of the underlying cause.
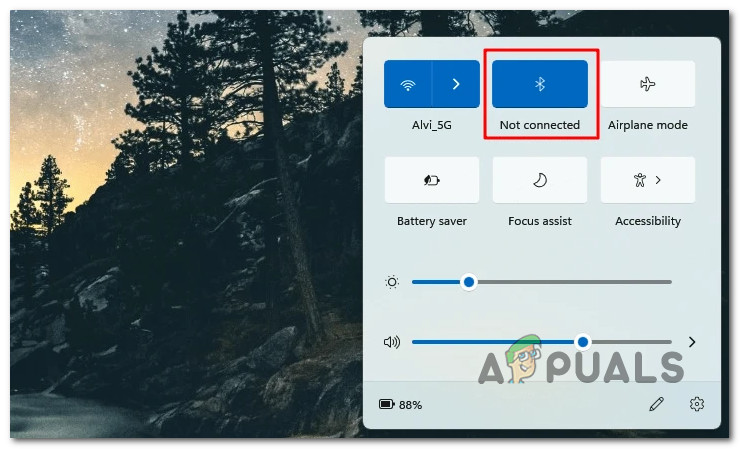
But before we get to the actual fixes, let’s go over the most common causes that will end up breaking the Bluetooth functionality on Windows 11:
- Bluetooth is Disabled from Settings – Windows 11 is not good at telling you if the Bluetooth component is disabled. Sure, it will let you know if you try to connect a headset, but if you’re experiencing connectivity issues with a Bluetooth printer, don’t expect an explanation on why the connection fails. So before doing anything else, open up the Settings screen and check if Bluetooth is enabled.
- Generic Bluetooth issues – Like any other native component, Bluetooth is interconnected with many dependencies that will generate temporary files as you connect new Bluetooth devices. If these temporary files lead to a generic issue, you can typically fix the problem by running the Bluetooth troubleshooter and applying the recommended fix.
- Bad Bluetooth driver migration – If you recently upgraded to Windows 11 from an older Windows version and you’re just noticing that the Bluetooth component broke, it might have happened due to a bad driver migration. In this case, you should reinstall the Bluetooth driver via Device Manager.
- Bluetooth Support service is disabled – One of the most common scenarios that might break the Bluetooth component on Windows 11 is a disabled Bluetooth Support service. If this is the source of the issue, you can fix the problem by accessing the Services screen and enabling the Bluetooth Support service.
- Bluetooth component hotfix is not installed – There’s a small segment of OEM laptops that we’re affected by a bug that rendered the Bluetooth component unusable on preview Windows 11 builds. Microsoft already addressed the issue, so make sure you install every pending update to take advantage of the fix.
- Network Discovery and File & Printer Sharing are disabled – You might not need these features enabled when connecting headsets to Windows 11. Still, you’ll need to keep Network Discovery, and Printer Sharing enabled if you want to join a Bluetooth printer.
Now that you were informed of all possible reasons that will produce this Bluetooth issue on Windows 11, let’s go over the actual fixes:
Make sure Bluetooth is discoverable
Before you get to the actual troubleshooting, the first thing you should do is investigate and see if your Bluetooth component has the Discoverable status. If your Bluetooth component is not discoverable, no device can connect to it.
So before doing anything else, take time to investigate the status of your Bluetooth component and make it discoverable in case it’s not.
Follow the instructions below to see ensure that your PC Bluetooth is discoverable:
- Press Windows key + I to open up the Settings menu.
- Once inside the Settings menu, click on Bluetooth & devices from the vertical menu on the left.
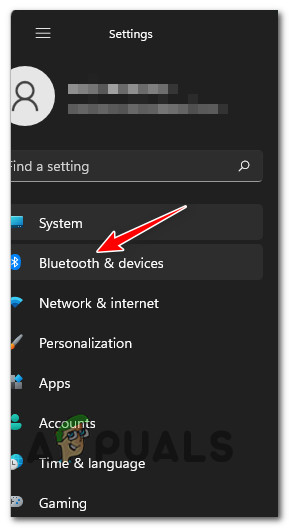
Bluetooth and Devices Note: In case the vertical side menu is not visible by default, click on the action button (top-left corner of the screen)
- Next, move over to the right-hand section of the screen and check if the Bluetooth slider is set to ON.
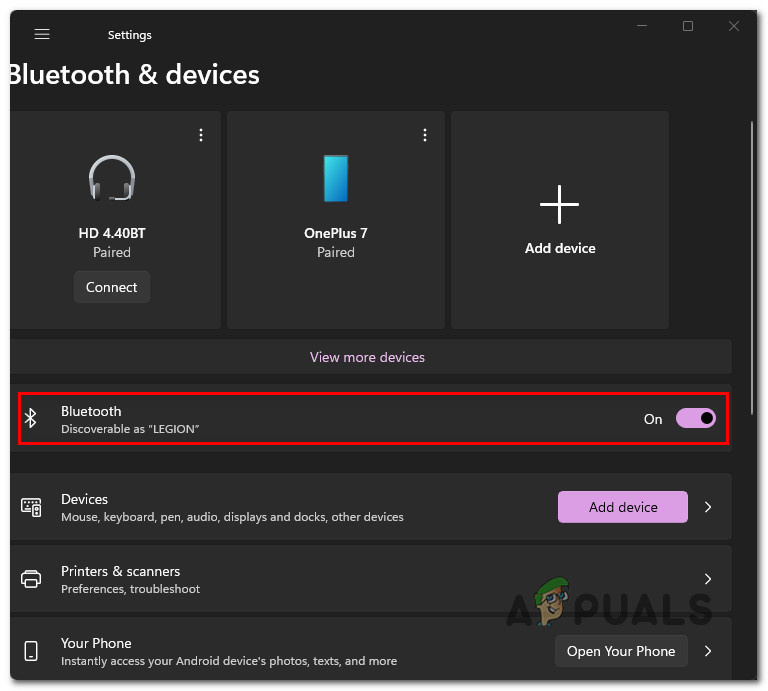
Make Bluetooth discoverable Note: If it’s set to OFF, flick the Bluetooth slider ON to make it discoverable.
Once you’ve ensured that Bluetooth is enabled and set as discoverable on Windows 11, attempt to connect the device again and see if the problem is now fixed.
In case the same kind of issue is persisting, move down to the next potential fix below.
Run the Bluetooth Troubleshooter
There are a lot of interconnected dependencies that might end up breaking the Bluetooth connectivity on Windows 11. Fortunately, the new Windows 11 Bluetooth troubleshooter is quite adept at identifying and automatically fixing typical inconsistencies.
If you haven’t tried using it yet, you should – before trying any of the other fixes below.
If the Bluetooth Troubleshooter detects a recognizable scenario, it will automatically suggest a fix that you can typically apply automatically.
Follow the instructions below for a step-by-step guide on running the Bluetooth Troubleshooter and applying the recommended fix on Windows 11:
- Press Windows key + R to open up a Run dialog box. Next, type ‘ms-settings:troubleshoot’ inside the text box and press Enter to open up the Troubleshooting tab of the Settings app.
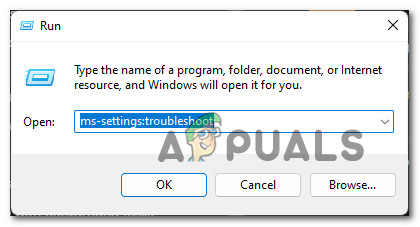
Accessing the Troubleshoot tab - Once you’re inside the Troubleshoot tab, move over to the right-hand pane and click on Other troubleshooters.
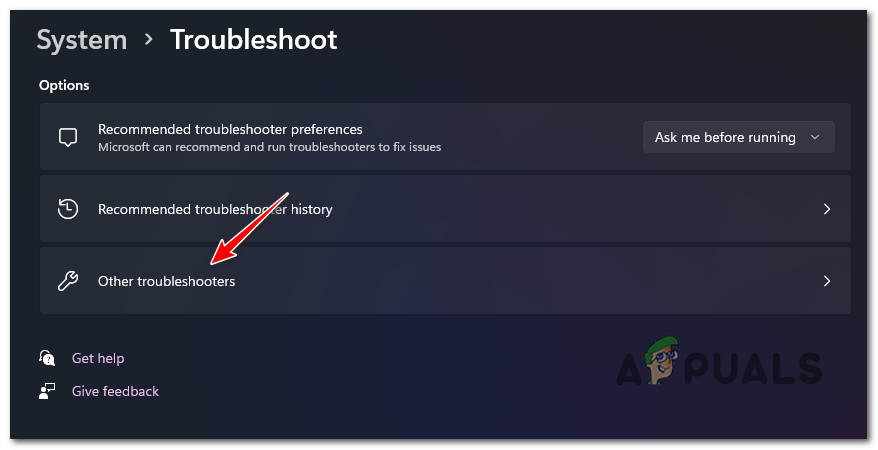
Accessing the other Troubleshooters menu - Next, scroll down to the Others tab from the Other troubleshooter menu, then click on the Run button associated with Bluetooth.
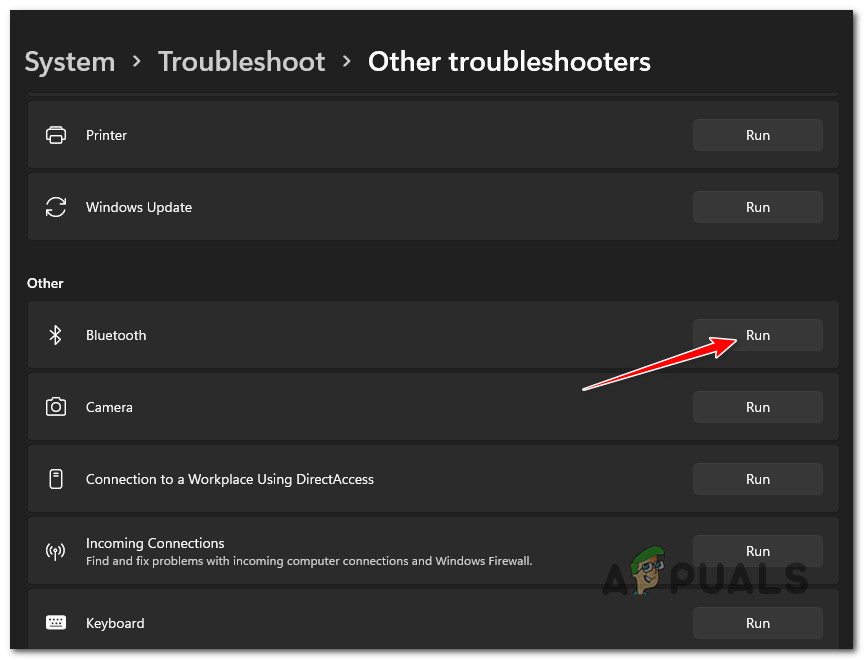
Run the Bluetooth troubleshooter - Once you open the Bluetooth troubleshooter, wait until the initial scan is complete.
- If a viable repair scenario is identified, the tool will automatically apply the fix. You’ll get a brief where you can see which fix was applied.
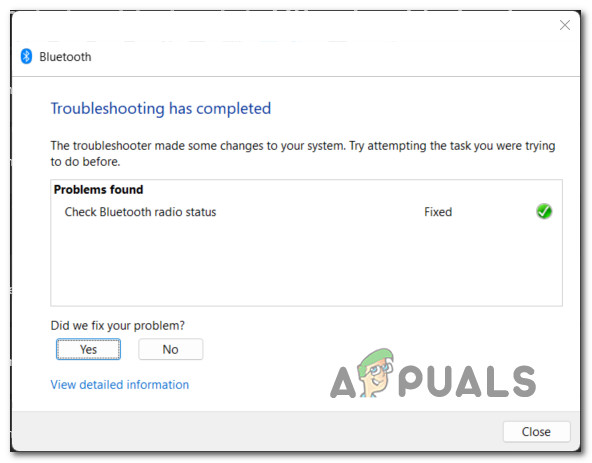
Troubleshoot the Bluetooth component Note: If the problem is still not fixed, click on No to prompt the tool to recommend a different device.
- Reboot your PC and see if the Bluetooth component starts functioning.
If this method doesn’t end up fixing the issue for you on Windows 11, move down to the next.
Reinstall the Bluetooth driver via Device Manager
If you started dealing with this issue immediately after upgrading to Windows 11 from an older Windows version, chances are you’re dealing with an impaired driver migration.
This thing is much more common than Microsoft says it is, and it’s not restricted to OEMs.
Fortunately, there’s an easy way to determine if your driver is indeed responsible for this issue. You’ll need to use Device Manager to uninstall the current Bluetooth driver.
This might seem like a counter-intuitive thing to do, but uninstalling the current Bluetooth driver will force your Windows 11 installation to install the latest compatible driver the next time it boots up.
Follow the instructions below for specific instructions on reinstalling the Bluetooth driver via Device Manager:
- Press Windows key + R to open up a Run dialog box. Next, type ‘devmgmt.msc’ and press Ctrl + Shift + Enter to open up Device Manager with admin access.

Open up Device Manager - When the User Account Control prompts you, click Yes to grant admin access.
- Once you’re inside Device Manager, the first thing you’d want to do is expand the drop-down menu named Bluetooth.
- Next, right-click on the main Bluetooth driver and choose Properties from the context menu.

Accessing the Properties screen - Once you’re inside the Properties screen, access the Driver tab, then click on Uninstall device from the context menu.
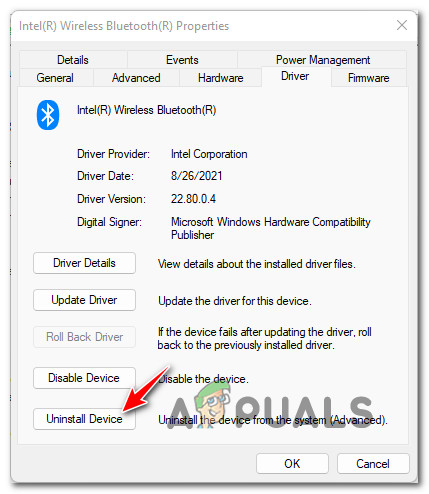
Uninstall the Bluetooth driver - Reboot your PC and wait for the next startup to complete.
Note: During this next startup, your Windows 11 installation that the Bluetooth driver is missing and automatically install a compatible equivalent. - Attempt to connect a device to your Bluetooth once again and see if the problem is now fixed.
If the Bluetooth issue is not fixed on Windows 11, move down to the next potential fix below.
Enable the Bluetooth Support Service
One significant dependency that might end up breaking the Bluetooth connectivity on your Windows 11 is a disabled Bluetooth Support service.
Note: This service is not used for every Bluetooth connection, but you will likely not be able to facilitate a printer connection while this service is disabled.
We’ve managed to identify several user reports confirming that the problem was finally fixed after they accessed the services screen and modified the default behavior of this startup service.
Follow the instructions below for specific instructions on how to enable and re-configure the Bluetooth Support Service:
- Press Windows key + R to open up a Run dialog box. Next, type ‘services.msc’ inside the text box and press Ctrl + Shift + Enter to open the Services screen with admin access.
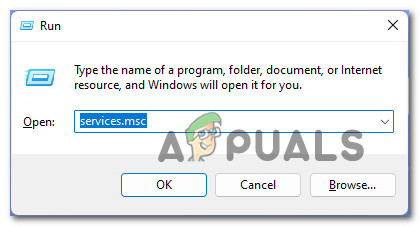
Open up the Services screen. - When the User Account Control prompts you, click Yes to grant administrative access.
- Once you’re inside the Services screen, move over to the right-hand section, scroll down through the list of services and locate the Bluetooth Support Service.
- After identifying the correct entry, right-click on Bluetooth Support Service and choose Properties from the context menu that just appeared.
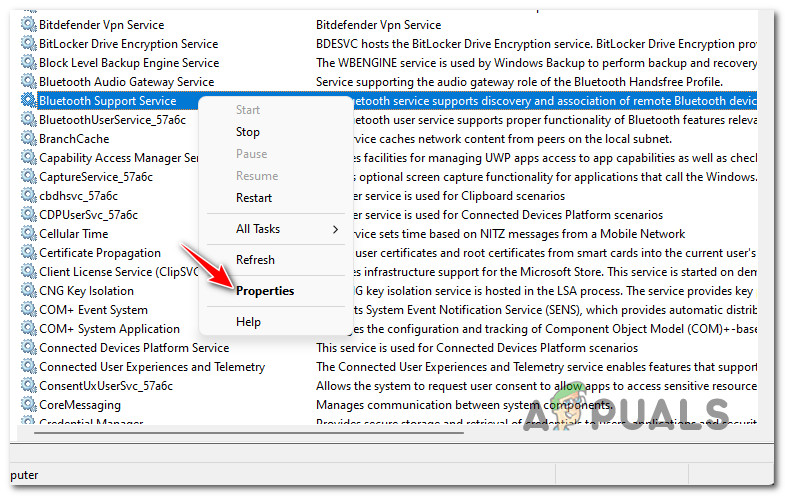
Accessing the properties screen of Bluetooth - Once you’re inside the Properties screen, click on General from the menu at the top, then change the Startup type to Manual if it’s currently set to Disabled.
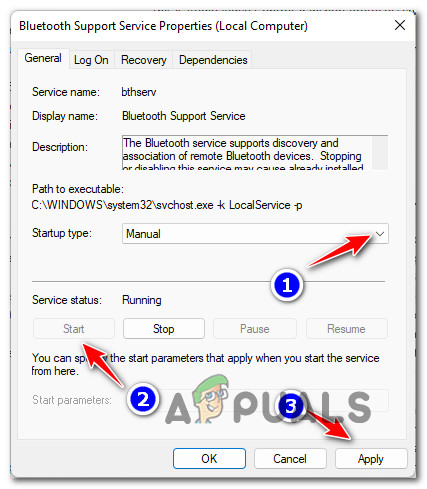
Enable the Bluetooth Support Service - Next, click on the Start button to ensure that the Bluetooth Support service runs before clicking on Apply to save the changes.
- Now that the Bluetooth Support service has been enabled and re-configured, repeat the Bluetooth action that was previously failing.
If the same kind of problem is still occurring, move down to the next potential fix below.
Install every pending Windows 11 update
Suppose you’re experiencing this issue on an OEM laptop. In that case, there’s also the possibility that you might be affected by a bug that renders the Bluetooth component usable on some preview Windows 11 builds.
Fortunately for you, if this scenario is applicable, Microsoft has already released a hotfix for this particular issue. You can take advantage of it by forcing the WU component to install every pending update – this will ensure that the Bluetooth hotfix is installed as part of the cumulative update.
If your Windows 11 computer is not up to date, follow the instructions below to install every pending Windows 11 update to install the hotfix for Bluetooth drivers:
- Press Windows key + R to open up a Run dialog box. Next, type ‘ms-settings:windowsupdate’ inside the text box that just appeared and press Enter to open up the Windows Update tab of the Settings app.
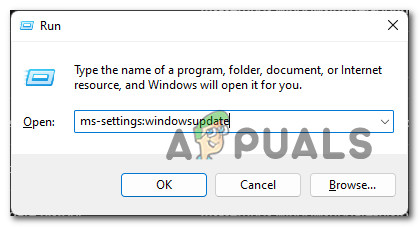
Open up the Windows Update screen. - When prompted by the User Account Control (UAC), click Yes to grant admin access.
- Once you’re inside the Windows Update screen, move over to the right-hand section of the screen and click on Check for Updates.
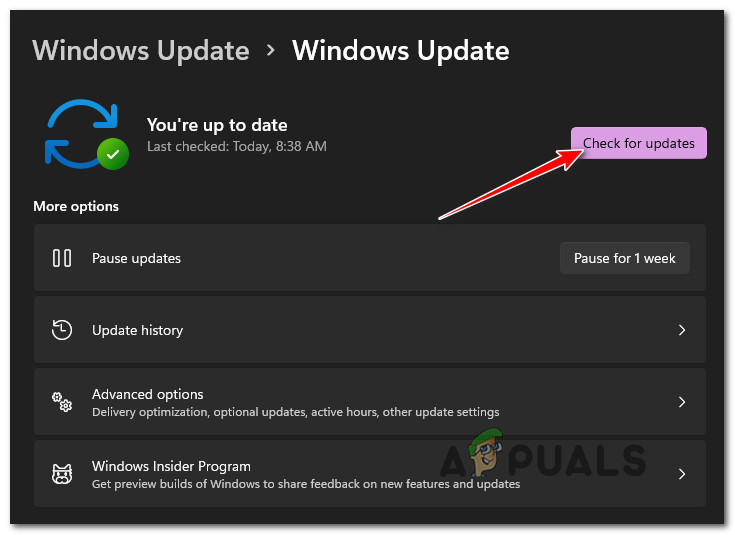
Check for Updates on Windows 11 - If new updates are found and waiting to be installed, click on Download Now and wait until the updates are installed locally.
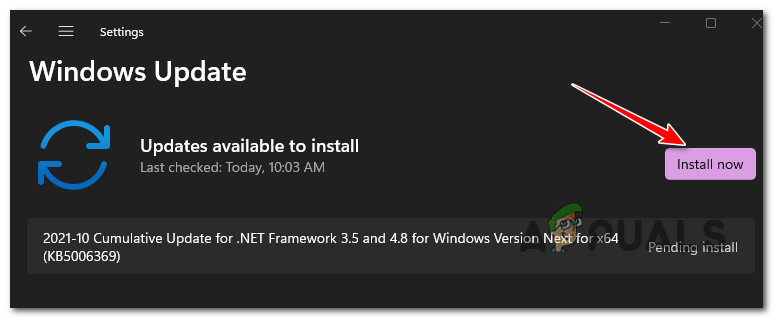
Installing the pending Windows 11 updates Note: Depending on your WU settings, the pending updates will either be installed automatically, or you’ll need to click on the Install Now button to start the installations.
- Depending on the number of updates waiting to be installed, you might be prompted to restart your computer before you get the chance to install every pending update and do as instructed. But make sure to return to this screen after the next startup and continue installing the remaining Windows Updates.
After you manage to install every pending Windows Update, attempt to connect the Bluetooth device once again and see if the problem is now resolved.
If the same kind of issue is still occurring, move down to the next potential fix below.
Enable Network Discovery settings and File and Printer Sharing (for Private Network)
Suppose you’re experiencing this issue while attempting to connect a Bluetooth printer (while other Bluetooth peripherals are connecting just fine). In that case, this issue is likely happening because either Network Discovery or File & Printer Sharing (or both) are disabled on your PC.
Suppose you’re experiencing this issue on a Windows 11 computer. In that case, you can fix the problem by opening the classic Control Panel Interface and enabling these options from the Network and Internet menu.
Follow the instructions below to learn how to do this:
- Press Windows key + R to open up a Run dialog box. Next, type ‘control’ inside the text box and press Enter to open the Classic Control Panel interface.
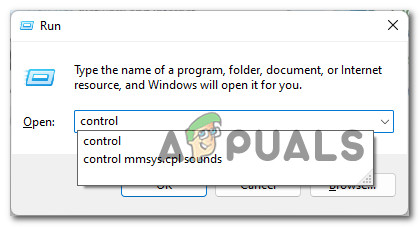
Open up the classic Control Panel menu. - Once you’re inside the classic Control Panel menu, click on Network and Internet from the list of available options.
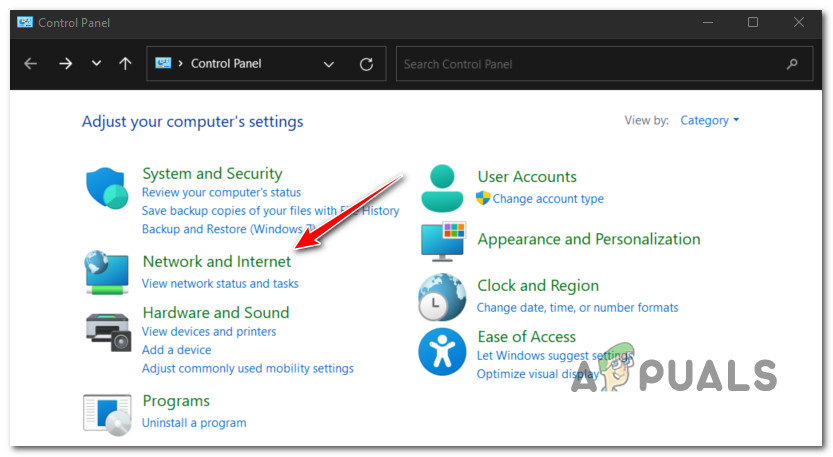
Accessing the Network and Internet menu - Next, click on Network and Sharing Center from the list of available options.
- Once you’re inside the Network and Sharing Center, click on Change advanced sharing settings from the vertical menu on the left.
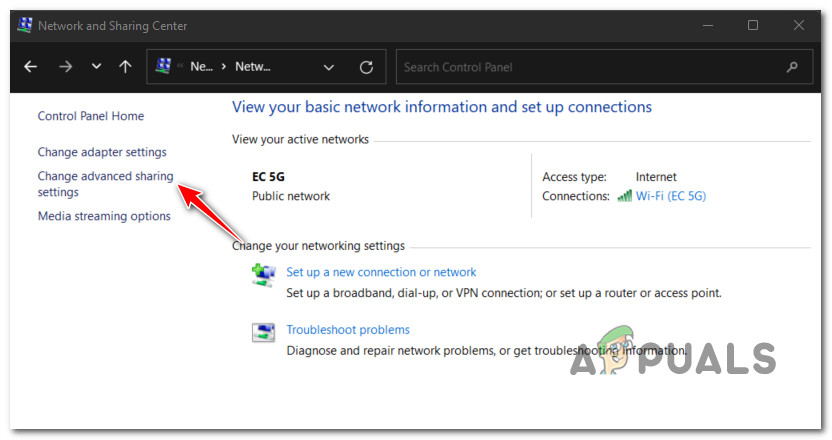
Change the Advanced sharing settings. - Once you’re finally inside the Advanced Sharing settings menu, change the toggle related to Network Discovery to Turn on network discovery.
- Next, change the toggle associated with File and printer sharing to Turn on File and printer sharing.
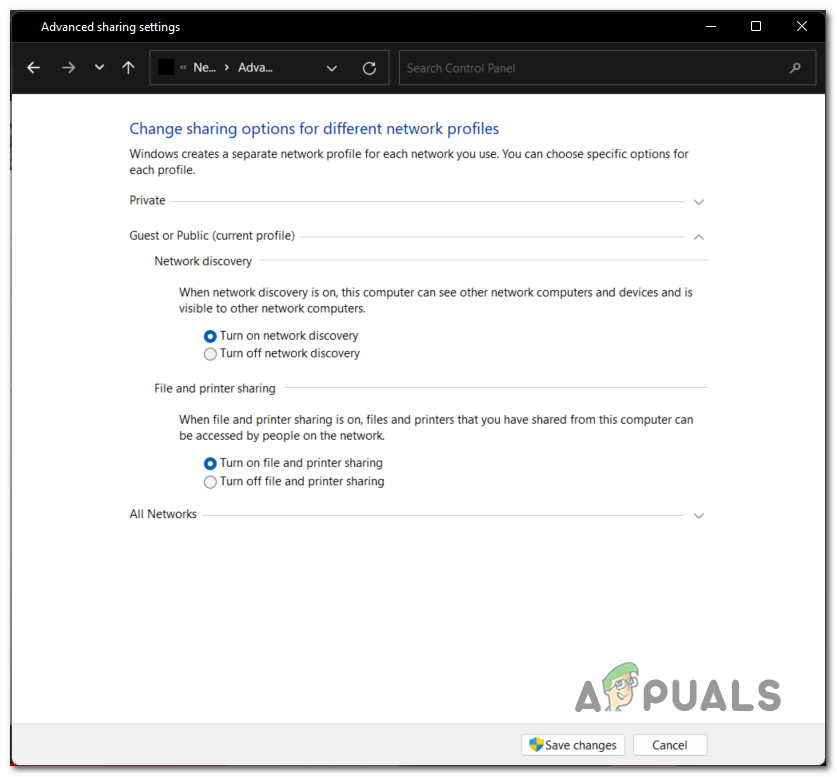
Enable the Bluetooth printer requirements - Finally, click on Save Changes to make the changes permanent.
Once you’ve ensured that both Network Discovery and File and printer sharing are enabled, attempt to connect your Bluetooth printer once again and see if the issue is now resolved.
The post Bluetooth Not Working on Windows 11? Here’s How To Fix It appeared first on Appuals.com.


0 Commentaires